
Atlas® Denture Comfort™
The Dentatus Atlas Denture Comfort protocol is distinctly different than the conventional overdenture technologies that primarily rely on copings, O-rings, and mechanical devices for retention. Such attachments that require a rigidly aligned denture create problems over uneven and bulbous ridge forms. To prevent scrapes and lesions, the denture base has to be relieved where food particles accumulate. Reliable clinical articles describe in great detail the coping, O-ring technologies needing multiple post-insertion check-ups, and more frequent denture adjustments.1
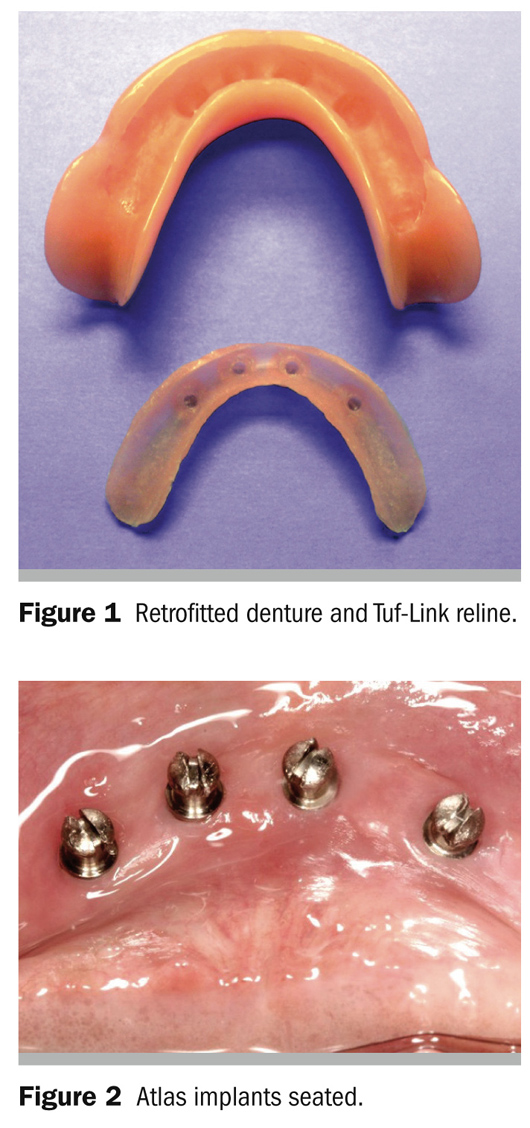
The Dentatus Atlas proprietary design overcomes the known rigid denture limitations with Tuf-Link® silicone reline material (Figure 1), accommodating the broad range of the diverse conditions of edentulism.
Clinical university reports describe that patients with the retrofitted Atlas System experienced 100% comfort and satisfaction.2
The Atlas Implants are installed most often without a flap in the anterior mandibular ridge ata safe distance from the mental foramen to thelaser-marked depth ofthe needlepoint CePo™ pilot drills that are used to create the osteotomies. In unusually difficult circumstances, patients may be referred to implant specialists for flap surgery procedures and implant installation in clearly marked positions by the restorative healthcare provider.
The locations for the four implants are indicated on the ridge with a sterile marking pen in equidistant spaces for bilateral support and denture retention. The osteotomies are made with the needlepoint CePo pilot drills at 1,500 rpm with sterile coolant with local anesthetic infiltration. The drill can be precisely positioned by piercing the tissue and guiding it to the best bone location before initiating the drilling procedures.
Osteotomies are then refined with reamers made for the wider 2.2-mm or 2.4-mm Atlas Implants. In hard D1 or D2 bone, the osteotomies are made 1 mm to 1.5 mm deeper to prevent bottoming out resistance that could prevent the implant platform to seat in the surrounding soft tissue. The sterilized, surface-textured implants are packaged with a driver cap used to initially stabilize the implant without direct contact or possible contamination; this is followed up by using a latch driver for a low-speed R/A handpiece. The installation is completed with the tactile manual winged driver. The tapered platform of the implant should seat flush with the surrounding soft tissue (Figure 2).
To create an ideal condition for the procedure, the existing denture must have a basic fit in a repeated position.Otherwise, a quick auto-cure reline should be made with reduced flanges to prevent denture lift in functional andparafunctional movements. A marking pen is used to outline the interior space 2mm below the denture flanges, extendingposteriorly short of the retromolar pads. The half-round denture cutting instrument is used to create, below the line, a continuous seamline to an approximate 1-mm depth that can becontrolled by leaning the instrument’s shank against the inner periphery.
The diamond groove-cutting instrument is used to create depth marks for a uniform reduction of the base without encroaching into the prepared seamline. The round carbide instrument is then used to create a continuous smooth level to the indicated depths.
Soft marking caps are placed on the protruding Atlas heads for replicating their position in the denture. The caps are covered with a thin layer of pressure indicating paste or other type of suitable marker, seating the denture firmly in place. The round carbide cutter is used to indent the marked spaces to a depth of 3.2 mm. For a closer reading and minimal denture reduction, a small layer of marking material can be placed on the top of the Atlas head. All sharp intersections are rounded off to prevent perforations in the liner.
The patient’s mouth and the prepared denture are carefully cleaned and thoroughly rinsed to prevent fine particles that could become embedded in the liner. The Tuf-link cartridge affixed with an auto-mixing tip is used to inject a sufficient volume of material into the denture to achieve a densely compressed, nonporous liner. The denture is placed over the implants with a slight forward and side-to-side movement that forces the liner to be fully adapted to the implants. The denture is then firmly pressed down and kept in place by the patient’s opposing teeth without movement during the initial 3 to 4 minutes. It is left in place for an additional 2 to 3 minutes for its complete polymerization. The liner is lifted out from the denture with a gentle pull at one end and the excess material is cut off with a fine, straight scissor along the visible seamline and is replaced into its indexed position.
As there is no need to ever adjust the intimate tissue fit, strict care should be observed to correct occluding bumping interferences to prevent rocking lateral stress on the implants. Patients should observe a soft-diet regimen during the first week and the denture should not be removed for 8 days and nights to prevent swelling of the tissue surrounding the implant that interferes with proper placement of the denture. The denture can be removed for brushing and daily hygienic care. Properly cared for, the liners should last 16 to 18 months and can be replaced in a very short procedure. In special considerations and for security, a duplicate liner can be made for emergency safekeeping by the patient in a water-filled container.
Dentatus Narrow-Body Ti alloy implants are FDA-designated for long-term use and for any length of time as decided by the healthcare provider.
The Dentatus Atlas clinical prosthetic procedures were developed in conjunction with the Implant Department at the New York University School of Dentistry. To learn more, we invite you to take advantage of the Atlas hands-on workshops offered throughout the country. You will learn the rationale for narrow-body implants and the technique from start to finish on an esthetic model that you can later use for patient education. This hands-on workshop is highly recommended by dentists who profited by learning the step-by-step procedures used in clinical environments.
References
1. Shatkin TE, Shatkin S, Oppenheimer AJ,Oppenheimer BD. A simplified approach to implant dentistry with mini dentalimplants. Alpha Omegan. 2003;96(3):7-15.
2. Cho S-C, Froum S, Tai CH, et al. Immediate loading of narrow diameter implants in severely atrophic mandibles. Pract Proced Aesthet Dent. 2007;19(3):167-174.
For more information, contact:
Dentatus USA, Ltd
Phone: 800-323-3136
Web: www.dentatus.com
The preceding material was provided by the manufacturer. The statements and opinions contained therein are solely those of the manufacturer and not of the editors, publisher, or the Editorial Board ofInside Dentistry. The preceding is not a warranty, endorsement, or approval for the aforementioned products or services or their effectiveness, quality, or safety on the part of Inside Dentistry or AEGIS Communications. The publisher disclaims responsibility for any injury to persons or property resulting from any ideas or products referred to in the preceding material.


