

Implant Placement in the Esthetic Zone: The Use of Autogenous Mandibular Block Grafting and Soft Tissue Augmentation—A Case Report
Maurice Salama, DMD; David Garber, DMD; Henry Salama, DMD; Guilherme Cabral, DDS, CDT
A common issue in tooth replacement is the ability of the dental team to reestablish normal form and architecture to the hard and soft tissues before implant placement. This is especially challenging in the esthetic zone, where the replacement of a missing tooth must not only function, but esthetically match the contours of the hard and soft tissue of the adjacent natural dentition. In this case report, the use of bone and soft tissue grafting for site development before implant placement will be highlighted. The restorative phase of tissue molding and color matching with light reflection using a new zirconium abutment and all-ceramic restoration will also be featured.
CASE REPORT
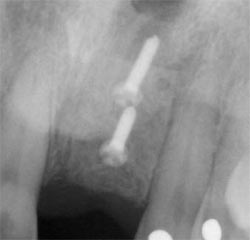
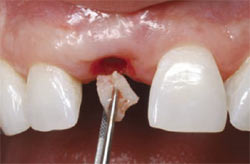
After the failure of a previously placed dental implant in the area of tooth No. 8 (Figure 1), the buccal plate and soft tissue had completely resorbed, creating a functional and cosmetic defect requiring bone and soft tissue augmentation (Figure 2 and Figure 3). After removal of the failed implant and healing of the soft tissue surrounding the defect, the patient was re-constructed using autogenous bone harvested from the chin region of the mandible.1-9
This technique involved the removal of a corticocancellous block of bone from the parasymphysis region of the chin as a donor site for the augmentation. Intra-marrow penetration was initiated into the host bone to allow for release of viable mesenchymal cells to assist in wound healing. The recipient site was then prepared for receiving the bone graft by shaping the defect.
The autogenous block was then shaped into a rectangular form and secured into place with two bone fixation screws (Stoma Dental, Germany). The buccal augmentation of the ridge should be overcorrected by 2 mm, as a minimum of 2 mm of bone labial to the implant surface appears to be critical to long-term stability and esthetics of the gingival tissues.10 Bi-cortical fixation is preferred to ensure that no micromovement or rotation of the block occurs during the healing phase. Proper release of the flap is critical to allow for tension-free primary closure of the wound.
Approximately 4 months after bone block grafting (Figure 4; Figure 5; Figure 6) the bone fixation screws were removed and a PrimaConnex® RD Implant (Keystone Dental, Inc, Burlington, MA) approximately 4.1 mm by 13 mm (Figure 7) was inserted into the block graft11-15 and a connective tissue graft simultaneously harvested from the maxillary left palatal region was inserted on the labial aspect to augment the buccal lingual thickness of the soft tissue volume for long-term maintenance and esthetics (Figure 8 and Figure 9).16-21
Before this stage, the dentist should create a minimum thickness of 2 mm of dense keratinized attached gingiva on the labial of the implant. Placement of the implant was performed using the 4-dimensional (4-D) concept, whereby the recipient site is evaluated for appropriate timing of each procedure before implant insertion, with selection of the correct implant size, location, and directional axis coming through the cingulum area just lingual to the incisal edge and including vertical depth placement of the fixture head of approximately 2 mm to 3 mm from the natural cementoenamel junctions (CEJs) of the adjacent teeth.22,23 In addition, the fourth dimension of time plays an extremely important role in treatment, requiring us to place the implant fixture in a staged approach, allowing time for the bone graft to heal, but not enough time for the bone graft to initiate substantial resorptive remodeling.2,5-8
At approximately 10 weeks after implant placement to allow for osseointegration, the implant was uncovered and a flared healing abutment was inserted into the implant to begin the expansion of the soft tissues in preparation for the restorative phase.
After the initial healing of the soft tissues surrounding the healing abutment—approximately 8 weeks to allow for connective tissue healing around the healing collar (Figure 10)—an impression was taken and a temporary restoration immediately fabricated using the Quick-Abutment system (Keystone Dental, Inc) with a corresponding laboratory analog and snap cap (Figure 11). The soft tissue was then allowed to heal for approximately 3 months around the temporary restoration to accommodate sculpting and to allow for proper maturation of this tissue before final restoration.
Once the soft tissues had been esthetically sculpted and shaped for 3 months (Figure 12), a final soft tissue impression was taken and sent to the laboratory for processing. A zirconium abutment, (Keystone Dental, Inc) (Figure 13 and Figure 14) was then inserted based on the selection by the laboratory technician and then restored, using an all-ceramic Procera® crown (Nobel Biocare, Yorba Linda, CA).24,25
The final restoration after the insertion of the zirconium abutment and all-ceramic restoration allows for ideal tissue color to be achieved26 (Figure 15; Figure 16; Figure 17; Figure 18). Adequate tissue thickness labial to the implant is considered critical in this regard. Note the 3-month postoperative view of the soft and hard tissue that have been reconstructed using autogenous bone harvested from the chin and autogenous connective tissue taken from the palatal region. This concept of site development was instituted in the early 1990s by Garber and Bahat,27 and it still plays a significant role today in the treatment planning of the implant patient.
CONCLUSION
A deficient area in the maxillary central incisor region was reconstructed using a staged approach of site development. This concept allows for the most predictable and stable long-term esthetic result.
Autogenous bone and soft tissue was first used to redevelop the normal contours of the recipient site. This was followed by implant placement and, after the osseointegration phase, contouring of the soft tissue for esthetics was completed by the use of an all-ceramic abutment and crown.
This 4-D staged approach takes more time and an additional surgical procedure, but it allows for a more predictable and maintainable long-term functional and esthetic reconstruction (Figure 19).
DISCLOSURE
The authors have received material support from Keystone Dental, Nobel Biocare, and Stoma Dental.
References
1. Pikos MA. Atrophic posterior maxilla and mandible: alveolar ridge reconstruction with mandibular block autografts. Alpha Omegan. 2005;98(3): 34-45.2. Pikos MA. Mandibular block autografts for alveolar ridge augmentation. Atlas Oral Maxillofac Surg Clin North Am. 2005;13(2):91-107.
3. Jensen OT, Pikos MA, Simion M, Vercellotti T. Bone grafting strategies for vertical alveolar augmentation. In: Miloro M, Ghali GE, Larsen PE, eds. Peterson’s Principles of Oral and Maxillofacial Surgery. 2nd ed. Ontario, Canada: BC Decker. 2004;12:223-232.
4. Pikos MA. Alveolar ridge augmentation using mandibular block grafts: Clinical update. Alpha Omegan. 2000;93(3):14-21.
5. Pikos MA. Block autografts for localized ridge augmentation: Part II. The posterior mandible. Implant Dent. 2000;9(1):67-75.
6. Pikos MA. Block autografts for localized ridge augmentation: Part I. The posterior maxilla. Implant Dent. 1999;8(3):279-284.
7. Pikos MA. Facilitating implant placement with chin grafts as donor sites for maxillary bone augmentation—Part II. Dent Implantol Update. 1996;7(1): 1-4.
8. Pikos MA. Facilitating implant placement with chin grafts as donor sites for maxillary bone augmentation—Part I. Dent Implantol Update. 1995;6(12): 89-92.
9. Grunder U, Gracis S, Capelli M. Influence of the 3-D bone-to-implant relationship on esthetics Int J Periodontics Restorative Dent. 2005;25: 113-119.
10. Pikos MA. Buccolingual expansion of the maxillary ridge. Dent Implantol Update. 1992;3(11): 85-87.
11. Adell R, Lekholm U, Rockler B, Brånemark PI. A 15-year study of osseointegrated implants in the treatment of the edentulous jaw. Int J Oral Surg. 1981(6);10: 381-416.
12. Mito RS, Lewis S, Beumer III J, et al. The UCLA implant study. A three-year review of the Branemark implant system success rate. J Calif Dent Assoc. 1989;17(3): 12-17.
13. Ahlqvist J, Borg K, Gunne J, et al. Osseo-integrated implants in edentulous jaws: a 2-year longitudinal study. Int J Oral Maxillofac Implants. 1990;5(2): 155-163.
14. Johansson C, Albrektsson T. Integration of screw implants in the rabbit. A 1-year follow-up of removal torque of titanium implants. Int J Oral Maxillofac Implants. 1987;2(2): 69-75.
15. Albrektsson T, Sennerby L. Direct bone anchorage of oral implants: Clinical and experimental considerations of the concept of osseointegration. Int J Prosthodont. 1990;3(1):30-41.
16. Carlsson L, Röstlund T, Albrektsson B, Albrektsson T. Removal torques for polished and rough titanium implants. Int J Oral Maxillofac Implants. 1988;3(1):21-24.
17. Wong M, Eulenberger J, Schenk R, Hunziker E. Effect of surface topology on the osseointegration of implant materials in trabecular bone. J Biomed Mat Res. 1995;29(12): 1567-1575.
18. Carr AB, Larsen PE, Papazoglou E, McGlumphy E. Reverse torque failure of screw-shape implants in baboons: Baseline data for abutment torque application. Int J Oral Maxillofac Implants. 1995;10(2):167-174.
19. Wennerberg A, Albrektsson T, Lausmaa J. Torque and histomorphometric evaluation of CP titanium screws blasted with 25 and 75 micron-sized particles of Al2O3. J Biomed Mat Res. 1996; 30:251-250.
20. Wennerberg A, Ektessabi A, Albrektsson T, et al. A 1-year follow-up of implants of differing surface roughness inserted in rabbit bone. In: Wennerberg A. On Surface Roughness and Implant Incorporation [PhD Thesis]. Goteborg, Sweden: Goteborg University, 1996: 1-19.
21. Carr AB, Beals DW, Larsen PE. Reverse-torque failure of screw-shaped implants in baboons after 6 months of healing. Int J Oral Maxillofac Implants. 1997;12(5): 598-603.
22. Funato A, Salama MA, Ishikawa T, et al. Timing, positioning, and sequential staging in esthetic implant therapy: a four-dimensional perspective. Int J Periodontics Restorative Dent. 2007;27(4):313-323.
23. Salama H, Salama MA, Garber D, Adar P. The interproximal height of bone: a guidepost to predictable aesthetic strategies and soft tissue contours in anterior tooth replacement. Pract Periodontics Aesthet Dent. 1998;10(9):1131-1141.
24. Sadan A, Blatz MB, Lang B. Clinical considerations for densely sintered alumina and zirconia restorations: Part 1. Int J Periodontics Restorative Dent. 2005;25(3):213-219.
25. Sadan A, Blatz MB, Lang B. Clinical considerations for densely sintered alumina and zirconia restorations: part 2. Int J Periodontics Restorative Dent. 2005;25(4):343-349.
26. Jung RE, Sailer I, Hämmerle CH, et al. In vitro color changes of soft tissues caused by restorative materials. Int J Periodontics Restorative Dent. 2007;27(3):251-257.
27. Garber D. Paper presented at: The Academy of Osseointegration; 1991; San Diego, CA.
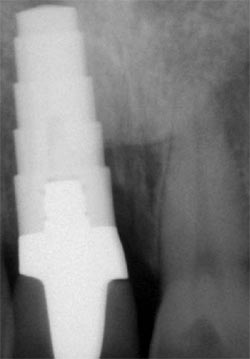 | Figure 1 A radiograph of a previously inserted implant in the area of tooth No. 8. The implant was removed because of infection and failure. | |
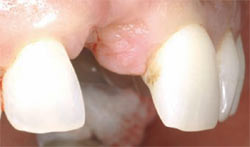 | 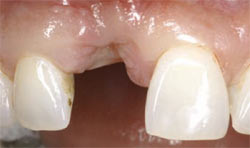 | |
| Figure 2 Lateral view of the soft tissue defect after removal of the implant. Notice collapse of the midline papilla towards the palate. | Figure 3 Frontal view of defect showing vertical and horizontal collapse of the ridge. | |
 | 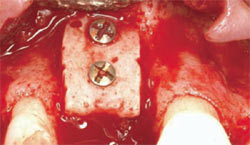 | |
| Figure 4 Autogenous block fitted into position. | Figure 5 Fixation screws inserted into block graft for stability during healing. | |
 | 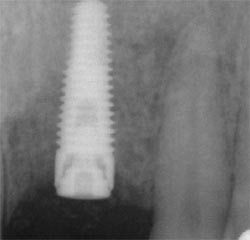 | |
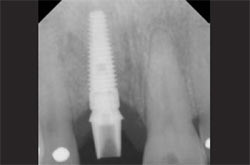
| Figure 6 Radiograph taken immediately after bone graft surgery. | Figure 7 Radiograph at 4 months after implant placement. | |
 | 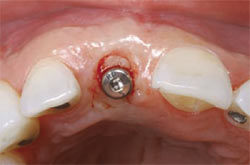 | |
| Figure 8 Soft tissue graft being inserted on the labial of the implant site. | Figure 9 Occlusal view of the implant site. | |
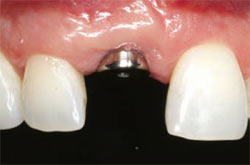 | 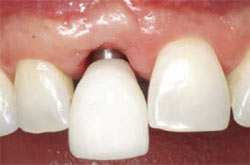 | |
| Figure 10 Flared healing abutment placed to assist in contouring soft tissue. | Figure 11 Temporary restoration with ideal contours to finalize tissue shape before final restoration. | |
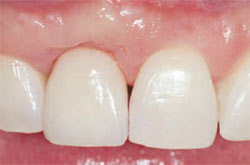 | 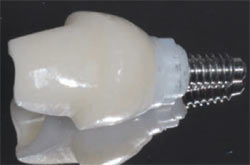 | |
| Figure 12 Eight weeks after temporization. Notice optimal soft tissue esthetics. | Figure 13 A zirconium abutment was selected in the laboratory that matched the subgingival contour formed by the temporary restoration. | |
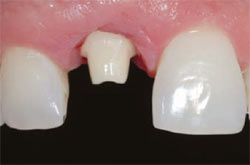 |  | |
| Figure 14 The final laboratory-prepared zirconium abutment at insertion. | Figure 15 Seating of the final crown on tooth No. 8. Note the optimal crown and gingival contours. | |
 |  | |
| Figure 16 The abutment at insertion. | Figure 17 Lateral view of the final all-ceramic crown. Note the optimal gingival thickness and zirconium abutment leading to excellent gingival color. | |
 |  | |
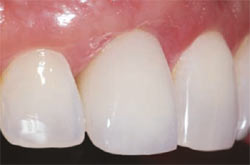
| Figure 18 The frontal view. Scallop of labial gingival margins and interdental papillae have been recreated using a staged approach. | Figure 19 The final esthetics when smiling. | |
| About the Authors | ||
| Maurice Salama, DMD Clinical Professor Periodontics University of Pennsylvania Philadelphia, Pennsylvania Medical College of Georgia Augusta, Georgia Private Practice Atlanta, Georgia | ||
| David Garber, DMD Clinical Professor in the Departments of Periodontics and Oral Rehabilitation Medical College of Georgia School of Dentistry Augusta, Georgia, Department of Prosthodontics Louisiana State University New Orleans, Louisiana Private Practice Atlanta, Georgia | ||
| Henry Salama, DMD Clinical Assistant Professor Periodontics University of Pennsylvania Philadelphia, Pennsylvania Private Practice, Atlanta, Georgia | ||
| Guilherme Cabral, DDS, CDT Ceramist Team Atlanta Lab Atlanta, Georgia | ||

