
Implementing Digital Radiography Into Your Practice
Martin Jablow, DMD
In many practices, the thought of converting to digital radiography is a daunting task. The first step is to decide on what type of digital radiography system you would like to implement and the reasons for the implementation. Is the infrastructure necessary to accomplish your goals already in place? Will this be an up-grade to existing computers in the operatories or will it require additional space and new computers in the treatment rooms? Is your staff accepting of the new technology? Have you budgeted for this technology in time, training, and money? All of these questions are important to ask during the initial planning stage.
As an example, if you are looking to start using digital radiography, you would need to understand the benefits and the total costs—including training and the time to implement the changes. The biggest part of this process is ascertaining whether you have the computer infrastructure in place to support your decision. If the computer infrastructure is inadequate, then the first step changes to upgrading the infrastructure and delaying the use of digital radiography. This is like a jigsaw puzzle: you need to know what the picture looks like to make assembling the puzzle much easier.
Include your staff in the decision-making process. Ask your staff if they want to stop searching for radiographs in the paper chart. Let the staff members have input. In many cases the staff may be using the new technology more then the dentist will. An example is digital radiography sensors. Request that the suppliers bring the system into your office and demonstrate the system with your x-ray heads. Let the staff try the sensors in each other’s mouths with the different holders during the demonstrations. Some sensors may feel better than others. If you are considering phosphor-plate digital radiography technology, have the salesperson demonstrate the different scanning units available for ease of use. Ask the staff where they think the scanner should be placed. Having one person make the decision for others can be a recipe for disaster if the staff does not want to embrace and incorporate the new technology.
One extremely important part of the process of implementing digital radiography is the computer monitor. The minimum contrast ratio of your monitor must be 500:1, and the higher the contrast ratio, the better. Do not use a notebook computer to view radiographs. Most notebook displays do not meet the minimum contrast requirement. If you do choose to use a notebook computer in the treatment room, the author would highly suggest the use of a stand-alone, high-quality LCD monitor connected to the notebook.
Software is another important part of integrating digital radiography into the practice. Is the software coming with your hardware compatible with your practice-management system? Some hardware is tightly integrated into your practice-management software. Other hardware/software combinations bridge from to your existing practice-management software to a third-party imaging software. Your decision may be based on which options integrate best for your practice management system, but do not let the thought of bridging software stop you from evaluating other hardware solutions. There is no correct solution to this question, just your personal choice.
There are two current digital radiography systems on the market: sensors and phosphor storage plates (PSPs). All current digital radiography systems produce images that are, at the minimum, the equivalent of film.1,2 Digital radiography is faster than film, uses no chemicals, and lowers radiation exposure to the patient. Each system has its advantages and disadvantages.
Sensors may be corded (Figure 1) or wireless. They have a CCD or CMOS sensor inside the plastic casing that processes the radiation from the x-ray head. The sensor is attached to the computer via USB, wireless RF (radio frequency), or Bluetooth (Bluetooth is a specification for low-power radio devices to link with computers or other devices over short distances), and the image is produced directly on the screen in a few seconds. Sensors are not available in all sizes. The sensors are rigid and thicker than film, so some people believe that sensors are more uncomfortable for the patient, although the author does not believe that any intraoral radiograph would be considered comfortable. A plastic barrier is placed over the sensor to prevent cross-contamination. There is a longer learning curve for using sensors but it is not difficult to become proficient with them. For taking panoramic or cephalometric films you will need a digital x-ray unit capable of interfacing with your office’s computer network, although some systems can store images on a flash memory card. Some panoramic models can be upgraded from film to digital. All sensor-based systems produce an image on the monitor faster then a PSP system.
PSPs (Figure 2) more closely resemble traditional x-ray film. PSPs come in all traditional sizes, including panoramic and cephalometric. The plates resemble film and are handled in much the same way using traditional techniques. The plate is exposed and the radiation is captured by the plate. The plate is then removed from the cross-contamination barrier and placed into a scanner. The scanner may be placed in a treatment room or central location. In the author’s office the scanner is located in the “old dark room.” The scanner then reads the plate and displays the image on a computer monitor. There are different types of scanners and you must purchase the correct one for your office’s needs. Some scan one film at a time (Figure 3) directly into the scanner while others require placement of the plates in a carousel before scanning. Some can only process intraoral plates while others can process both intra- and extraoral plates (Figure 4). Plates can be used hundreds of times before replacing. The plates can be scratched so some care must be taken when handling them. The plates must be erased after each scan. Some scanners erase the image after scanning, others do not. If you have an existing film-based panoramic or cephalometric x-ray system, there is no need to upgrade to a digital model, be-cause PSPs can be used with your current system. PSPs cost about $25 per #2 size plate to $800 for panoramic-size plates.
The newest digital radiography system is cone beam computed tomography (CBCT). The hardware resembles a panoramic machine. The use of CBCT is much superior to panoramic radiography for predicating the neurovascular bundle for third molar extraction3 and for implant placement. CBCT allows very accurate 3-D viewing of both hard and soft tissue, allowing enhanced patient treatment.
Redundant systems are an extremely important part of the digital world. If a sensor or scanner stops working what will you do? Most companies can provide loaner sensors or scanners within 24 hours; however, you will lose the ability to diagnose if you cannot take radiographs while waiting for the replacement. Consider having, at minimum, two sensors or having a sensor and a phosphor plate system to prevent downtime. Having a redundant system in place will prevent having to postpone treatment because of incomplete diagnosis and reduce loss of income.
Back-up is another very important part of digital radiography. All hard drives will eventually fail so you need to back up all of your images. You will want to make more than one back-up and a back-up should be off-site at all times. The easiest way to get a back-up off-site is with an external hard drive that you or a staff member takes home at the end of each day. A back-up can be done over the existing office computer network and online back-up solutions exist.
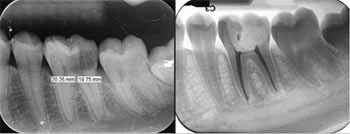
One of the biggest surprises with digital radiography comes from the patients. The patients just love to watch the images pop up on the computer monitor. It is easy to show patients the radiographs when they are displayed on large screens. The patients ask more questions about the radiographs and co-diagnosis becomes much easier. For the dentist, viewing larger images makes diagnosing easier along with the ability to enhance the images (Figure 5). Image enhancements include being able to change brightness and contrast. You can magnify the image along with doing precise digital measurements. These enhancements of the original image facilitate easier detection of pathology. The ease with which images can be transmitted via the Internet to other dentists makes digital radiography a terrific way to have instant consultations.
Digital radiography is a technology that will continue to improve. The speed of viewing and enhancement of images, reduced patient radiation exposure, no need for dark room chemicals, and the ability to e-mail images for quick consultation with dental colleagues makes digital radiography a must for simplifying your office’s imaging needs.
References
1. Alkurt MT, Peker I, Bala O. In vitro comparison of four different dental X-ray films and direct digital radiography for proximal caries detection. Oper Dent. 2007;32(5):504-509.
2. Mentes A, Gencoglu N. Canal length evaluation of curved canals by direct digital or conventional radiography. Oral Surg Oral Med Oral Pathol Oral Radiol Endod. 2002;93(1): 88-91.
3. Tantanapornkul W, Okouchi K, Fujiwara Y, et al. Oral Surg Oral Med Oral Pathol Oral Radiol Endod. 2007;103(2):253-259.
 | 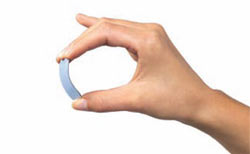 | |
| Figure 1 EVA sensor. Photograph courtesy of Dent-X. | Figure 2 Phosphor plate. Photograph courtesy of Palodex Group. | |
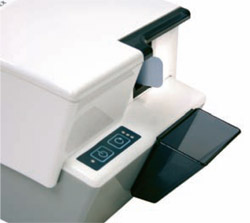 | 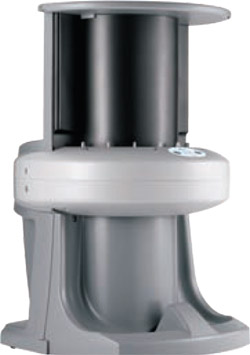 | |
| Figure 3 Optime intraoral scanner. Photograph courtesy of Palodex Group. | Figure 4 Scan-X intra-/extraoral scanner. Photograph courtesy of Air Techniques. | |
 | ||
| Figure 5 Digital radiographs with measurements and inverted color. | ||
| About the Author | ||
 Martin Jablow, DMD Martin Jablow, DMDPrivate Practice Woodbridge, New Jersey | ||

