
Treatment of an Avulsed Maxillary Central with the Thommen SPI® System Using an EASY® Abutment
Robert Schneider
Because of their predictability and longevity, the use of dental implants to replace single or multiple missing teeth or entire edentulous arches is common in today’s prosthodontic and surgical practices.1-5 Recent advances in implant dentistry allow practitioners the option to employ more user-friendly restorative abutments and provide their patients with custom provisional restorations to assist in shaping soft tissue contours to a more ideal position. These improvements in restorative techniques have led to more predictable development of acceptable emer-gence profiles, something of primary importance in the esthetic zone.6-9 The development of an appropriate emergence profile by the restorative dentist and the laboratory technician is critical in the maintenance of the patient’s long-term periodontal health.
Several current implant systems present very good long-term documented success levels as well as several advantages over the traditional fixed and removable treatment alternatives in many cases, although single-implant restorations are not without challenge in the esthetic zone. Achievement and maintenance of proper gingival architecture because of the changes that take place in the alveolar bone after tooth extraction and the resulting apical migration of the patient’s gingiva are a serious concern and frequently require ridge reconstruction procedures of either or both the hard and soft tissues.
This article will review a technique for using a Thommen SPI® (Swiss Precision Implant) EASY abutment (Thommen Medical, Cleveland, OH) in addition to provisionalization to develop soft tissue contours in a 22-year-old male patient whose right maxillary central incisor was avulsed because of previous workplace trauma.
PATIENT TREATMENT
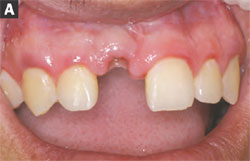
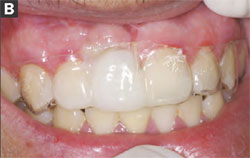
The patient’s maxillary right central incisor was avulsed in a workplace accident and the remaining root tip was extracted, leaving a moderate buccal plate and soft tissue defect. After a treatment option discussion, the patient declined treatment with a traditional fixed partial denture, resin-bonded fixed partial denture, or removable partial denture. The teeth on either side of the defect were not restored. After consultation with the surgeon, the patient opted for reconstruction of the defect with a hard tissue graft from the ramus and a palatal soft tissue graft to reconstruct the site before implant placement (Figure 1A and Figure 1B).
Three months after the tooth extraction, a hard and soft tissue graft was placed in the area to reconstruct the deficient alveolar ridge. The patient was wearing an acrylic resin removable partial denture (RPD) as a provisional restoration. After the grafting, the provisional RPD was adjusted accordingly so as to not place pressure on the grafted area and compromise healing. Healing was uneventful and, 6 months after grafting, a 5-mm diameter SPI ELEMENT® implant (Thommen Medical) was placed using a surgical guide fabricated from the diagnostic wax-up. A 3.2-mm healing cap was placed and the soft tissue was allowed to mature for 8 weeks. The patient was able to continue to wear his previously adjusted provisional RPD, again adjusted to not place pressure or induce excessive micromovement on the implant and interfere with the healing and osseointegration process.
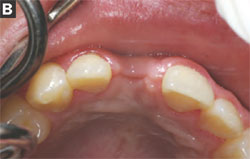
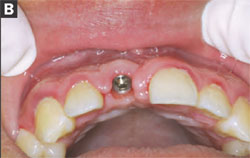
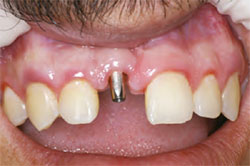
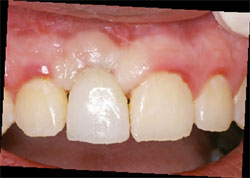
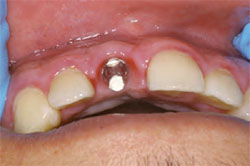
After the 8-week healing period, the healing cap was removed and the facial tissue thickness was evaluated for placement of an EASY abutment (Figure 2A and Figure 2B). The EASY abutment was selected because it was determined before surgery that the final restoration was to be cemented and not screw-retained. The EASY abutments are manufactured with either a long or short cone length and three tissue-cuff heights to allow the restoring clinician the opportunity to place the finished restoration’s margin at an acceptable level for esthetics, emergence profile, cement removal, and optimal periodontal health. Because of adequate interarch and interocclusal distance, an EASY abutment with 6.5-mm cone height and 0.5-mm tissue cuff was selected. No abutment preparation was required because of pretreatment planning and optimal placement.
A prosthetic abutment selection kit can be very helpful in some situations to allow the practitioner to evaluate the tissue-cuff height and interocclusal clearance. The kit is for use in the laboratory and at chairside to evaluate the need for specific types of abutments. The use of the kit will reduce the need for an extensive inventory of abutments and allow the practitioner to order exactly what he or she needs to successfully complete the restoration. The abutment was placed with the recommended 25 Ncm torque value (Figure 3). The EASY impression cap was placed and the final impression made with a polyvinyl siloxane (PVS) impression material and a stock tray (Figure 4).
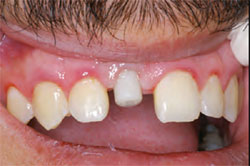
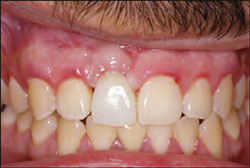
After the final impression at the abutment level, a polymethyl methacrylate (PMMA) provisional component made for the EASY abutment was used as the substructure to maintain marginal integrity and adaptation to the abutment (Figure 5). A thermoplastic matrix made from the patient’s diagnostic casts was used to form the provisional restoration using a PMMA material (Figure 6A and Figure 6B). A more ideal emergence profile was achieved by further addition of PMMA after the removal of the polymerized provisional from the patient’s mouth. The finished provisional restoration was smoothed, polished, and cemented with provisional cement. Note that under most circumstances, with the development of an optimal emergence profile the soft tissue will slightly blanch; as a rule, the blanching should subside in 3 to 5 minutes (Figure 7, Figure 8 and Figure 9). If the blanching does not resolve, the provisional may be over-contoured and should be removed, adjusted, and repolished. The use of the temporary cap as a substructure allows for excellent marginal adaptation and retention of the provisional restoration, resulting in optimal soft tissue health.
The laboratory analog was inserted into the impression coping and the master cast poured in high-strength, low-expansion die stone. The laboratory could now fabricate the definitive restoration of the chosen materials using the master cast and the EASY burnout coping that was included with the original kit that included the abutment, abutment screw, impression cap, temporary cap, and burnout coping for a crown-and-bridge. The laboratory would return the final restoration to the prosthodontist/restorative dentist for delivery.
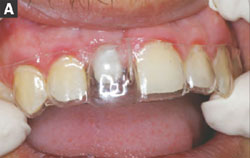
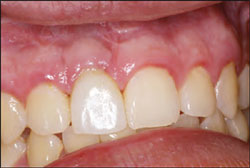
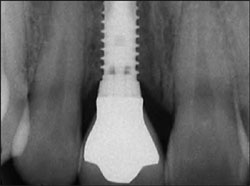
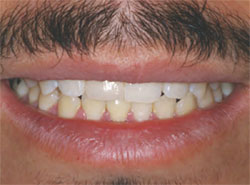
When the adequate tissue maturation was achieved, the definitive restoration was tried in, adjusted as necessary, and repolished. The author places a cotton pellet and a small amount of PVS material in the abutment access hole after tightening to the recommended torque to allow future access to the retaining screw if necessary (Figure 10). Before final cementation the author routinely takes a periapical radiograph to ensure complete seating of the restoration and to serve as a baseline reference for future recall examinations (Figure 11). The restoration was then cemented (Figure 12 and Figure 13).
CONCLUSION
More predictable esthetics and stable periodontal health are achievable with newer techniques and materials. As dentists treat more and younger patients with dental implants, we must ensure that the restorations will have long life and cause minimal problems when replacement is required. Newer implant abutment designs make it much easier to successfully use "stock" abutments to achieve a very predictable long-term result for patients.
DISCLOSURE
The author is a current consultant for Thommen Medical.
ACKNOWLEDGEMENT
The author thanks Teresa Morgan, DDS, MS (University of Iowa Hospitals and Clinics, Hospital Dentistry Institute, Division of Oral and Maxillofacial Surgery, Iowa City, IA), for her expertise in the surgical procedures performed for this patient and Kraig Ceynar, CDT (UIHC, Hospital Dentistry Institute, Iowa City, Iowa), for his assistance in the fabrication of the definitive restoration.
REFERENCES
1. Kois JC, Kan JY. Predictable peri-implant gingival aesthetics: surgical and prosthodontic rationales. Pract Proced Aesthet Dent. 2001;13(9):691-698.
2. Schropp L, Kostopoulos L, Wenzel A. Bone healing following immediate versus delayed placement of titanium implants into extraction sockets: a prospective clinical study. Int J Oral Maxillofac Implants. 2003;18(2):189-199.
3. Kois JC. Altering gingival levels: The restorative connections. Part 1: Biological variables. J Esthet Dent. 1994;6(1):3-9.
4. Spear FM. Maintenance of the interdental papilla following anterior tooth removal. Pract Periodontics Aesthet Dent. 1999; 11(1):21-28.
5. Wannfors K, Smedberg JL. A prospective clinical evaluation of different single-tooth restoration designs on osseointegrated implants. A 3-year follow-up of Brånemark implants. Clin Oral Implants Res. 1999;10(6):435-438.
6. Petrungaro PS. Immediate restoration of implants utilizing a flapless approach to preserve interdental tissue contours. Pract Proced Aesthet Dent. 2005;17(2): 151-158.
7. Saadoun AP, Le Gall MG. Periodontal implications in implant treatment planning for aesthetic results. Pract Periodontics Aesthet Dent. 1998;10(5): 655-664.
8. Kan JY, Rungcharassaeng K. Immediate placement and provisionalization of maxillary anterior single implants: a surgical and prosthetic rationale. Pract Periodontics Aesthet Dent. 2000;12(9):817-824.
9. Schneider R. Restoration of an immediately placed implant with the Thommen SPI® EASY abutment in the esthetic zone. Inside Dentistry. 2007;3(4):73-74.
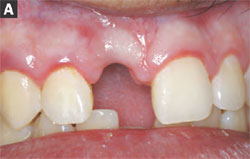 |  | |
| Figure 1A and Figure 1B The patientas oral condition after hard and soft tissue grafting of the maxillary right central incisor site. | ||
 |  | |
| Figure 2A and Figure 2B Appearance of the soft tissue after removal of the healing cap for measurement of the tissue thickness and abutment placement. | ||
 | 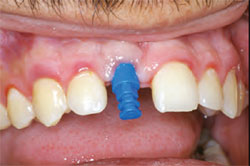 | |
| Figure 3 Definitive EASY abutment placement.The restoration margin will be about 2 mm subgingival. | Figure 4 The EASY impression cap in place before the final impression. | |
 | ||
| Figure 5 The PMMA component in place. | ||
 |  | |
| Figure 6A and Figure 6B The thermoplastic matrix in place to ensure adequate clearance of the provisional component and the matrix in place after addition of the provisional PMMA material. | ||
 |  | |
| Figure 7 Initial placement of the provisional restoration. Note the soft tissue blanch. | Figure 8 Three to 5 minutes after initial placement of the provisional. Note the lack of tissuebuna blanch and soft tissue adaptation. | |
 |  | |
| Figure 9 Facial view of the soft tissue around the provisional 3 weeks after cementation. Note the improvement in tissue contours and health. | Figure 10 Appearance of the EASY abutment before cementation of the definitive restoration. A cotton pellet and PVS is placed in the access hole to facilitate re-entry in the future if necessary. | |
 |  | |
| Figure 11 Pre-cementation radiograph is taken to verify seating of all components and to act as a baseline reference for future appointments. | Figure 12 Cementation of the definitive restoration. | |
 | ||
| Figure 13 The patientas smile with the cemented definitive restoration. | ||
| About the Author | ||
 | Robert Schneider, DDS, MS | |

