Emergency Intraoral Repairs with Narrow-bodied Implants
Michael Kleinman, DDS, Ziv Mazor, DMD; Keith Rossein, DDS
Narrow-body, 1-piece implants (1.8-mm diameter pure titanium) became commercially available in 1993 and were initially promoted as transitional implants that could be immediately loaded, so patients undergoing implant treatment or bone augmentation procedures never had to be without teeth.1-8
It has been estimated that a quarter to a third of all patients who could benefit from implant therapy never have the treatment because of ridges that are too narrow, limited vertical or interproximal space, convergent adjacent roots, and/or the inability to pay for the treatment. Often included in this category are the elderly and patients with systemic problems and/or undergoing radiation or chemotherapy.
Narrow-body implants have solved some of these problems. In addition to provisionalization, narrow-body implants have been used to replace congenitally missing laterals,9 to support overdentures,10-13 and for orthodontic anchorage.14 In fact, many manufacturers, including Nobel Biocare, Bicon, Imtec, BioHorizons, Sterngold, and OCO Biomedical have come to the same conclusions and have designed and developed their own narrow-body implants.
Of concern to many practitioners is whether or not narrow-body implants, without holes or wedges, completely osseointegrate to provide the needed support and retention for a variety of restorations. The answer is yes.
The Department of Implant Dentistry at New York University (NYU) conducted human histological studies in 1996,15 as did the Center of Prosthetic and Implant Dentistry at Loma Linda University in 1998.10 In the NYU studies, 8 months after the studies began, a core of thenarrow-bodied implant and bone was taken. The histological data indicated that (1) the apical half of the implant had 50% osseointegration with dense trabecular bone growth; (2) there was new bone growth in the coronal aspect of the implant; and (3) there was an undetectable inflammatory response.10,15
More recently, from an article published in the International Journal of Oral & Maxillofacial Implants16 from research done by Froum et al at NYU on narrow-bodied transitional implants, it was concluded that, “The percentage of BIC [bone to implant contact] achieved with Tis [transitional implants] was similarto that documented in the literature for conventional turned, machine-surfaced implants.” The NYU research indicated that the average percentage of bone-to-implant contact was 52.9% ± 13.81%. Part of their conclusion was that although transitional implants are typically removed when the definitive implants are restored, the results of their study suggested a change in the transitional implant protocol.16
There are 3 important advantages to using narrow-body implants. Because the implants are so narrow in comparison to definitive implants, they are almost always placed in good hard bone, and thus become initially stabilized (the precursor to good osseointegration). Because less bone is being removed than with larger implants, blood supply is minimally interrupted, so the bone is better nourished. There is less disruption of the linear strength of the bone when using the narrow-bodied implants. Dentatus was the first implant manufacturer to make the narrow-body, 1-piece implants available, and recently their titanium alloy self-threading implants received Food and Drug Administration clearance “for long-term use and for any length of time as decided by the healthcare provider” (data on file, Dentatus USA). Most other companies have similar designations. This is a significant milestone in implantology and should make the opportunity for implant therapy available to many more patients.
This article discusses using the Anew™ implant system (Dentatus USA, New York, NY) to repair bridges that had lost a key abutment.17,18 The technique used in this case made it possible to restore bridges that otherwise would not have been savable.
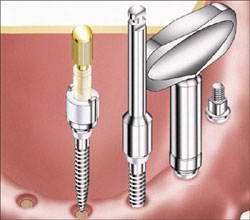
The Anew implant prosthetic system is an innovative idea that is likely to change the landscape of implantology. The implants are designed for immediate chairside replacement and function of missing teeth (Figure 1). Implants with a short-threaded prosthetic extension tolerate a wide range of angulations of single- and large-unit restorations that are seated without torque or friction. The restoration is secured with a retrievable resin screwcap that can be removed without force and cannot damage the implant threaded section. The antirotational index coping embedded in the restoration prevents rotation of the implants during the reassembly of the bridge. The Anew implants are available in 1.8-mm, 2.2-mm, and 2.4-mm diameters and in 3 lengths with a surface treated section. They are packaged presterilized and ready for immediate use.
When or if for any reason the restoration needs to be removed, it can be unscrewed with minimal discomfort to the patient. The 2 cases shown here demonstrate a chairside technique. However, Anew narrow-bodied implants can be the treatment plan of choice to retain permanent customized restorations that are indexed by conventional impression transfer techniques and constructed by a qualified laboratory using materials of their choice.
Most dentists encounter situations in which a permanently cemented bridge breaks at the interface of 2 pontics or a pontic and an abutment. In other instances, supporting-abutment teeth fail or are lost. In either circumstance, it is difficult, if not impossible, to affect a “permanent” repair. Psychologically, there is added pressure when the bridge was fabricated and inserted by the dentist who has to resolve the problem.
Traditionally, broken sections of bridges are secured with metal splint bars, orthodontic wires, amalgams, and composites. However, the forces of mastication are so strong that these types of repairs usually do not last long. But what if the support of a “root” that had long been gone could be added? This is now possible with the narrow-bodied implants. If the bridge fractured at the interface of 2 crowns but remained firmly cemented to the abutment teeth, an opening could be drilled through the occlusal surface of the pontic, a drill to create the osteotomy could be inserted through that opening and into the soft tissue and bone, and the implant could be installed through the crown directly into the osteotomy. Then the index coping can be luted to the bridge with composite and screwed down to create a strong, permanent intraoral repair. If abutment teeth are lost and the restoration can be removed intact, a similar procedure can be used.
CASE 1
The patient was a 69-year-old man who presented with missing maxillary posterior teeth but still had natural teeth Nos. 5 through 11 (Figures 1A and 1B). The remaining teeth had periodontal disease before he fractured his jaw in a car accident. Teeth Nos. 8 and 9 were jarred loose after the accident and were splinted together. Because of the condition of the remaining teeth and the patient’s finances (he was uninsured), a full denture was suggested as a treatment plan. The patient wanted to prolong a maxillary denture as long as possible. Teeth Nos. 8 through 10 were extracted and, as a transition to what ultimately could be a full upper denture, a fixed bridge on teeth Nos. 5 through 12 was fabricated in February 2002 to act as a quasi-, fixed permanent restoration until a full denture might be needed. Root canal was performed on tooth No. 5 (the abutment). The tooth No. 11 abutment had root canal and a post. In January 2003, tooth No. 11 fractured and had to be extracted, and the bridge became, essentially, a unilateral cantilever. In March 2004, to stabilize the bridge, 2 Dentatus Anew implants were placed in the areas of teeth Nos. 8 and 9 to support the bridge (Figures 1C, 1D, 1E, 1F, 1G, 1H, 1I, 1J, 1K, 1L). There was insufficient bone to place another Anew implant in the area of tooth No. 11. Plastic screwcaps were used to screw the bridge to the implants and cement was used for the natural teeth abutments (Figures 1M, 1N, 1O, 1P, 1Q, 1R, 1S, 1T, 1U, 1V, 1W). After 1.5 years, the implant at tooth No. 8 has loosened, No. 9 is solid, and the bridge is not mobile. The bridge is being maintained to delay a full upper denture as long as possible. The patient is very happy with the plan.
CASE 2
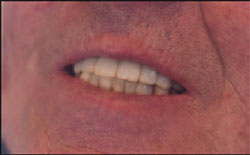
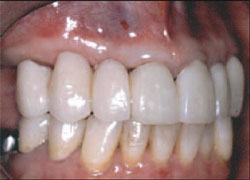
A 49-year-old woman seeking an immediate prosthetic solution presented after decementation of her old anterior maxillary bridge. Her dental history revealed extractions of the right upper molars and premolars several months earlier, a fact that required cutting and shortening her porcelain-fused-to-metal bridge up to the right lateral incisor (Figure 2A).
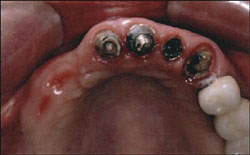
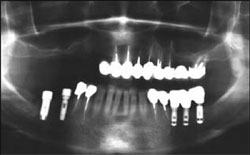
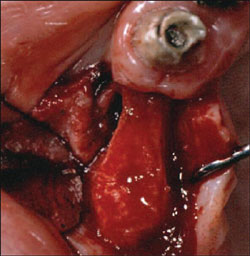
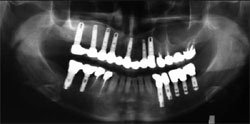
Clinical and radiographic examination revealed extensive tooth decay under the remaining abutments (Figures2B and 2C). The patient insisted on having a fixed restoration through the entire treatment sequence. After examination and evaluating the patient’s needs, it was decided to create an implant-supported fixed restoration from teeth Nos. 16 through 23. Because there was not enough ridge height on the right posterior segment (only 2 mm to 3 mm of ridge height remained) a sinus augmentation with simultaneous implants placement was planned.
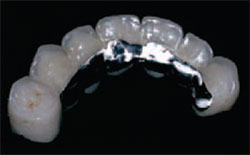
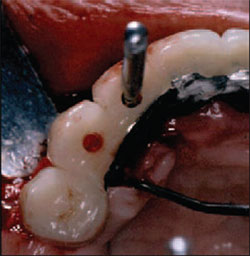
The treatment plan was to fabricate an immediate temporary fixed bridge that would be supported by 2 narrow diameter implants at the place of teeth Nos. 12 and 13 as well as some remaining roots, which would allow the patient to have a fixed restoration through the entire treatment sequence. (Figures 2D, 2E, 2F, 2G, 2H, 2I, 2J, 2K, 2L). The finished case is shown in Figures 2M and 2N.
CONCLUSION
Narrow-bodied, immediate-load implants are practical and predictable and will offer a greater number of people the opportunity for implant treatment. For intraoral repair and support of either transitional or long-term restorations, using narrow-body implants should be considered the treatment of choice.
ACKNOWLEDGMENT
This implant-restorative protocol was developed in conjunction with the Department of Implant Dentistry at New York University’s College of Dentistry.
DISCLOSURE
Dr. Rossein is a paid consultant for Dentatus USA.
REFERENCES
1. Froum SJ, Emtiaz S, Bloom M, et al. The use of transitional implants for immediate fixed temporary prostheses in cases of implant restorations. Pract Perio Aesthet Dent. 1998;10(6):737-746.
2. Petrungaro P. Reconstruction of severely resorbed atrophic maxillae and management with transitional implants. Implant Dent. 2000;9(3): 271-277.
3. Brown MS. Tarnow DP. Fixed provisionalization with transitional implants for partially edentulous patients: a case report. Pract Proced Aesthet Dent. 2001;13(2): 123-127.
4. Maksoud MA. Transitional implants as temporary fixed restorations in a sinus graft. Contemporary Esthetics and Restorative Practice. 2001;5(6): 74-76.
5. Mazor Z, Brosh I. Use of transitional implants for fixed interim prosthesis. Can J Dent Tech. 2001;5(8):54-55.
6. Petrungaro P. Immediate extraction/implant placement: healing phase management with platelet rich plasma and transitional implants. Int Oral Implant. 2001;2(4):23-35.
7. Simon H. Caputo AA. Removal torque of immediately loaded transitional endosseous implants in human subjects. Int J Oral Maxillofac Implants. 2002;17(6):839-845.
8. Petrungaro P. Unique implant technology for immediate provisional restorations at implant placement. Contemporary Esthetics and Restorative Practice. 2005;9(5): 68-70.
9. Keller GW. Temporarily replacing congenitally missing maxillary lateral incisors in teenagers using transitional implants. Implant News & Views. 2001;3(1):1-10.
10. Bohsali K, Simon H, Kan J, et al. Modular transitional implants to support the interim maxillary overdenture. Compend Cont Educ Dent. 1999;20(10):975-984.
11. Rossein K, Boris F. Stabilizing a full denture with a transitional implant-supported splint. Contemporary Esthetics and Restorative Practice. 2001;5(3):68-76.
12. Shatkin TE, Shatkin S, Oppenheimer AJ, et al. A simplified approach to implant dentistry with mini dental implants. Alpha Omegan. 2003;96(3):7-14.
13. Rossein K. Retaining and stabilizing dentures with narrow-bodied implants. Dent Today. 2005;24(9):100-106.
14. Gray J, Smith R. Transitional implants for orthodontic anchorage. J Clin Orthod. 2000; 34(11): 659-666.
15. Tarnow D. Froum S. A case report and histology of MTI modular transitional implant. NYU School of Dentistry. May 1966; Abstract.
16. Froum S, Simon H, Cho S, et al. Histologic evaluation of bone-implant contact of immediately loaded transitional implants after 6 to 27 months. Int J Oral Maxillofac Implants. 2005;20:(1):54-60.
17. Ravasini G, Ugolini G, Dalla Turca S, et al. Protocollo operativo per l’utilizzo di impianti provvisori immediati (Mini Transitional Implants - MTI) Daialog: Rivista Pratica Per Il Team Odontoiatrico Edizioni Martina Bologna, Anno 1’ Numero 1.
18. Spitler NS. Rescuing bridges in trouble. Implant News & Views. 2002;(4)6:1-4.
 |
||||||||||
| Illustration 1 The Dentatus Anew implant comes sterilized and assembled with its component parts. The short brass driver is used to start the installation into the osteotomy, followed by the slow-speed driver and is completed with the manual driver. Illustration courtesy of Dentatus USA. | ||||||||||
| Case 1 clinical photos courtesy of Dr. Michael Kleinman. | ||||||||||
 |
 |
|||||||||
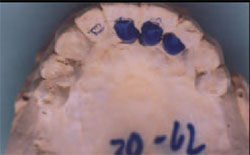
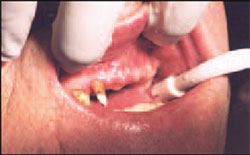
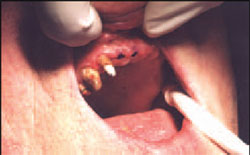
| Figure 1A Preoperative existing laboratory-processed temporary bridge. Abutment tooth No. 11 with post/core fractured, and the root was extracted. The bridge was relined with acrylic to approximate the soft tissue around tooth No. 11. | Figure 1B Preoperative stone model with block-out resin indicating the position of the Anew implants, taking into account enough room for the acrylic. | |||||||||
 |
 |
|||||||||
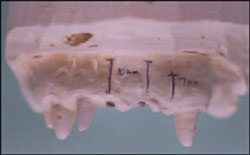
| Figure 1C Preoperative model showing the position and lengths for 2 10-mm implants. | Figure 1D Maxillary ridge observed before drilling osteotomies. | |||||||||
 |
 |
|||||||||
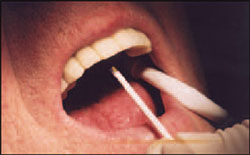
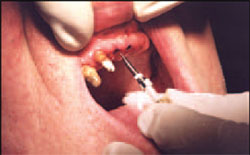
| Figure 1E A marking stick is placed through the openings drilled with an acrylic bur in the pontics of teeth Nos. 8 and 9, and the ridge is marked for the location of the osteotomies. | Figure 1F Locations of the osteotomies have been marked on the patient’s maxillary ridge. | |||||||||
 |
 |
|||||||||
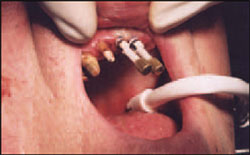
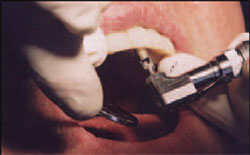
| Figure 1G The osteotomies are being prepared with the Profile drill. The osteotomy is drilled to about half the depth in the maxilla. The assistant should use a water spray from the air/water syringe to prevent the bone from overheating. | Figure 1H The implant assembly, left intact, is screwed in several millimeters with the short brass driver. | |||||||||
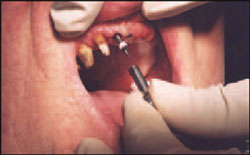 Figure 1I |
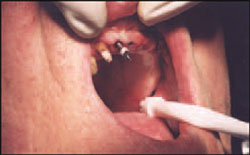 Figure 1J |
|||||||||
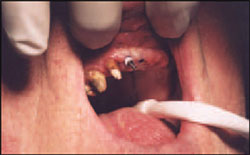 Figure 1K |
||||||||||
| Figures 1I through 1K The screwcap, index coping, and gingival collar are removed and the insertion is continued with the manual key driver. | ||||||||||
 |
 |
|||||||||
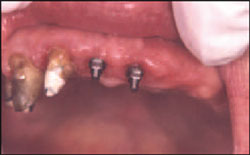
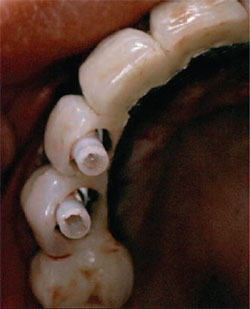
| Figure 1L Both implants are fully inserted. | Figure 1M The antirotational index copings are placed over the implants and the screwcaps are turned with the brass driver to tighten them down. | |||||||||
 |
||||||||||
| Figure 1N The Dentatus Hollow Trephine Drill is used to widen the openings in teeth Nos. 8 and 9 so that the screwcaps can protrude through and additional space is created for the acrylic. | ||||||||||
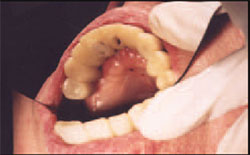 Figure 1O |
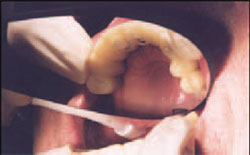 Figure 1P |
|||||||||
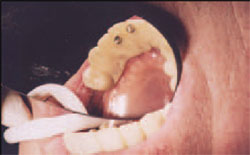
| Figures 1O and 1P The bridge is placed over the screwcap assembly. | ||||||||||
 |
 |
|||||||||
| Figure 1Q Brass plugs are placed in the screwcaps to prevent acrylic from seeping inside. An acrylic layer is placed around the screwcaps. No lubrication of the screwcaps is necessary, as the acrylic will not adhere to the screwcaps. | Figure 1R The brass plugs are removed and the screwcaps are unscrewed. | |||||||||
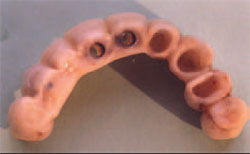 Figure 1S |
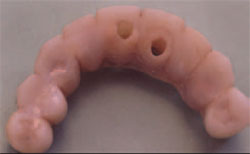 Figure 1T |
|||||||||
| Figures 1S and 1T The bridge is removed so that it can be adjusted and polished outside the mouth. The index copings are now incorporated into the bridge. | ||||||||||
 |
 |
|||||||||
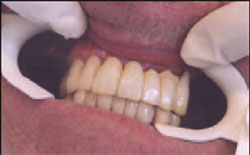
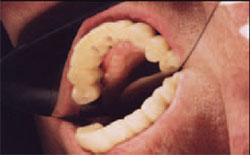
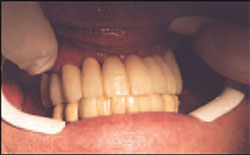
| Figure 1U The finished bridge is inserted. | Figure 1V The screwcaps are tightened down and cut even with the occlusion. The hollow opening of the screwcap is filled with Cavit and covered over with acrylic. | |||||||||
 |
||||||||||
| Figure 1W The final bridge is cemented to the natural teeth and screwed to the implants. | ||||||||||
| Case 2 clinical photos courtesy of Dr. Ziv Mazor. | ||||||||||
 |
 |
|||||||||
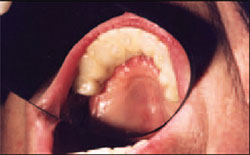
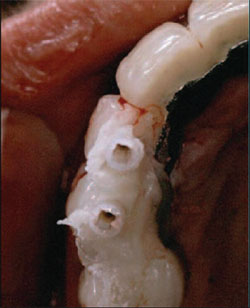
| Figure 2A Preoperative facial view. | Figure 2B Preoperative palatal view. Note the extensive decay. | |||||||||
 |
 |
|||||||||
| Figure 2C Preoperative panoramic radiograph shows the lack of bone height in the posterior segment. | Figure 2D Temporary bridge with rigid metal support fabricated by the dental laboratory. | |||||||||
 |
 |
|||||||||
| Figure 2E Try in of the temporary before beginning the treatment. | Figure 2F Flap reflection exposing the underlined narrow ridge in the areas of teeth Nos. 12 and 13. | |||||||||
 |
 |
|||||||||
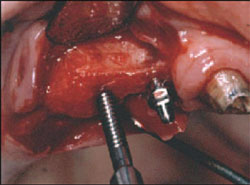
| Figure 2G Using the temporary bridge as a surgical guiding stent for placing the Anew implants. | Figure 2H Insertion of 2 implants 13 mm in length. | |||||||||
 |
 |
|||||||||
| Figure 2I Assembled prosthetic components and checking with the temporary for interferences. | Figure 2J Temporary bridge relined with acrylic resin. | |||||||||
 |
 |
|||||||||
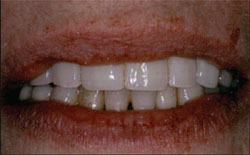
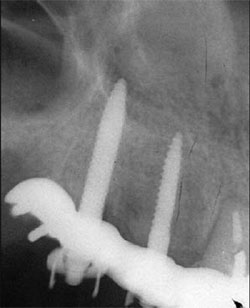
| Figure 2K Postoperative facial view | Figure 2L Periapical x-ray taken immediately after surgery. | |||||||||
 |
 |
|||||||||
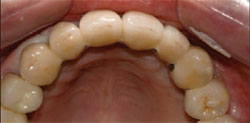
| Figure 2M Panorex taken after final prosthetic treatment. Note the amount of sinus augmentation. | Figure 2N The final prosthetic work. | |||||||||
|
||||||||||