
Realignment of an Anterior Tooth Fragment Using Two Composite Systems and Artistically Applied Re-engineering Principles
Frank J. Milnar, DDS, AAACD
It is incumbent upon clinicians today to seriously integrate treatment alternatives that will result in clinical outcomes that are esthetic, durable, and predictable as well as minimally invasive. Such an endeavor is realistically possible because biomodification and biomimetics (ie, the mimicking of natural life) are at the forefront of contemporary dental composite resin development and adhesive dental procedures.1 As a result, restorative therapies can be achieved with less technique sensitivity, greater conservation of tooth structure, and in such a way that lifelike esthetics and function are maintained.
Minimal intervention and biomimetic approaches ultimately seek to limit the restoration/re-treatment cycle for the patient’s long-term benefit.2 This suggests that restorative therapies be undertaken as a last resort and with the least amount of tooth preparation necessary.3
Adolescents with fractured teeth as a result of injury or trauma are perfect candidates for minimally invasive, biomimetic restorative techniques that incorporate the use of nature-replicating direct composite materials and adhesive techniques.4 Techniques for adhesive bonding and composite placement have simplified the immediate and definitive treatment of traumatic tooth injuries.4 Considering that approximately one quarter of the population under the age of 18 experiences a traumatic anterior tooth fracture, it behooves clinicians to approach the treatment of such injured dentition in a way that curtails the likelihood for further hard tissue destruction and/or the need for re-treatment.5
Admittedly, there are other treatment options available (eg, indirect crowns and veneers) that—depending on the specific clinical situation—could be used to restore fractured teeth.6 However, if the severed tooth fragment is available, the most appropriate treatment alternative may be the one that preserves the inherent beauty of the tooth fragment through anatomical/morphological concepts of realignment and re-engineering principles for reattachment. Reattaching the fractured fragment to the remaining tooth may provide esthetically pleasing results,5 improved function, and a positive psychological response from the patient,7 as well as a faster and less-complicated restorative procedure.7-9 Additionally, reattaching the tooth fragment can promote maintenance of the patient’s original occlusion.9
To this end, recent developments in direct composites and their adhesive placement protocol have enabled dentists to predictably use direct methods immediately for the artistic restoration of fractured anterior teeth.10 Today, there are many biomimetic and nature-replicating direct composites available (Amelogen Plus®, Ultradent Products, Inc, South Jordan, UT; Vit-l-escence™, Ultradent Products, Inc; Gradia® Direct, GC America, Alsip, IL; 4 Seasons® Flow, and Ivoclar Vivadent, Amherst, NY). These materials replicate the optical characteristics of natural teeth, imitate the behavior of tooth structure in its composition, and demonstrate enhanced physical properties compared to earlier generations of direct-composite resins.11 As a result, they have helped to expand the treatment options available for the variety of clinical situations faced by clinicians today.8
Case Presentation
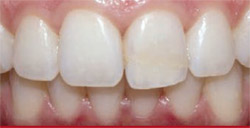
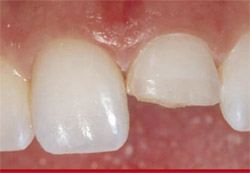
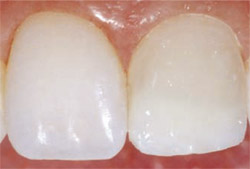
A 19-year-old woman was dissatisfied with the appearance of anterior maxillary tooth No. 9 (Figure 1). The tooth was fractured 8 years earlier and reattached at that time. Over the years, the adhesive bond became unsightly and its form inappropriate. The literature indicates that one of the challenges facing dentists when immediately reattaching tooth fragments to traumatized anterior teeth is disguising the fracture line with the proper use of masking and restorative resins.12
A comprehensive intraoral examination was performed that included radiographs, photographs, and an occlusal analysis. The morphological, histological, and optical characteristics of teeth Nos. 8 and 9 were observed. The patient was in good health, and no pathologies were identified that would contraindicate restorative treatment.
Because of the age of the patient and vitality of tooth No. 9, ultra-conservative treatment was requested and offered. Specifically, the proposed treatment plan involved detaching the tooth fragment, realigning it, and reattaching it using two different composite systems—one for the initial opaque layer (Amelogen Plus, Ultradent Products, Inc) and one for the dentin and enamel replacement layers (Vit-l-escence, Ultradent Products, Inc). The decision to save and reattach the tooth fragment was based on its residual esthetic appearance in the incisal third.
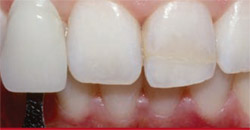
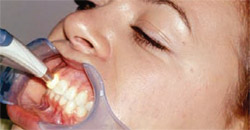
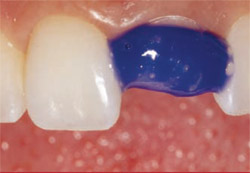
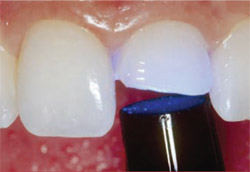
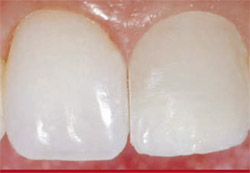
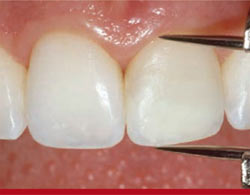
To identify the appropriate composite shades, subjective shade selection using tabs from the VITA Classic Shade Guide (Vident, Brea, CA) indicated a tooth shade of B1 (Figure 2). The patient’s tooth shade was also assessed and verified objectively using a digital spectrophotometer (VITA EasyShade, Vident) (Figure 3).
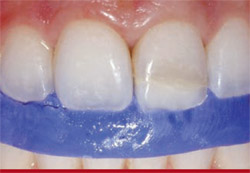
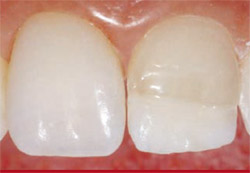
The selected composite shades were previewed on teeth No. 8 (dentin shade Vit-l-escence, B1) and No. 9 (enamel shade Vit-l-escence, Pearl Frost) (Figure 4). The initial opaque layer composite (Amelogen Plus) was selected based on its enhanced physical properties, including strength. In particular, the Opaque White shade was selected to best approximate the appearance of the independent tooth and its fragment. The dentin (shade B1) and enamel (Pearl Frost) replacement composites (Vit-l-escence) were chosen for their artistic capabilities and characteristics.
An impression was taken using an addition-silicone material (Registrado, VOCO America, Inc, Sunnyside, NY) before removing the tooth fragment (Figure 5) to create a putty stent. After refinement and placement in the patient’s mouth, this stent would enable spatial reference and be used as a volumetric guide when placing the composite. In addition, the putty stent would help preserve the facial/lingual line angle.13
The tooth fragment was carefully detached (Figure 6), after which a 360° bevel was placed around (both the proximal and distal aspects of) tooth No. 9.14 Diamond burs were used for this purpose. The preparation was then pumiced, rinsed, and dried, and then acid-etched (Ultra-Etch®, Ultradent Products, Inc) according to the manufacturer’s instructions (Figure 7). A dentin-bonding agent (Peak, Ultradent Products, Inc) was placed and light-cured according to the manufacturer’s instructions (Figure 8) using an LED curing light.
After the putty stent was placed in the patient’s mouth for use as a spatial reference, the opaquing composite (Opaque White, Amelogen Plus) was applied to tooth No. 9 in a 1.5-mm thick layer (Figure 9). The distal tooth fragment was placed into the opaque composite and aligned, after which it was light-cured (Figure 10).
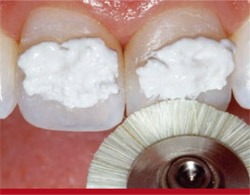
The dentin replacement layer in shade B1 was placed over the tooth and reattached fragment to form the “body” of the restoration. This composite layer was sculpted to mask the fracture line, then light-cured for 20 seconds according to the manufacturer’s instructions (Figure 11). The final enamel replacement layer of Pearl Frost composite was placed on tooth No. 9, sculpted, and then light-cured for 20 seconds (Figure 12). To ensure a complete depth of cure, trans-enamel light-curing was performed from multiple aspects of the conservatively restored tooth.
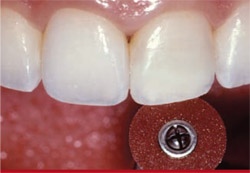
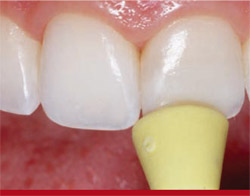
An extra-fine polishing and finishing disc was used to bevel the incisal edge 30° to the lingual (Figure 13), and the facial surface was smoothed using a Jiffy polisher (Figure 14). Additional finishing was completed using a Jiffy polishing cup (Figure 15).
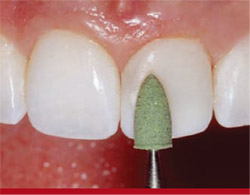
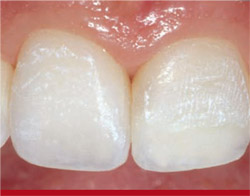
Then, a Green Stone (Brasseler USA, Savannah, GA) was used to create tertiary anatomy and micro-morphological modification to optimize light reflection. After all tertiary anatomy and surface characterizations were completed, the surface texture was compared and verified on both teeth Nos. 8 and 9 (Figure 16).
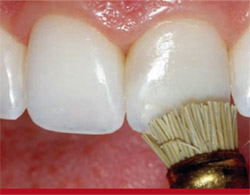
Final polishing was accomplished using a Jiffy polishing brush and cup (Figure 17), while a 0.5-µm diamond-grit polishing paste and goat-hair wheel were used to impart a final luster to the restorations (Figure 18). At the completion of the polishing protocol, a caliper was used to verify the geometric and anatomical symmetry between teeth Nos. 8 and 9 (Figure 19).
Conclusion
Restorations such as the one illustrated in this case report impact only the affected tooth structure and preserve a patient’s future right to pursue conservative and alternative treatment options. When the inherent beauty of the remaining tooth fragment was realigned and conscientiously reattached to the tooth, a seamless restoration based on re-engineering principles of anatomical and morphological concepts was produced (Figure 20 and Figure 21). This type of dentistry requires not only mechanical skills, but artistic acumen in terms of creatively analyzing the clinical problem so that an esthetic, biomimetic, and minimally invasive restorative therapy can be planned. It demonstrates that when the original tooth fragment is available, adhesive protocols and biomimetic direct-composite resins can be used to create a restoration that is reliable, strong, reinforced, durable, and esthetic.10,15
Disclosure
Dr. Milnar has received financial and materials/product support from Ultradent Products, Inc.
References
1. Andreasen JO. Buonocore memorial lecture. Adhesive dentistry applied to the treatment of traumatic dental injuries. Oper Dent. 2001;26(4):328-335.
2. Malterud MI. Minimally invasive restorative dentistry: a biomimetic approach. Pract Proced Aesthet Dent. 2006;18(7):409-414.
3. White JM, Eakle WS. Rationale and treatment approach in minimally invasive dentistry. J Am Dent Assoc. 2000;131(Suppl): 13S-19S.
4. Chu FC, Yim TM, Wei SH. Clinical considerations for reattachment of tooth fragments. Quintessence Int. 2000;31(6):385-391.
5. Spinas E. Longevity of composite restorations of traumatically injured teeth. Am J Dent. 2004;17(6):407-411.
6. Terry DA. Adhesive reattachment of a tooth fragment: the biological restoration. Pract Proced Aesthet Dent. 2003;15(5):403-409.
7. Hedge RJ. Tooth fragment reattachment—an esthetic alternative: report of a case. J Indian Soc Pedod Prev Dent. 2003;21(3): 117-119.
8. Terry DA, Leinfelder KF. An integration of composite resin with natural tooth structure: the Class IV restoration. Pract Proced Aesthet Dent. 2004;16(3):235-242.
9. Behle C. Placement of direct composite veneers utilizing a silicone buildup guide and intraoral mock-up. Pract Peridontics Aesthet Dent. 2000;12(3):259-266.
10. Maia EA, Baratieri LN, de Andrada MA, et al. Tooth fragment reattachment: fundamentals of the technique and two case reports. Quintessence Int. 2003;34(2): 99-107.
11. Lambert DL. Conservative aesthetic solutions for the adolescent and young adult utilizing composite resins. Dent Clin North Am. 2006;50(1):87-118, vi-vii.
12. Arapostathis K, Arhakis A, Kalfas S. A modified technique on the reattachment of permanent tooth fragments following dental trauma. Case report. J Clin Pediatr Dent. 2005; 30(1):29-34.
13. Mount GJ, Ngo H. Minimal intervention: a new concept for operative dentistry. Quintessence Int. 2000;31(8): 527-533.
14. De Santis R, Prisco D, Nazhat SN, et al. Mechanical strength of tooth fragment reattachment. J Biomed Mater Res. 2001;55(4):629-636.
15. Reis A, Francci C, Loguercio AD, et al. Re-attachment of anterior fractured teeth: fracture strength using different techniques. Oper Dent. 2001;26(3): 287-294.
 |
 |
|
| Figure 1 Preoperative close-up view revealing the discolored adhesive bond that reconnected the fragment to fractured tooth No. 9. | Figure 2 Subjective shade selection using tabs from the VITA Classic Shade Guide indicated a tooth shade of B1. | |
 |
 |
|
| Figure 3 The patient's tooth shade was also assessed objectively using a digital spectrophotometer (EasyShade). | Figure 4 The selected composite shades were previewed on teeth No. 8 (dentin shade Vit-l-escence, B1) and No. 9 (enamel shade Vit-l-escence, Pearl Frost). | |
 |
 |
|
| Figure 5 An impression was taken using an addition-silicone material (Registrado) before removing the tooth fragment to create a putty stent. | Figure 6 The tooth fragment was detached, after which a 360° bevel was placed. | |
 |
 |
|
| Figure 7 The preparation was acid-etched (Ultra Etch). | Figure 8 A dentin bonding agent (Peak) was placed and light-cured according to the manufacturer's instructions. | |
|
|
 |
|
| Figure 9 After the putty stent was placed in the patient's mouth for use as a spatial reference, the opaquing composite (Opaque White, Amelogen Plus) was applied to tooth No. 9. | Figure 10 The distal tooth fragment was placed into the opaque composite and aligned, after which it was light-cured. | |
 |
 |
|
| Figure 11 The dentin replacement layer in shade B1 was placed and then light-cured. | Figure 12 The final enamel replacement layer in Pearl Frost was applied, sculpted, and then light-cured. | |
 |
 |
|
| Figure 13 An extra-fine polishing and finishing disc was used to bevel the incisal edge 30° to the lingual. | Figure 14 The facial surface was smoothed using a Jiffy polisher. | |
 |
 |
|
| Figure 15 Additional finishing was completed using a Jiffy polishing cup. | Figure 16 After all tertiary anatomy and surface characterizations were completed, the surface texture was compared and verified on both teeth Nos. 8 and 9. | |
 |
 |
|
| Figure 17 A Jiffy polishing brush and cup were used for final polishing. | Figure 18 A 0.5-µm diamond-grit polishing paste and goat-hair wheel were used to impart a final luster to the restorations. | |
 |
 |
|
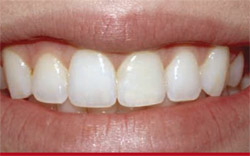
| Figure 19 A caliper was used to verify the geometric and anatomical symmetry between teeth Nos. 8 and 9. | Figure 20 Close-up postoperative view of the patient in natural smile. Note the "seamless" and invisible appearance of the reattached tooth fragment. | |
 |
||
| Figure 21 Close-up retracted view showing the nature-replicating characteristics of the reattachment restoration on tooth No. 9. | ||
| About the Author | ||
 Frank J. Milnar, DDS, AAACD Frank J. Milnar, DDS, AAACDFamily, Cosmetic,and Restorative Dentistry St. Paul, Minnesota |
||

