
A Trio of Techniques for Assuring Predictable Results
Joyce Bassett, DDS
Do you ever wonder where to take off tooth structure when preparing a difficult case? Is your laboratory team frustrated at times with the preparation design of your case? Is it difficult to obtain the final esthetics because you took off too much tooth structure here, and not enough there? Do you realize your preparations are the guide for the final esthetics?
There are techniques to assure predictable and repeatable results, guaranteeing conservative tooth preparation and still meeting current esthetic standards. The use of these techniques will simplify difficult space-management cases and systemize routine procedures.1 Innovative preparation designs, such as those for porcelain laminate veneers, are much less invasive than complete crown preparations. The goal is to restore function and esthetics at a minimal biologic cost. However, tooth preparation requires the execution of a combination of meticulously planned techniques. In the past, the dentist would visualize the final outcome and prepare the teeth within these boundaries, leaving large margins of error. Depth guides were used to ensure proper facial reduction, but the teeth had to be in the proper arch form and not be deficient facially in order for the depth cutters to ensure accuracy.
Smile design principles—midline, canting, arch form, and buccal corridor expansion—are parameters to consider when preparing teeth. Evaluating these principles leads to working from the final outcome and tracing the steps backward to the preoperative state. Today, diagnostic wax-ups based on these smile design principles are fabricated and indices are used over the unprepared teeth to guide the dentist in tooth removal. This has led to another technique that involves the prefabrication of provisionals (made from the diagnostic wax-up) bonded over the unprepared teeth. Then the original technique, employing depth guides on the facials of these provisionals, facilitates routine porcelain veneer preparation. This article presents three different case types, ranging from simple to complex, in which tooth preparation design principles and indices are used.
CASE ONE
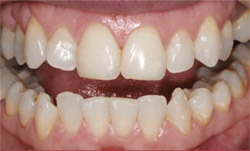
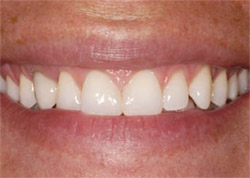
A patient presented with rotated, malpositioned maxillary and mandibular teeth (Figure 1). She was happy with her dominant centrals, but was looking for a more symmetrical smile. She had limited funds and time. The primary clinical recommendation was orthodontic management. She refused orthodontics and requested a treatment plan that could be more expeditiously executed. She had been using an at-home bleaching system and claimed that the color was as white as it was going to get. She was happy with the shade and did not want to attempt a Zoom!® power bleaching (Discus Dental, Culver City, CA). A comprehensive history and physical was performed. No temporomandibular joint (TMJ) disorders, periodontal, or periapical pathologies were identified. She had no occlusal wear and demonstrated acceptable occlusal function (Figure 2).
The cosmetic analysis revealed a low smile line as a result of Gortex implants placed in her lips 10 years earlier. This created an asymmetrical backdrop that had to be addressed. The right lateral was rotated, the canines were protruding, and the bicuspids were lingualized. There was old composite bonding on the facials of the centrals. Ten maxillary units were prescribed to correct all of these parameters. Because the patient felt that her lip covered most of these issues, she chose a more conservative treatment plan, calling for only four maxillary bonded-porcelain restorations, recontouring of the canines, and future lip fillers in the Cupid’s bow area of the lip. The patient’s time constraints required immediate tooth preparation; therefore, a pretreatment wax-up was not performed and the case was prepared.
Preparation Design
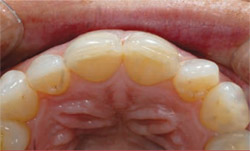
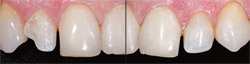
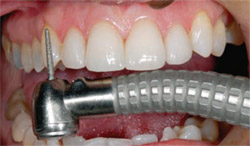
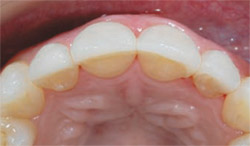
Current preparation techniques recommend the use of depth guides to ensure proper enamel reduction. This technique is only beneficial when the teeth are in proper arch form with no facial enamel deficit.2 In an improper alignment case where the teeth are rotated lingually or labially, it is necessary to remove the protruding portion of the misaligned tooth.3 When evaluating from the occlusal, the dentist must visualize, then align the arch form before the definitive preparation begins (Figure 3). In this case, the protruding portions of the misaligned tooth were removed with a diamond bur (Figure 4).
A rotated tooth will not occupy the same mesial-distal diameter as its contralateral counterpart. The difference must be measured and equalized by removing the adjacent tooth without causing a discrepancy in the ultimate width of the central incisors. In this case, the distal surfaces of both centrals were recontoured to accommodate the added space necessary to make the two laterals the same width (Figure 5 and Figure 6).
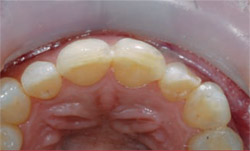
The midline was evaluated for canting and proper mesial-distal placement.4 The angulation of the midline is extremely important when focusing on the symmetry and balance of the smile. Because it was acceptable in this case, there was no reason to alter this contact. When these steps were achieved, the case was in appropriate arch form with the correct amount of facial enamel fullness. Traditional simple techniques could be employed using depth-cutters and standard veneer preparation (Figure 7).5,6
The original length of the patient’s centrals was just shy of the wet-dry line of the lower lip (Figure 2). Lengthening these teeth would interfere with her phonetics; therefore, the original incisal-edge position could not be altered. Calipers were used to measure 2 mm from the incisal edge. The porcelain would overlap the incisal and terminate on the lingual surface. This would add strength to the ceramics, provide a vertical stop during cementation, and give the ceramist room to establish the depth of incisal translucency and incisal effects.3
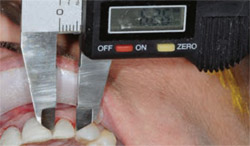
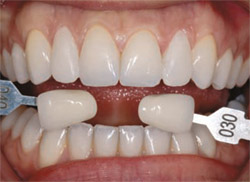
Provisional restorations were fabricated using direct-composite freehand bonding. Calipers were used to measure the widths to assure symmetry of the contralateral provisional restorations (teeth Nos. 8 and 9 and teeth Nos. 7 and 10, respectively) (Figure 8).
Once the patient’s expectations of the provisional esthetics were established, a record of the provisionals and photographs were sent to the ceramist to serve as a template in the fabrication of the final prosthesis. The most important provisional photograph for the ceramist was a full-face image with retractors. The ceramist evaluated the incisal-edge position relative to the interpupillary line and the angle of the dental midline (Figure 9).
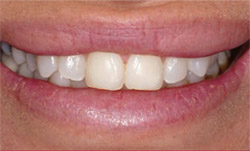
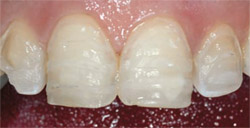
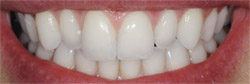
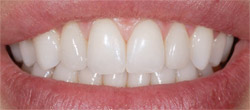
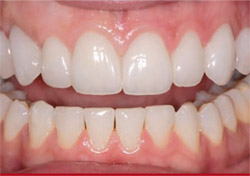
The delivery appointment entailed try-in, cementation of teeth Nos. 7 through 10, and an esthetic evaluation of the canines. The canines were recontoured after final approval of the prosthesis esthetics. This helped in the management of patient expectations and also gave the ceramist the opportunity to maximize the esthetics of teeth Nos. 7 through 10 using the natural, unaltered position and morphology of teeth Nos. 6 and 11. A medium-grit diamond veneer bur was used to recontour the bulges of the native canines so that the facial contours blended (Figure 10). The patient was pleased with the final esthetics (Figure 11).
CASE TWO
A patient presented with a smile that met all of the criteria of smile design principles except that teeth Nos. 7 and 10 appeared dark and were lingualized (Figure 12). This appeared to be a perfect case for "prepless veneers" (feldspathic porcelain).7 It is important to note that if no preparation is performed, the emergence profile will appear bulbous, and there will be no specific margin for the ceramist to determine where to place the porcelain margin. Therefore, a minimum of 0.3-mm reduction at the gingival margin is necessary. Most dentists believe that a definitive tooth preparation must be completed, ideally in enamel, with a chamfer preparation.8 This was a very demanding case because the adjacent dentition was perfect, as were the facial esthetics, but the patient’s expectations were set and she was willing to invest the time and necessary financial resources to attain these goals. Therefore, an additive wax-up and a siltech stint (Flexitime®, Heraeus Kulzer, Inc, Armonk, NY) over the wax-up was fabricated (Figure 13). This allowed the clinician to develop the tooth form, contour, and emergence profile. The provisionalization phase allows esthetic modifications before the final restoration is fabricated. The ultimate desired form of the restoration determines the tooth preparation. Inadequate reduction of the tooth will hinder the delivery of an esthetic result.9
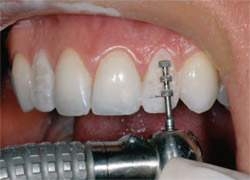
To assure appropriate but minimal reduction, Luxatemp® Fluorescence provisionals (Zenith Dental, Englewood, NJ) were added to the facial surface of the lingually positioned lateral incisors using the Grel technique (Figure 14 ).10 In this technique the tooth is buccally augmented and mimics the volume of the final porcelain restoration. This facilitates appropriate preparation to assure maximum esthetics with minimal reduction.
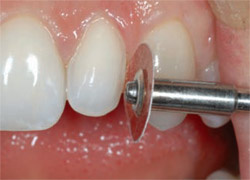
The depth-cutter was used across the facial of the provisional (Figure 15 ). The provisional was then removed and the marks left by the depth-cutter were smoothed with a medium-grit diamond veneer bur. There was no need for any incisal reduction because of the short nature of the original tooth. Discs were then used on the mesial and the distal to assure a facial path of insertion for the laminate (Figure 16).11
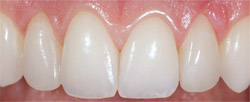
The completed preparation will often require more facial reduction than is first anticipated. This is so because the middle and the cervical thirds must be adequately reduced to assure an anatomic emergence profile and room for the porcelain. If the principles of Grel’s technique were not used, under-preparation of the tooth would have occurred and the final esthetics would have been compromised (Figure 17 and Figure 18).
CASE THREE
A patient presented with a provisional restoration over a stock abutment that she deemed unsightly because of the color and shape. The patient’s chief complaint was the esthetics of her smile. Her initial goal was to attain a natural, beautiful appearance. Full records were taken including photographs, models, a facebow, and a centric relation bite registration mounted on a semi-adjustable articulator. An occlusal analysis was performed and she demonstrated acceptable occlusal function. A comprehensive history and dental examination revealed no periodontal, periapical, or TMJ pathoses.
The cosmetic analysis revealed triangular-shaped teeth with a large amount of composite placed interproximally to close diastemas. Her tooth form was flat and masculine in appearance. She exhibited a high smile line, which put her in a high-risk esthetic category. Therefore, a satisfactory result in gingival esthetics was challenging. From a frontal perspective, the right bicuspids displayed more gingiva than the left bicuspids, which contributed to the appearance of a crooked smile (Figure 19). Her maxillary restorative treatment plan called for seven bonded-porcelain restorations, a custom abutment and crown on the implant, gingival recontouring on the right bicuspids, and a Zoom! power bleaching on the mandibular teeth.12,13
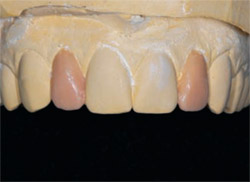
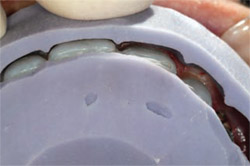
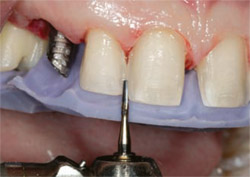
Correction of the crown shape and volume was determined by the fabrication of an additive wax-up. A corresponding sectioned silicone facial and incisal index, which is accurate and rigid, was produced. The sectioned silicone matrix was necessary to control the space available at three different planes, from cervical to incisal (Figure 20).14
Preparation Design
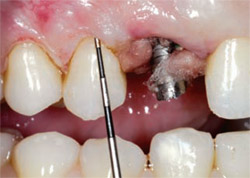
The patient was anesthetized. Upon removal of the implant’s provisional restoration, significant hemorrhagic tissue was noted. The tissue was managed by placing cotton pellets with a hemostatic agent in the sulcus of the implant site until the fixture-level impression phase (Figure 21).
To determine the level of the final margin relative to the hard and soft tissue, a periodontal probe was used to sound to bone to determine if 3 mm of tooth structure was available from the free gingival margin to the osseous crest for biologic width.15-18 A laser was used for gingival recontouring in the area of the right bicuspids following Tarnow’s principles.17
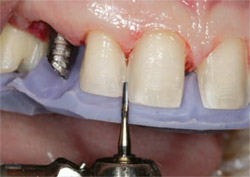
Before any facial preparation began, the facial index was placed. This facilitated evaluating which areas of the tooth required minimal preparation because of augmentation.3
The desired final color of the restoration and the underlying stump shade were the determining factors in the amount of facial reduction. A minimal preparation of 0.3 mm of facial reduction is necessary for a one-shade shift. The medium preparation of 0.5 mm can provide up to two to three shade shifts depending on the underlying preparation color. A deep preparation of 1 mm is necessary to provide a difference in color of three shades or more. In general, a depth of 0.2 mm is needed to change the hue of the tooth by one shade.4
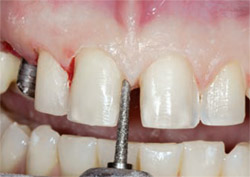
Because the patient desired natural esthetics, a two-shift change was planned and 0.5 mm in facial reduction was performed. At this point in treatment this parameter was revisited with the patient. When this patient was questioned again to clarify her desires and align her expectations with the results, she changed her mind and requested the "whitest teeth possible." For teaching purposes, images of the right side being facially prepared for feldspathic porcelain and the left side being prepared for pressed porcelain were taken (Figure 22).
The facial preparations were completed in three planes using the three-sectioned labial matrix as the guide. The middle third is flat and the incisal third must be rolled toward the lingual to allow space for both tooth form and light transmission. The gingival chamfer margin was placed in enamel following the contour of the free gingiva. This completed the use of the facial matrix. The interproximal composite that was placed to close the diastemas was removed and the incisal matrix was placed (Figure 23).
The incisal matrix was used to ensure 2 mm of reduction from the definitive incisal edge. Any tooth structure in this zone was removed. The porcelain would overlap the incisal and terminate on the lingual surface.
Attention to proper preparation design for diastema closure between the centrals and the distal of the left canine required a maximum wrap and a full-slice preparation 0.5 mm subgingivally.4
It was critical that the preparation continued to the lingual to allow the ceramist the freedom to build the porcelain from the lingual and reduce the possibility of black gingival triangles (Figure 24).
The incisal matrix was again placed over the prepared teeth. It was used at this time to evaluate the axial inclinations and to assure that the interproximal preparations aligned within the outline form of the matrix. Any portion of the tooth that fell outside the form of the matrix guide would have to be removed (Figure 25). This would give the ceramist the ability to change the widths and tooth form of the final restorations. At this point the use of the matrices was complete. Standard preparation guidelines were used, including rounding of all transition zones. The retraction cord was placed intra-sulcularly. A fixture-level custom impression coping was placed on the right canine. Complete seating was verified radiographically.
Impressions and records were then sent to the ceramist. Once the patient’s expectations of the provisional esthetics were established, a record of the provisionals and photographs were sent to the ceramist to serve as a template in the fabrication of the final prosthesis.
The delivery appointment entailed try-in, evaluation of the esthetics, torquing of the custom abutment, and cementation of the 10 porcelain-bonded restorations. The patient was pleased with the final result because her expectations were understood and met (Figure 26).
CONCLUSION
When treating smile design cases ranging from simple additive types to difficult space-management types, it is necessary to understand and apply preparation design principles. Technical support of indices and the prefabrication of provisionals will allow for conservative removal of tooth structure while simultaneously assuring the best esthetic outcome.
ACKNOWLEDGMENT
The author would like to acknowledge Brad Patrick for the ceramic fabrication and Heraeus Kulzer for the ceramics (Venus Porcelain) used in all three cases.
References
1. Garber DA, Goldstein RE, Fenman RA. Porcelain Laminate Veneers. Chicago, IL. Quintessence. 1998.2. Magne P, Belser UC. Novel porcelain laminate preparation approach driven by a diagnostic mock-up. J Esthet Restor Dent. 2004;16(1):7-18.
3. Magne P, Belser U. Bonded Porcelain Restorations in the Anterior Dentition: A Biomimetic Approach. Hanover Park, IL: Quintessence; 2002:240-251.
4 Grel G. The Science and Art of Porcelain Laminate Veneers. Hanover Park, IL: Quintessence; 2003:241-251, 261-276.
5. Bassett J. Restoring tetracycline stained teeth with a conservative preparation with porcelain veneers: case presentation. Pract Proced and Aesthet Dent. 2004;16(7): 481-486.
6. Crispin BJ. Full veneers: the functional and esthetic application of bonded ceramics. Compendium. 1994;15(3):284-294.
7. Stacey GD. Shear stress analysis of the bonding of porcelain veneers to enamel. J Prosthet Dent. 1993;70(5):395-402.
8. Sheets CG, Taniguchi T. Advantages and limitations in the use of porcelain veneer restorations. J Prosthet Dent. 1990;64(4): 406-411.
9. Vence BS. Sequential tooth preparation for aesthetic porcelain full-coverage crown restorations. Pract Periodontics Aesthet Dent. 2000;12(1):77-86.
10. Grel G. Predictable, precise, and repeatable tooth preparation for porcelain laminate veneers. Pract Proced Aesthet Dent. 2003;15(1): 17-26.
11. Magne P, Douglas WH. Porcelain veneers: dentin bonding optimization and biomimetic recovery of the crown. Int J Prosthodont. 1999;12(2):111-121.
12. Narcisi EM, Culp L. Diagnosis and treatment planning for ceramic restorations. Dental Clinics North Am. 2001;45(1):127-142.
13. Christiansen GJ. Have porcelain veneers arrived? J Am Dent Assoc. 1991;122(1):81.
14. Magne P, Magne M, Belser U. Natural and restorative oral esthetics. Part I: Rationale and basic strategies for successful esthetic rehabilitations. J Esthet Dent. 1993;5(4):161-173.
15. Kois JC. The restorative-periodontal interface: biological parameters. Periodontology 2000. 1996;11: 29-38.
16. Kois JC. Altering gingival levels: the restorative connection—Part 1: Biological variables. J Esthet Dent. 6(1): 3-9.
17. Tarnow DP, Magner AW, Fletcher P. The effect of the distance from the contact point to the crest of bone on the presence or absence of the interproximal dental papilla. J Perio-dontal. 1992;63(12):995-996.
18. Kois JC. Predictable single tooth peri-implant esthetics: five diagnostic keys. Compend Cont Educ Dent. 2001;22(3):199-206.
 |  | |
| Figure 1 Preoperative view. Note the rotated malpositioned teeth. | Figure 2 Note the low smile line because of the Gortex implants and long central incisors just shy of the lower lip. | |
 |  | |
| Figure 3 Preoperative occlusal view. Note the protruding portion of the lateral incisor. | Figure 4 Aligning the arch form by removing the protruding portion of the misaligned tooth. | |
 | ||
| Figure 5 and Figure 6 The lateral spaces were measured and equalized by the removal of tooth structure on the distal of the centrals. | ||
 |  | |
| Figure 7 Depth-cutters were employed to ensure the proper amount of enamel reduction. | Figure 8 All contralateral widths were measured to ensure symmetry. | |
 |  | |
| Figure 9 The ceramist uses this photo to evaluate that the midline of the centrals is perpendicular to the interpupillary line. | Figure 10 Recontouring of the protruding portion of the canine after final cementation of the ceramics on teeth Nos. 7 through 10. | |
 |  | |
| Figure 11 Final occlusal view. Note the symmetry and arch-form correction. | Figure 12 Case 2: Preoperative ideal smile design principles with lingualized lateral incisors. | |
 |  | |
| Figure 13 The additive wax-up. | Figure 14 The provisional was added to the tooth and the photograph taken with shade tabs before dehydration of the dentition occurred. | |
 |  | |
| Figure 15 The depth-cutting instrument establishes the amount of facial reduction. Note that the patient's facial enamel was removed during this stage. | Figure 16 A disc was used to ensure the path of insertion from a labial perspective. | |
 |  | |
| Figure 17 Postoperative view; note the invisible prosthetics. | Figure 18 Postoperative smile view. Note the uncompromised esthetics. | |
 |  | |
| Figure 19 Case 3: Preoperative note: Triangularshaped teeth, stained interproximal composite bonding, a dark canine provisional, and greater gingival display on the right bicuspids compared to the left, making the smile appear crooked. | Figure 20 A sectioned silicon matrix threeplane visualization. | |
 |  | |
| Figure 21 Sounding to bone to determine the amount of gingiva to be removed. | Figure 22 Medium preparation on the left: 0.5 mm (feldspathic); and deep preparation on the right: 1 mm (pressed ceramic). | |
 |  | |
| Figure 23 An incisal matrix was used to guide the reduction of interproximal and incisal tooth structure. Note the overlap of the mesial of tooth No. 10 and the distal of tooth No. 9. | Figure 24 After removal of the direct composite, a subgingival slice preparation is necessary to create room for the ceramist to close the diastema. | |
 |  | |
| Figure 25 Centering the preparation in the matrix and assuring that the preparation aligns within the outline form of the matrix. | Figure 26 The final esthetics. Note the gingival symmetry, healthy papilla, and tooth form. | |
| About the Author | ||
 Joyce Bassett, DDS Joyce Bassett, DDS Private Practice Scottsdale, Arizona Adjunct Faculty Senior Dental Student Esthetic Continuum Arizona School of Dentistry Mesa, Arizona | ||

