
Nanocomposite Technology: A Blend of the Best of Microhybrids and Microfills
Richard Trushkowsky, DDS
Direct composite resin restorations have become a significant component of the restorative armamentarium. The materials currently available can be used in a wide variety of clinical situations, including anterior and posterior restorations. The exponential advances of adhesive dentistry and improvements in material (physical, optical, and handling properties) have fueled this revolution. Directly placed restorations are more conservative of tooth structure compared with other restorative techniques such as inlays and crowns. However, the appropriate choice of material and technique depends on the individual clinical situation and the clinician’s familiarity with different materials. The latest generation of composites (Filtek™ Supreme Plus, 3M™ ESPE™, St Paul, MN; Premise, Kerr Corporation, Orange, CA; 4 Seasons®, Ivoclar Vivadent, Inc, Amherst, NY; Esthet-X®, Dentsply Caulk, Milford, DE) consists of naturally shaded composites that provide varying degrees of opacity, translucency, and fluorescence, which mimic the natural tooth. Better handling has resulted in composites that can be sculpted to approximate the final restoration with minimal shaping and polishing.1,2 In addition, newer bonding systems have decreased the instance of postoperative sensitivity.3 These materials incorporate acidic monomers to modify the smear layer, which is subsequently incorporated in the hybrid layer. The primer and adhesive penetrate to the same depth as the etching material so that there is no demineralized dentin that is not impregnated with the adhesive.3
Case 1
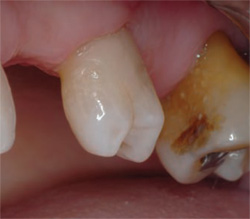
A 45-year-old woman presented with sensitivity on teeth Nos. 5 and 12 (Figure 1A and Figure 1B). Root caries and cervical lesions have become more prevalent as a result of aging, gingival recession, and dentin exposure.4 The patient’s sensitivity was a result of a noncarious cervical lesion, possibly a result of toothbrush abrasion. The exposure of dentin in the cervical third to the oral surroundings causes stimulus of mechanoreceptors at the pulp-dentin boundary that will result in hypersensitivity.5 The patient was presented with the option of gingival grafting (referral to a periodontist) or restorations. The patient elected to have the teeth restored rather than undergo a surgical procedure. These lesions should be restored if the lesion is unaesthetic, a pulpal exposure is a possibility, the tooth structure is compromised, and sensitization has occurred. The shade was selected before isolation to avoid desiccation of the teeth, which will make them appear lighter than normal. The Rite-Lite (AdDent, Danbury, CT) provides 5500° K light for shade matching with 6 LEDs and simulates north sky daylight to assist in the shade matching. The Demetron Shade Light (Kerr Corporation) or the 3M™ ESPE™ shade wheel (3M™ ESPE™) (Figure 1C) can also be used as a guide to aid in shade selection.
The dentin shade was selected by examining the exposed dentin, the body shade was chosen by inspecting the middle one third of the tooth, the enamel was selected by looking at the proximal or incisal of the anterior teeth, and the final translucent layer (in the same color family) gave the restoration a feeling of depth, and can be used to modify the value.
No cavity preparation was performed other than the occlusal margin of the preparation being beveled with a flame-shaped diamond stone. This provided a better surface for bonding and better blending of the composite to the tooth structure. The rest of the preparation was cleaned with a rubber cup and pumice paste (Nada pumice paste, Preventech, Matthews, NC), using care to avoid traumatizing the gingiva. The tooth was rinsed with water spray and then dried. Adper™ Prompt™ L-Pop™ Self-Etch Adhesive (3M™ ESPE™) was used because of its potential to create less sensitivity during placement and posttreatment (Figure 1D).6-9 The shaft of the disposable applicator was held with one hand while the thumb and index finger of the other hand squeezed the red fluid reservoir, starting with the outer end, in the direction of the disposable applicator. When the reservoir was fully squeezed out, the yellow blister area was markedly convex toward the outside. The red reservoir was squeezed until empty and folded at its connection to the yellow reservoir. It is important to keep the reservoir squeezed while flooding to prevent flow back. Beginning at the outer end again, all fluid from the yellow section was squeezed into the green section of the blister. The disposable applicator was then turned back and forth in the liquid with a spinning motion. A homogeneous yellowish color indicated optimal mixing. The adhesive was brushed onto the entire cavity surface for approximately 15 seconds, while applying pressure and massaging (Figure 1D). Next, the adhesive was lightly blown until it became a thin film, presented an even shine, and the solvent evaporated. (This step should be repeated as necessary.)6 The surface layer should then be hardened with an LED or halogen light for 10 seconds.
Filtek Supreme Plus (3M™ ESPE™) was selected as the restorative material, which contains a combination of 2 types of nanofillers (5 nm to 75 nm) and nanoclusters. A nanomer is 1/1,000,000,000 (one-billionth) of a micron. Nanoparticles are discrete nonagglomerated and nonaggregated particles of 20 nm to 75 nm in size. Nanocluster fillers are loosely bound agglomerates of nanosized particles. The agglomerates act as a single unit, enabling high filler loading and high strength. The combination of nanomer-sized particles to the nanocluster formulations reduces the interstitial spacing of the filler particles.10 This will provide increased filler loading, better physical properties,11-14 and improved polish retention when compared with composites containing only nanoclusters. The translucent shade formulations provide a highly translucent composite, and because of the combination of silica nanoparticles with the silica nanocluster, impart a gloss greater than the dentin, body shades, and enamel.15,16
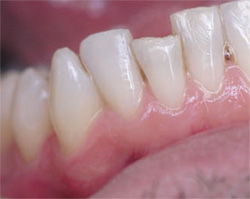
The first increment (dentin shade) was placed on the cervical area of the defect and polymerized with an LED light (Ultra-Lume® LED 5, Ultradent, South Jordan, UT) for 20 seconds. The second increment (body shade) was placed over the entire restoration to minimize shrinkage effects and minimize contraction of the composite material toward the incisal margin, possibly resulting in an open gingival margin. This increment was then light-cured for 20 seconds. A final increment of yellow enamel was placed over all of the surfaces of the restoration, including the bevel. Finishing and polishing were then accomplished with abrasive discs applied to a dry surface. A polishing paste (Enamelize™, Cosmedent, Chicago, IL) with a flexible felt disc can impart an even higher luster. The restorations (Figure 1E and Figure 1F) restored both esthetics and eliminated the original sensitivity, which was the patient’s chief complaint.
Case 2
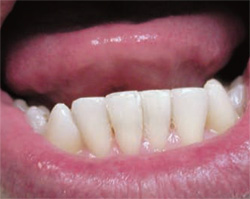
A 40-year-old man presented with a fractured mandibular right central incisor (Figure 2A). The shade was assessed (as in the first case) before isolation to avoid dehydration. A cervical chamfer 0.3 mm in depth and 2 mm long was placed around the entire labial margin, which increased the surface area for bonding and provided more bulk at the margins to reduce the chance of fracture. A 0.5 mm scalloped bevel was then placed with a flame-shaped diamond on the chamfer to disguise the margin and reduce microleakage. A chamfer was placed 2 mm long and 0.3 mm in depth on the lingual.17
A total-etch technique with 35% phosphoric acid was placed on the enamel margins for 15 seconds and 10 seconds on the dentin. It was then rinsed for 10 seconds and the high-volume vacuum was used to remove the excess. The area was kept slightly moist. Adper™ Singlebond™ (3M™ ESPE™) was applied to all of the etched surfaces for 20 seconds with a slight scrubbing and then reapplied. The excess was removed with a dry applicator. Light air flow was used to remove excess solvent and then light-cured. The enamel layer (A1E) was placed to initiate the anatomical build-up. A dentin shade (A3D) was then selected to provide opacity (Figure 2B), eliminate the dark shadow from the back of the mouth, and continue the anatomic build-up of the tooth. Next, a body shade (A2B) (Figure 2C) was placed, providing decreased opacity. A final enamel shade (A1E) and translucent shade (C) provided depth to the restoration. The restoration was then polished as previously described (Figure 2D).
Discussion
The use of self-etch adhesives helps eliminate or minimize operator error. The incidence of postoperative sensitivity should also be reduced because all demineralized areas have been penetrated by resin. However, proper attention to technique is still critical for increased longevity of the restorations. The use of composites that feature a range of opacities and translucencies, combined with good handling and polishability, allow the formation of more naturally appearing restorations. The introduction of nanotechnology has been a recent contribution.
References
1. Teel TT. Using a combination of flowable and direct composite for the conservative restoration of the single maxillary central incisor. Contemp Esthet Restorative Pract. 2004;8:18-26.2. Radz GM. Creating a new smile—direct bonding with a new microhybrid composite resin. Contemp Esthet Restorative Pract. 2003;7:20-27.
3. Munoz C, Dunn J, Fundingsland J, Richter R. Three year clinical performance of Prompt L-Pop. Presented at: The IADR/AADR/CADR 82nd General Session; March 10-13, 2004; Honolulu, Hawaii. Abstract 0541.
4. Sensi LG, Marson FC, Baratieri LN, Monteiro Junior S. Effect of placement techniques on the marginal adaptation of Class V composite restorations. J Contemp Dent Pract. 2005;6(4):17-25.
5. de Melo FV, Belli R, Monteiro Jr S, et al. Esthetic noncarious Class V restorations: a case report. J Esthet Restor Dent. 2005;17(5): 275-284.
6. Samimi P, Barekatain M, Fathpour K. In vivo microleakage of composite resin with different bonding agents. Presented at: The IADR/AADR/CADR 83rd General Session; March 9-12, 2005; Baltimore, Maryland; Abstract 2994.
7. Sundfeld RH, Valentino TA, de Alexandre RS, et al. Hybrid layer thickness and resin tag length of a self-etching adhesive bonded to sound dentin. J Dent. 2005;33(8):675-681.
8. Nakaoki Y, Sasakawa W, Horiuchi S, et al. Effect of double-application of all-in-one adhesives on dentin bonding. J Dent. 2005;55(9):765-772.
9. Di Hipolito V, de Goes MF, Carrilho MR, et al. SEM evaluation of contemporary self-etching primers applied to ground and unground enamel. J Adhes Dent. 2005;7(3):203-211.
10. Trushkowsky RD. Innovation in composite technology: nanocomposite anterior and posterior restorations. Contemp Esthet Restorative Pract. 2003;7:58-61.
11. Ferguson RW, Kobussen GA, Halvorson RH, Reistad CA. Wear testing of a new nanofilled flowable restorative. Presented at: The ADEA/AADR/CADR Meeting and Exhibition; March 8-11, 2006; Orlando, Florida. Abstract 0390.
12. Lu H, Lee Y-K, Oguri M, Powers JM. Mechanical properties of dental resin composites. Presented at: The IADR/AADR/CADR 83rd General Session; March 9-12, 2005; Baltimore, Maryland. Abstract 1845.
13. Latta MA, Barkmeier WW, Murdock CM. Laboratory evaluation of localized wear of selected composite restoratives. Presented at: The ADEA/AADR/CADR Meeting and Exhibition; March 8-11, 2006; Orlando, Florida. Abstract 0399.
14. Wilson KS, Zhang K, Antonucci JM. Systematic variation of interfacial phase reactivity in dental nanocomposites. Biomaterials. 2005;26(25):5095-5103.
15. Wu D, Holmes BN, Mitra SB, et al. Esthetic properties of novel dental nanocomposites. Presented at: The IADR/AADR/CADR 80th General Session; March 6-9, 2002; San Diego, California. Abstract 0065.
16. Mitra SB, Wu D, Jones V, et al. A new method to characterize gloss retention of dental restorative materials using atomic force microscopy. Presented at: The 81st General Session of the International Association for Dental Research; June 25-28, 2003; Goteborg, Sweden. Abstract 2928.
17. Terry DA. Restoring the incisal edge. NY State Dent J. 2005;71(5): 30-35.
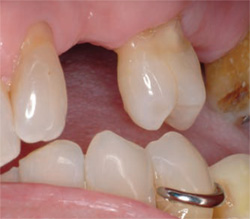 | 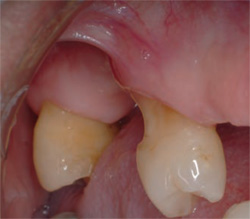 | |
| Figure 1A Composite buildup and crown preparation was performed on the mandibular left second molar. | Figure 1B The maxillary right premolar with a noncarious cervical lesion. | |
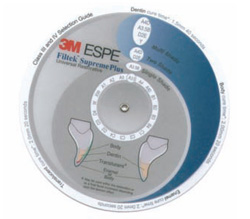 | 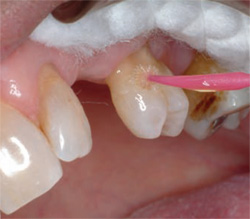 | |
| Figure 1C The 3M™ ESPE™ shade wheel. | Figure 1D Adper™ Prompt™ L-Pop™ Self-Etch Adhesive was massaged into the dentin surface. | |
 |  | |
| Figure 1E The maxillary left premolar restored to proper form. | Figure 1F The maxillary right premolar restored and sensitivity eliminated. | |
 | 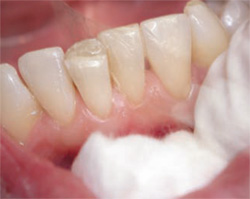 | |
| Figure 2A Tooth No. 25 with a fractured incisal edge. | Figure 2B The dentin layer was placed over the enamel layer to provide opacity. | |
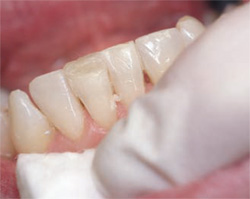 |  | |
| Figure 2C The body shade was placed with decreased opacity. | Figure 2D The incisal edge of tooth No. 25 was restored to blend with the adjacent teeth. | |
| About the Author | ||
 Richard Trushkowsky, DDS Richard Trushkowsky, DDS Private Practice Staten Island, New York | ||

