
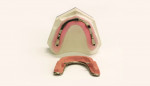
Figure 1
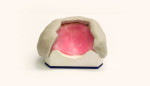
Figure 2
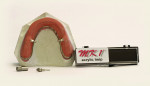
Figure 3
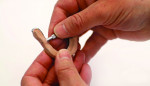
Figure 4
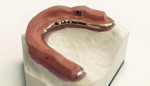
Figure 5
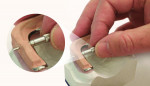
Figure 6
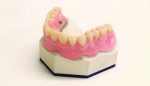
Figure 7
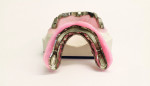
Figure 8
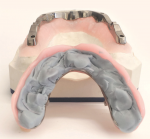
Figure 9
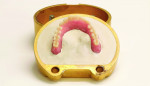
Figure 10
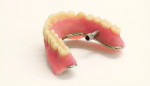
Figure 11
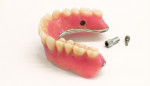
Figure 12
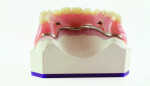
Figure 13

Figure 14
Processing a Double Structure Implant Bar
The correct procedure for fabricating Panthera Dental’s ReBourke bar
By Andreas Klie, RDT
Digital solutions are becoming increasingly important as part of the dental technology sector, so it is now possible to obtain more advanced and more accurate dental solutions, thus providing patients with better treatment options. These advanced solutions, however, pose additional challenges to many technicians. As simple as it may sound, one of the main challenges remains the processing of implant-retained dentures. In some cases, it is evident that this challenge has influenced the treatment plan suggested by the dental practitioner and/or the recommendations made by the dental laboratory in regard to choosing the right implant bar option for the patient.
This article outlines the processing procedure for Panthera Dental’s ReBourke bar, which the author believes is one of the best implant bar solutions on the market. The primary bar is designed with a 25° angulation in the anterior region to allow an easy path of insertion and avoid movement on the occlusal axis.
Two MK1 attachments are used in the posterior area, locking the denture onto the primary bar. This gives the patient the same feeling as a fixed restoration, while still allowing for removal of the denture for cleaning.
The need for correct processing procedures became more evident when, on numerous occasions, technicians who had considered using a ReBourke bar for their cases were ultimately too intimidated by the processing of this type of restoration. Some had taken the leap, but without the right procedures, they totally destroyed the bar and supra-structure. This ordeal in some instances dissuaded them from working on these types of cases anymore.
Procedure
Once the implant bar (Figure 1) is returned to the laboratory, the waxed-up denture is matrixed using silicone (Figure 2). Leaving the MK1 attachment in place in the supra-structure for processing is one potential mistake technicians can make. During waxing of the case on the master model, the final MK1 attachment must be removed and replaced with the MK1 acrylic help processing pin provided with the case (Figure 3). The tool for removal of the attachment is also provided in the processing kit (Figure 4).
Once the MK1 attachments have been removed, the supra-structure is placed back onto the bar, on the master model (Figure 5), and the MK1 acrylic help processing pins are inserted to lock in the supra-structure (Figure 6).
The original matrixed denture is transferred onto the supra-structure and waxed down onto the model in preparation for processing. It is important to ensure the wax is well adapted to the model as the processing will be done off the model (Figure 7). This step is very important, especially because most laboratories are using an injection system for processing their dentures. The risk of processing on the model with the bar in place is that acrylic might flow around the bar, locking the supra-structure in place and making it virtually impossible to retrieve the bar without damaging or bending anything. The technician must remove the MK1 acrylic help processing pins (Figure 8), remove the waxed-up denture from the model, and reinsert the MK1 acrylic help processing pins before flasking and processing the waxed up denture.
The supra-structure is filled with a rigid silicone. It is important that the silicone is well adapted into the supra-structure to ensure no acrylic gets in underneath the supra-structure and holds the supra-structure in place during the flasking process. The silicone also will facilitate removal when deflasking by preventing any distortions on the supra-structure (Figure 9).
The case is flasked off the model, directly in the flask, using the processing method of choice: conventional flasking and packing, or injection processing. Whichever method is used, it is important to ensure the protruding processing pins are covered to eliminate any undercuts that could cause problems in the flasking process (Figure 10).
After the denture has been deflasked, the processing pins are removed, and the denture is trimmed and polished (Figure 11).
The MK1 attachments are inserted into the final polished denture (Figure 12), and the completed denture is placed back onto the master model. The technician needs to ensure the MK1 attachments are fully engaged before polishing back the MK1 pins to be flush with the acrylic in order to avoid any irritation to the patient. It is important to note that failing to fully engage them before trimming them back will result in the MK1 attachments not fully engaging in the patient’s mouth (Figure 13).
Opening up a small funnel on the labial access holes will give the patient a guide for the MK1 key and assist the patient in disengaging the MK1 attachment (Figure 14).
Conclusion
These easy steps for processing what seems to be a more complex implant bar have helped many dental technicians overcome their fear and apprehension. By doing so, they are able to offer their dentists a perfect solution for a fixed-removable prosthesis, for the benefit of the patients.
Andreas Klie, RDT, is Regional Sales Director for Ontario for Panthera Dental.
Contact Information
Panthera Dental
pantheradental.com
855-233-0388

