
Improving Your First Impression
When considering impression materials for crown-and-bridge impressions, the author looks for four basic characteristics: strength, elasticity, dimensional stability and the ability to register detail in any environment. For this reason, he has chosen to highlight Take 1® Advanced™ impression material (Kerr Corporation, Orange, CA). Kerr has reintroduced this material and made some impressive improvements over the old Take 1 material. Take 1 Advanced is very forgiving and addresses the top five problems laboratories are having with 50% of the cases that are sent in to them. Take 1 Advanced is very hydrophilic, meaning that even though there may be saliva or blood in the impression field, the material will be more likely to overcome these obstacles and solve the problem of bubbles, fins, folds, and margin identification. Also, the dimensional stability of Take 1 Advanced is superior. This means that the material has the ability to get into undercuts yet be strong and resilient enough to overcome deformation.
One notable improvement to Take 1 Advanced is the delivery. It is available in cartridges, Volume™ for use in automatic mixing machines, and an innovative all-in-one Unidose syringe that allows the clinician to have more control because he or she is closer to the preparation. Also, Take 1 Advanced comes in three set times and multiple viscosities, to appeal to a wide variety of preferences and style of practice.
With a high-quality material selection that is forgiving and cost-effective, techniques need to be examined. A step-by-step guide follows:
Step 1: After preparation, evaluate the preparation to make sure the margin can be identified. Use a cord, Expasyl™ (Kerr Corporation), a diode laser, or whatever your preference is for retraction and hemostasis. Remember, if the margin is visible, the impression material can find the margin.
Step 2: Make sure the preparation is dried (not desiccated) and there is no bleeding around it. The author uses Expasyl if there is a little bleeding remaining around the preparation; it is easy to use and, in his opinion, practically foolproof. Place the tip of the wash material as close to the sulcus as possible and extrude at a quick pace around the preparation without lifting the tip (Figure 1). Go around the tooth until the entire tooth is covered. While syringing the wash material around the tooth, the assistant should be placing the tray material into the impression tray. (It is helpful to time the assistant loading the tray while the wash is being placed so that when it is finished, the tray is ready to place in the mouth).
Step 3: Blow the wash material into the sulcus, creating a thin coating of material around the tooth (Figure 2).
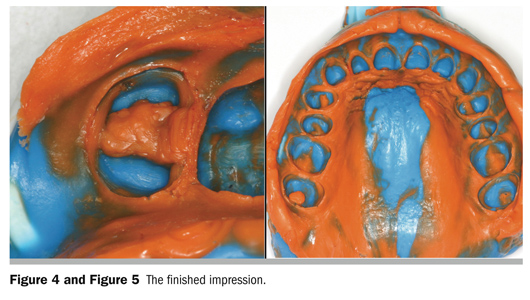
Step 4:Rewash the preparation with wash material, keeping the tip of the gun as close to the sulcus as possible (Figure 3). Avoid creating bubbles in this step. Take the impression tray from the assistant and have the patient bite to their habitual bite. Watch as your patient bites to centric occlusion. Sometimes impressions can be lost in this step; therefore, coaching them to achieve centric occlusion is beneficial. Leave the impression in the mouth for the specified amount of time according to manufacturer instructions (Figure 4 and Figure 5). Times will vary depending on material viscosity and manufacturer. Distortion will occur if the material is not fully set. It is highly recommended to use a timer.
Techniques can be adapted to suit different styles of practice; however, the basic principles ofimpression taking must be adhered to. Whenselecting an impression material it isimportant to match different characteristics of your individual practicing style to your preferred choice of impression material. If you have a preference for putty or traymaterial, choose a manufacturer that offersthis selection. Your preference of tray typemay also influence your material choice.
Finally, a system of impression taking needs to be established between dentists and their assistants. This system needs to be consistently performed, with no deviation, to minimize the problems associated with impressions, which in turn will increase the profitability and efficiency.
When you make a very difficult technique such as impression taking look simple in the eyes of your patients, they will know they have come to the right place—your office.
For more information, contact: Kerr Corporation
Phone: 800-537-7123
Web: kerrdental.com
The preceding material was provided by the manufacturer. The statements and opinions contained therein are solely those of the manufacturer and not of the editors, publisher, orthe Editorial Board of Inside Dentistry. The preceding is not a warranty, endorsement, or approval for the aforementioned products orservices or their effectiveness, quality, orsafety on the part of Inside Dentistry or AEGIS Communications. The publisher disclaims responsibilityfor any injury to persons or property resulting from any ideas or productsreferred to in the precedingmaterial.
About the Author
Sam Simos, DDS Private Practice Marseilles, Illinois Bolingbrook, Illinois


