You must be signed in to read the rest of this article.
Registration on CDEWorld is free. You may also login to CDEWorld with your DentalAegis.com account.
When designing the optimal esthetic outcome for a patient during the smile rejuvenation process, the clinician must create a symmetrical and harmonious relationship between the lips, gingival architecture, and the positions of the natural dentate forms. Spear1 has referred to this diagnostic methodology as facially generated treatment planning, where the maxillary central incisal edges determine where the soft tissue (ie, gingiva) and bony crest should be positioned.
The versatility of the erbium, chromium: yttrium, scandium, gallium, garnet (Er,Cr:YSGG) laser and its ability to recontour both hard and soft tissues creates the opportunity for a minimally invasive approach in many clinical situations that require repositioning of the periodontal structures for esthetic or restorative reasons. Surgical techniques using the laser also have been shown to decrease the need for suturing, reduce postoperative discomfort, and shorten healing times.2,3
This article demonstrates and discusses techniques for the use of the Er,Cr:YSGG laser for osseous crown-lengthening procedures, specifically highlighting the associated biologic principles as well as the open-flap and closed-flap techniques.
The Esthetics of Gingival Display - The Dentogingival Complex
The dentogingival complex consists of connective-tissue attachment, epithelial attachment (or junctional epithelium), and the gingival sulcus. As described by Kois,4 the most critical relationship for biologic health when the clinician is placing a restoration at or below the free gingival margin (FGM) is the margin location relative to the bony crest. Kois stated that “the distance from the free gingival margin to the osseous crest on the facial aspect should be 3 mm.” Interproximally, on anterior teeth, this distance should be 4 mm because of the curvature of the cementoenamel junction and the position of the bony crest relative to it. The height of the interdental papilla also can be predicted to be maintainable 4-mm incisal to the osseous crest between anterior teeth with normal root proximity, which is approximately 2 mm to 3 mm at the osseous crest.With these parameters in mind, the clinician must first decide where the restorative margin will be placed. For all-ceramic restorations that do not need to block out undesirable dentin (preparation) colors or core materials, it may be desirable to place the restorative margin at the free gingival crest or slightly supragingival. If an intracrevicular margin is required for esthetic reasons, however, it should be placed no farther than 0.5 mm into the gingival sulcus to avoid adverse biologic responses caused by encroachment upon the attachment apparatus.
Coslet et al5 and Kois6 also have described a variation in biologic width that compares the distance from the alveolar crest to the FGM and divides this distance into three categories: (1) normal crest; (2) high crest; and (3) low crest. In simplified terms, normal crest patients (about 70%) have approximately a 2-mm combined epithelial and connective-tissue attachment and an average 1-mm to 3-mm sulcus depth. If the sulcus depth is > 1 mm, the free gingival excess can be resected safely and, on healing, will result in a dentogingival complex measuring 3 mm on the facial aspect. Patients with a high crest often have a shallower sulcus depth and a combined epithelial and connective-tissue attachment < 2 mm. These patients have relatively stable FGM positions and are not prone to recession upon manipulation of the tissues. Low-crest patients often have normal sulcus depth (1 mm to 3 mm) and a combined epithelial and connective-tissue attachment that is > 2 mm.These patients are highly prone to recession and must be treatment planned accordingly. The FGM of low-crest patients will tend to reposition apically and turn into a normal crest situation after gingival retraction or surgery. Therefore, the most important factor in postrestorative gingival health and stability is the position of the restorative margin relative to the bony crest, not the preoperative health and/or position of the gingival tissues.
Laser-Assisting Crown Lengthening
Use of the Er,Cr:YSGG laser for gingival and bony recontouring has a tremendous impact on the way periodontal surgery is performed. Because the laser cuts only at the end of the tip, the user has effective control of soft- and hard-tissue resection. Using the Er,Cr:YSGG with a tapered tip allows the operator to make scalloped gingivectomy incisions with surgical precision and no bleeding. When using traditional rotary instruments to perform osseous resection, there is always a risk that their rotation will damage adjacent root surfaces. Additionally, because the surgical laser wound is less traumatic, there is less chance of bony damage from frictional heat, which is always possible when using rotary instrumentation without proper irrigation. This minimally invasive technology translates into less postoperative discomfort and quicker healing of the patient.7
Laser-Assisted Open-Flap Crown Lengthening
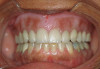
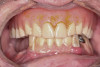
For an esthetic gingival display, it is critical that symmetry (right and left) exists as far as cervicoincisal tooth height and gingival zenith positions are concerned. Patients who exhibit asymmetrical gingival levels may be candidates for surgical gingival and/or alveolar bone repositioning to improve their esthetics (Figure 1). Typically, these patients have adequate amounts of attached gingiva so that, after the resective procedure, the mucogingival junction will not be encroached upon. If adequate amounts of free gingiva exist, minor asymmetries can be corrected with gingivectomy or gingivoplasty alone. A minimum sulcus depth of 1 mm must always remain after any tissue resection unless the alveolar bony crest is also repositioned in the apical direction as well. To give the appearance of spatially moving teeth in the cervical direction to alleviate excessive gingival display or asymmetry, osseous correction must often be peformed in conjunction with soft-tissue resection because of sulcus depth violation. A tissue marker can be used to plan the soft-tissue surgery (Figure 2). Following the guidelines for esthetic tissue levels, the perceived final gingival level is traced, creating heights of contour at the distolabial line angles. The Er,Cr:YSGG laser was used to remove the gingival tissue and create symmetry according to the proposed surgical plan (Figure 3).
Then, the teeth were prepared to the respective corrected free gingival margins. As the biologic width would be encroached upon, it is important that the same amount of bone be removed to recreate normal biologic parameters.7 After the teeth were prepared, the Er,Cr:YSGG laser was used to “trough” around areas where the gingivectomies had been performed to allow for retraction needed for master impressions to be made (Figure 4). A hemostatic agent and tissue deflector was used to aid in tissue management during the impression process (Figure 5). A two-cord retraction technique was used as the tissue was prepared for the impression process (Figure 6). The completed master impression is shown in Figure 7. Note that the entire restorative margin and 0.5 mm of tooth or root surface apical to the margin needed to be captured in the master impression. A plastic matrix was filled with a bis-Acrylic provisional material and placed on the preparations to fabricate the provisional restorations.
After the provisional shell was fabricated, the osseous portion of the surgical procedure was completed. An intrasulcular internal bevel incision was made, and a full-thickness mucoperiosteal flap was elevated (Figure 8). The alveolar crest correction could be made using the Er,Cr: YSGG laser and either a 14-mm 600-μm or a 9-mm 600-μm tip. Because the laser only cuts at the tip, it is set against the side of the root parallel with the long axis of the tooth. This placement ensures that the dentin/cementum surface is never damaged. A black marker can be used to place a line at a point 3 mm from the end of the tip. This line is used as a guide to position the bone apically, 3 mm from the restorative margin. Only the alveolar bone would be ablated (resected). The root surface was then planed using a backaction chisel. The alveolar architecture, thus, should mimic the restorative margin, 3 mm apically, allowing for biologic width restoration to a normal crest position.
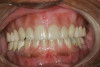
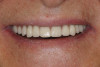
The interproximal bone on facial esthetic correction cases is not altered; the flap is sutured back using 3-0 silk and an interrupted suture technique (Figure 9). At the delivery appointment, the tissue is shown before cementation in Figure 10. Figure 11 shows the restorations of tooth Nos. 7 through 10 with all-ceramic restorations at delivery. Note the position of the gingival papilla between tooth Nos. 8 and 9. The definitive restorations are shown in Figure 12, 6 months after corrective gingival and bony surgery with the Er,Cr:YSGG laser. The gingival tissues matured nicely around the definitive restorations and the papillae filled in the gingival embrasures between the teeth. It is important to note that conventional treatment modalities would probably have the patient in provisional restorations at the 6-month follow- up visit.
The Closed-Flap Technique
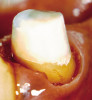
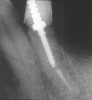
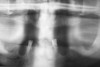
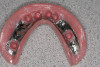
For minor, localized biologic width and/or esthetic gingival zenith corrections, the Er,Cr:YSGG laser can be used to perform a closed-flap surgical technique, instead of an open-flap procedure, to make the correction and complete the restorative process without the necessary healing time required for open-flap crown-lengthening surgeries. The patient depicted in Figure 13 had a long-span bridge on the mandibular left side that was in need of replacement. From the radiograph (Figure 14), it was noted that there was a biologic width violation on the distal surface of the second premolar abutment. After removal of the bridge, there was an area on the distal of the abutment where the soft tissue was extremely inflamed and edematous and the bony crest was approximately 1-mm apical to the previous restorative margin.
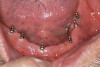
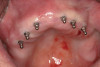
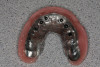
To perform the closed-flap technique, the soft tissues (epithelial and connective-tissue attachments) were resected using a 9-mm 600-μm tip in the proximal area. The osseous crest was sounded using a periodontal probe to determine its position and topography. Using a 9-mm 600-μm tip, the laser was then used to remove bone, holding the tip adjacent to the tooth and “walking” the tip across the affected area using a “sewing machine” (up-and-down movement) to a 3-mm depth (Figure 15). After establishing the corrected crestal level, the bone was “smoothed” by setting the laser at 50 pulses per second and moving the tip in a horizontal direction over the crestal bone. It is important to note that with both of these movements, the tip of the laser is in contact with the bony crest. A radiograph was taken to confirm that a slight “trough” was made in the bone, correcting the crest position 3-mm apical to the restorative margin (Figure 16). To blend, or “ramp,” the bony crest distally, the tip of the laser was angled away from the tooth, eliminating the slight “trench” and creating a smooth transition from the distal tooth surface to the adjacent bony edentulous area (Figure 17). A radiograph was taken to verify that the correction was made (Figure 18). The correction could be verified by sounding with a periodontal probe as well. Then, the master impression was made (Figure 19), and provisional restoration fabricated and cemented to place.
The definitive restoration could be seated 2 to 3 weeks after the closed-flap crown-lengthening procedure. The surgical area would heal by secondary intention around the finished restoration with ideal tooth contours, rather than around an ill-fitting temporary restoration (Figure 20 and Figure 21).The criteria fr clinical health of the dentogingival complex are: (1) pink color (absence of inflammation); (2) reestablishment of a probable gingival sulcus; and (3) absence of bleeding on probing.8,9
Remolding of the Bony Crest
There has been much discussion about the condition of the bony crest after the closed-flap laser correction and whether this procedure is not better performed using an open-flap technique. After treating and observing the healing of hundreds of closed-flap crown-lengthening procedures over the past several years, the author has no doubts that closed-flap crown lengthening is an excellent way to handle minor bony corrections in a minimally invasive fashion (Figure 22 and Figure 23).
Many teeth have been extracted without flap reflection, leaving less than ideal contours of the resulting osseous crest peripheral to the extraction site. The author has observed that as the extraction site heals and the bone fills in, the crest remodels and becomes smooth. The same clinical observations have been noted when minor closed-flap crown lengthening has been carefully performed. Critics have noted that the technique does not leave the bony crest as smooth as when performing surgery with an open flap and smoothing the bone with hand instrumentation. The author has found this to be true. However, the real question is one of clinical relevance. If after healing, a minor closed-flap site exhibits pink, healthy gingival reattachment and a sulcus that does not bleed when probed, the author believes that this result satisfies the criteria for clinical success. It should be emphasized that the closed-flap procedure is indicated for minor biologic width corrections and gingival zenith esthetic corrections.
When faced with involved cuspal fractures where clinical crowns are lost and the remaining tooth structure is located below the gingival tissue at the bony crest, an open-flap crown-lengthening procedure may be preferred for access, adequate instrumentation, and predictable healing.
Conclusion
Techniques have been described using the Er,Cr:YSGG laser for periodontal crown-lengthening procedures. Using the biologic parameters discussed in this article, it is now possible to perform open-flap periodontal procedures both facially and interdentally and predict to what level the tissues will heal based on the position of the restorative margin. It is important for the clinician to use a periodontal probe and sound from the free gingival margin to the alveolar crest to determine the biologic parameters of the patient before preparing teeth for restorative materials. This step enables the clinician to make final impressions on the day of preparation and surgery, deliver the definitive restorations several weeks later, and be confident that the gingival tissues will heal to the appropriate esthetic levels. Patients and dentists can enjoy a shortened treatment time by avoiding extended time in provisional restorations while the tissues mature around their new ceramic restorations.
References
1. Spear FM, Kokich VG, Mathews DP. Interdisciplinary management of anterior dental esthetics. J Am Dent Assoc. 2006;137(2):160-169.
2. Jetter C. Soft-tissue management using an Er,Cr:YSGG laser during restorative procedures. Compend Contin Educ Dent. 2008;29(1):46-49.
3. Ishikawa I, Aoki A, Takasaki AA. Clinical application of erbium:YAG laser in periodontology. J Int Acad Periodontol. 2008;10(1):22-30.
4. Kois JC. Altering gingival levels: the restorative connection part 1: biologic variables. J Esthet Dent. 1994;6(1):3-9.
5. Coslet GJ, Vanarsdall R, Weisgold A. Diagnosis and classification of delayed passive eruption of the dentogingival junction in the adult. Alpha Omegan. 1977;70(3):24-28.
6. Kois JC. New paradigms for anterior tooth preparation. Oral Health. 1988;88(4):19-30.
7. Dean DB. Concepts in laser periodontal therapy: using the Er,Cr:YSGG laser. 2005. The Academy Of Dental Therapeutics and Stomatology. Available at: http://www.ineece.com/coursereview.aspx?url=1428%2fPDF%2fConceptsInLaserPerio.pdf&scid=13714. Accessed Aug 26, 2008.
8. Lowe RA. The use of dental lasers and ridge preservation to maximize esthetic outcomes. Contemporary Esthetics and Restorative Practice. 2004;8(7):48-53.
9. Lowe RA. Clinical use of the Er,Cr: YSGG laser for osseous clinical crown lengthening: redefining the standard of care. Pract Proced Aesthet Dent. 2006;18(Suppl 4): S2-S9.
About the Author
Robert A. Lowe, DDS
Diplomat, American Board of Aesthetic Dentistry
Private Practice
Charlotte, North Carolina