
Restoring Failing Composites with Zirconia Crowns
Donald J. Alexander, DDS
In this author’s practice, many comprehensive cases are performed, including placing crowns to replace composite restorations that have failed or were done poorly. In the author’s opinion, ceramic crowns, especially those fabricated from zirconia, serve extremely well when a crown is required to restore a tooth to its proper form and function. The clinical example provided in this article demonstrates a step-by-step procedure for replacing failing anterior composites with ceramic crowns, with a focus on tooth reduction. The purpose behind tooth reduction for a crown is to provide the laboratory technician with the proper amount of space to structurally and artistically mimic the tooth that is being restored. Traditionally, crown preparations have been completed with diamond burs. However, diamonds grind the tooth away, causing the tooth to heat internally. It has been the author’s experience that the use of crown-prepping carbides (KOMET USA, Rock Hill, SC) significantly aids in this endeavor. Previous versions of carbide burs for crown preparation have chattered and lack specific dimensions reflecting the required tooth reductions. The KOMET burs, because of their precise and controlled chatter-free tooth reduction, allow for exacting reductions while providing a finished surface comparable to that achieved by using a diamond finisher.
CLINICAL EXAMPLE
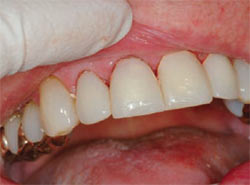
The patient was a 72-year-old man who had been coming to the author’s practice for many years. During a recall examination, the author and the patient discussed replacing and restoring teeth Nos. 7 through 10 with crowns because their anterior composite restorations were failing (Figure 1). The evaluation of the patient’s joints revealed that they were stable and asymptomatic.1-5 Both the patient and the author agreed that restoring all four teeth was proper to maintain symmetry of shape and color. The author chose Lava™ (3M ESPE, St. Paul, MN) crowns over other materials because he felt that it would give him the greatest control over color and strength.6-8
Photographs of selected Vita 3-D Master® shade tabs (Vident, Brea, CA) were taken from several directions to give the laboratory a comprehensive view of the shading required. Timing of this step is essential as the adjacent teeth dehydrate as the procedure progresses, resulting in crowns with too high a value if this step is delayed.9,10 The patient was satisfied with his natural tooth shape and position; therefore, a diagnostic wax-up was not required. An alginate impression was taken of the existing teeth to allow for fabrication of a temporary. After administration of anesthesia to the area with 2% lidocaine and 1:100,00 epinephrine in local infiltration areas, the procedure was initiated. The technique used in this procedure was similar to any cylinder-type crown preparation. The author elected to use KOMET USA’s crown prepping carbide burs for the preparation of the crowns for teeth Nos. 8 through 10. Incisal reduction was performed with an H837KRU.314.014 bur (Figure 2). This bur has a diameter of 1.4 mm. Next, the axial reduction was performed using the H881U.314.012 bur (Figure 3). Because the diameter of the bur (1.2 mm) is constant, by engaging the bur’s full diameter into the tooth, the reduction of the preparation is a known volume, allowing the clinician to progress efficiently and smoothly without the need for depth cuts or fear of inadequate reduction. Also, the tip of this bur has a 0.6-mm radial arch, which creates a chamfer that is easily and accurately read by a CAD/CAM scanner. The goal of the gingival portion of the preparation was also to achieve between 5° and 10° of taper. The facial portion of the preparation must also have similar depth reductions in the body and incisal portions of the tooth, allowing for sufficient thickness of material for strength and color purposes. The lingual portion of the preparation was modified with a KS4 and KS5 burs (KOMET USA). At this time, the remaining crown on tooth No. 7 was removed with the aid of the H4MCL bur. After the placement of No. 1 Ultrapak cord (Ultradent Products Inc, South Jordan, UT) soaked in Styptin (Figure 4), the final margin placement was set and the preparations finished. Because of the KOMET USA H881U.314.012 bur’s rounded tip, a small lip was left at the edge of the preparation. However, because of the nature of the H881U.314.012 bur’s toothing, it is possible to not only remove this lip but also finish the preparation with an ultra-smooth, clean finish. A KS5 finishing diamond was used to finish the lingual portion of the preparation.
Approximately 5 minutes after placing No. 2 Ultrapak cord (Ultradent Products Inc) in the gingiva around the preparations, it was removed and the preparations were scrubbed with ViscoStat® (Ultradent Products Inc) at the gingival tooth interface. A polyvinylsiloxane (PVS) impression was made with Aquasil Ultra® fast set (DENTSPLY International, York, PA) of the preparations in the maxillary arch. A mandibular alginate was made with Jeltrate® (DENTSPLY International). Because the target teeth had been stable and not undergone the effects of wear, the bite had been deemed acceptable and stable before the initiation of the procedure. It was therefore concluded that building the occlusion in maximum intercuspation was predictable and sufficient and would not result in more dentistry. A PVS closed bite was taken (Figure 5) by placing the material over the preparations only. (Placing this material over the entire arch only results in adding potential areas of error and, in fact, causes more problems for the laboratory than it solves.) 6-8,11,12
A 1.5-mm Copyplast matrix (Scheu-Dental GmbH, Iserlohn, Germany) was made of the original mold (Figure 6). Proper trimming of this matrix is im- portant. Ideally it is trimmed approximately 3 mm to 4 mm beyond the gingival margin; it is also preferential to leave the palatal area intact so as to increase stability. Rather than making an impression, it was decided to fabricate the temporary crowns directly. Protemp™ 3 Garant shade A2 (3M ESPE) (Figure 7) was placed in the matrix and it was seated intraorally. After sufficient time to allow the material to set, it was removed and placed in a TRIAD curing unit (DENTSPLY Trubyte, York, PA) for 2 minutes. The temporaries were trimmed with KOMET USA lab carbide burs (261-EF-023, H261-DF-023, H251-ACR-060, H73E-023, H46-012) and dual-sided diamond discs (6934-220, 6924-180, 76351, 320-A). The trimmed temporaries were tried in and relined. The occlusion was adjusted and incisal edge position and lingual contour confirmed via speech and function. The restorations were then polished on the lathe with pumice and diamond paste, painted with unfilled resin, and recured in the TRIAD curing unit for 2 minutes. Finally, the temporary crowns were cemented with Fynal® (DENTSPLY International) and the excess removed.13
The patient returned 1 week later to determine that size, shape, and resultant speech were acceptable. The patient had been asked to critique the look of the temporaries and to also ask for input from others. After having the patient sign off on the shape and evaluating the temporaries, an impression of the temporaries was made as well as a face-bow record. This was performed so the laboratory could use the model and its 3-dimensional position as a guide in the fabrication of the final restorations.8
After the Lava restorations were delivered to the office (Figure 8), the patient returned so that the author could complete the case. After removal of the temporary restorations, the final crowns were tried in and checked for marginal integrity, incisal edge position, contour, and proper shade. After slight modification for fit, the crowns were cemented (Figure 9 and Figure 10), cleaned, and the final occlusion was adjusted. Finally, the adjusted portions of the ceramic crowns were polished with Dialite polishers (KOMET USA).8
CONCLUSION
Having precise and controlled tooth reduction is imperative to placing long-lasting crowns. Having the proper tools makes removing troubled crowns easier. The crown prepping carbide bur series not only allows this, but also facilitates preparing the actual tooth structure in an efficient manner. In the author’s opinion, preparing for crown restorations has never been easier.
DISCLOSURE
Dr. Alexander is a paid consultant for Komet USA. He also receives a royalty from the crown prepping carbide series of burs.
ACKNOWLEDGMENT
The author would like to thank Ken Braiman, of Progressive Dental Reconstruction, in Jacksonville, Florida, for providing the crowns used in this case. He would furthermore like to thank and acknowledge Dr. Frank Spear of the Seattle Institute for his influence on the path and role dentistry has come to play in his life.
References
1. Dawson PE. Evaluation, Diagnosis, and Treatment of Occlusal Problems. 2nd Ed. St. Louis MO: Mosby; 1989.2. Dawson PE. Functional Occlusion. 1st Ed. St. Louis, MO: Mosby; 2007.
3. Spear F. Facially Generated Treatment Planning. Lecture presented at: The Seattle Institute for Advanced Dental Education; 2001; Seattle, WA.
4. Spear F. Occlusion in Clinical Practice. The Seattle Institute for Advanced Dental Education Hotel Lecture Series; 2002; Kissimee, FL.
5. Spear F. State of the Art Esthetics. The Seattle Institute for Advanced Dental Education Hotel Lecture Series; 2000; Kissimee, FL.
6. Chiche G, Pinault A. Esthetics of Anterior Fixed Prosthodontics. Chicago, IL: Quintessence Publishing Co; 1994.
7. Spear F. Esthetic Techniques and Materials. The Seattle Institute for Advanced Dental Education Hotel Lecture Series; 2001; Kisimee, FL.
8. Spear F. Esthetic, Clinical, and Technical Management—Crowns and Veneers. Lecture presented at: The Seattle Institute for Advanced Dental Education; Seattle, WA; 2005.
9. Chu S, Devigus A, Mieleszko A, et al. Fundamentals of Color; Shade Matching and Communication in Esthetic Dentistry. Chicago, IL: Quintessence Publishing Co; 2004.
10. Spear F. Color Managing Digital Photography. [educational DVD]. 2005.
11. Spear F. Anterior Esthetic Crown Preparation. [educational DVD]. 2005.
12. Magne P, Belser U. Bonded Porcelain Restorations in the Anterior Dentition: A Biomimetic Approach. Chicago, IL: Quintessence Publishing Co; 2002.
13. Spear F. Creating Excellent Anterior Full Crown Temporaries. [educational DVD]. 2005.
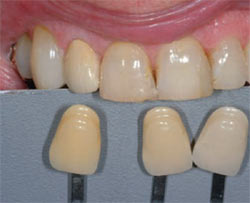 | 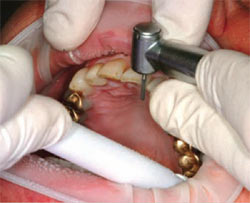 | |
| Figure 1 Teeth Nos. 7 through 10 with composite restorations failing. | Figure 2 Incisal reduction was performed with an H837KRU.314.014 bur. | |
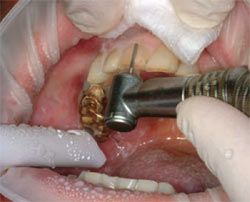 | 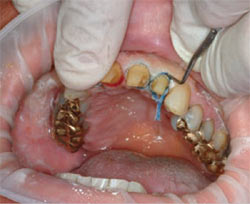 | |
| Figure 3 Axial reduction was performed using the H881U.314.012 bur. | Figure 4 Ultrapak cord soaked in Styptin placed in the gingiva. | |
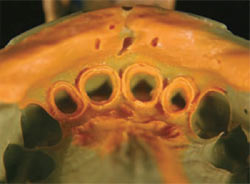 |  | |
| Figure 5 A PVS impression of the prepared teeth was taken. | Figure 6 The die model. | |
 |  | |
| Figure 7 The temporary restorations. | Figure 8 The Lava restorations. | |
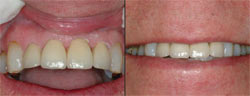 | ||
| Figure 9 and Figure 10 The final crowns cemented. | ||
| About the Author | ||
 Donald J. Alexander, DDS Donald J. Alexander, DDS Private Practice Jacksonville, Florida | ||

