
Esthetic-Driven Comprehensive Treatment for the Periodontally Compromised Patient
Jon B. Marashi, DDS; Jason J. Kim
Periodontitis affects a significant percentage of the adult population. This has driven research and clinical practice to devise effective therapies in the treatment and management of periodontal disease. Many patients go through extensive periodontal procedures and follow rigorous home-care routines to maintain teeth that may otherwise have been lost. Periodontally compromised teeth can exhibit recession of the gingival complex, causing loss of interdental papilla and exposure of root surfaces. This results in clinical crowns of excessive lengths and the presence of black triangles. These teeth will be more prone to plaque adherence, which may result in caries formation or continued periodontal breakdown.
In severe cases of adult periodontitis, an once-healthy dentition is often left with an unsightly appearance. The psychological effects of an unsightly appearance can lead to a lack of desire to smile and decreased self-esteem. Therefore, it is the role of the periodontist, restorative dentist, and ceramist to work together in the management of the biological, functional, and esthetic issues surrounding the periodontally compromised patient. To reach optimum dental health, a solid periodontal and restorative plan must be created and implemented. Proper planning will minimize unforeseen circumstances and establish reasonable expectations between the dentists and the patient.
CASE STUDY
A 57-year-old man presented to the primary author’s office by referral of a periodontist. The patient’s main concern was the appearance of his teeth. He stated that his smile made him very self-conscious and, therefore, he did not like to display his teeth. This, in turn, led friends and relatives to tell him that he did not look like a pleasant person.
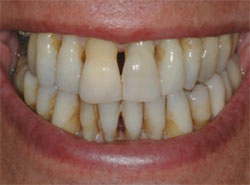
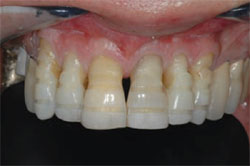
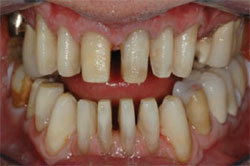
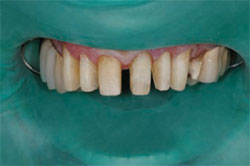
The patient demonstrated extreme gingival recession, black triangles, and lengthy, discolored dentition (Figure 1, Figure 2, Figure 3 ). The patient had developed severe, generalized periodontitis early in adulthood, and had maintained his dentition through constant care with a periodontist and diligent home care. He also smoked an occasional cigar, which had contributed to the staining of the dentition. Recently, he had lost teeth Nos. 3 and 4 as a result of furcal caries, mobility, and bone loss. Two ITI implants (Straumann USA LLC, Andover, MA) had been placed and were now ready for restoration (Figure 4 ). The patient was highly interested in esthetic treatment, but was very skeptical of the potential outcome because of the length of his clinical crowns, and feared that having his teeth restored would look artificial.
A careful review of the patient’s medical and dental history was completed and followed by a comprehensive intraoral and extraoral examination. Diagnostic study models were also taken. The patient had greater than 50% bone loss on his teeth, yet demonstrated minimal tooth mobility. The patient exhibited a sufficient arch form and stable occlusion for restorative treatment, so orthodontic treatment would not be necessary. Preoperative photographs were taken using a digital camera. This made it possible to e-mail the images to the ceramist to discuss pre-existing conditions and to better evaluate the final result.
Recommendations were made to place ceramic restorations, specifically to close off the black triangles, improve the color, and give the appearance of shorter teeth. The following restorations would be placed: implant porcelain-fused-to-metal (PFM) crowns on teeth Nos. 3 and 4, porcelain laminate veneers on teeth Nos. 5 through 15 and 21 through 29, and a new replacement PFM on tooth No. 12. Teeth Nos. 14 and 15 were previously restored with PFM restorations. These crowns demonstrated an exceptional marginal fit, precisely following the gingival and furcal contours. Therefore, it was decided to bond veneers directly to the restorations with supragingival margins to help maintain cleanability in the area.
CLINICAL PROTOCOL Smile Design Preparation
The patient was anesthetized using a combination of Citanest (AstraZeneca Pharmaceuticals LP, Wilmington, DE) and Septocaine® (Septodont USA, New Castle, DE) through local infiltration. A 0.5-mm labial reduction was done using a Brasseler #828.026 depth-cutting bur (Rosenthal Group Esthetic Design Kit, Brasseler USA, Savannah, GA) on the veneer preparations (Figure 5 ). Gross removal of the facial enamel and incisal/occlusal reduction was accomplished by using a large coarse-diamond bur (Brasseler #6856-029). Next, the interproximal contact points were opened to allow room for the porcelain restorations to close the black triangles. Preparation refinement was done using a chamfer bur (Brasseler #6844-016). All preparations were then smoothed and polished using finishing disks (Sof-Lex™, 3M ESPE, St. Paul, MN) (Figure 6 ).
It is important to note that bilateral centric stops were preserved during tooth preparation; therefore, there was no change in vertical dimension.
Retraction cords impregnated with a hemostatic agent (ViscoStat Clear, Ultradent Products, Inc, South Jordan, UT) were placed on all of the preparations. Prefabricated final abutments were torqued into place on teeth Nos. 3 and 4 (ITI-Strau-man). The impression caps and positioning cylinders were placed and final impressions were taken using a polyether material (Impregum™, 3M ESPE). The preparation shade was blend of Vita A3/B4. Next, a stick bite was taken using a polyvinyl siloxane material.
Before tooth preparation, alginate impressions were taken of the upper and lower arches. After preparation, these were filled with a bis-acrylic temporization material (Luxatemp® B1, Zenith DMG, Englewood, New Jersey). The material was allowed to set and the temporaries were then inserted with a non-eugenol temporary cement (TempoCem® NE, Zenith DMG). The excess cement was then cleaned off. This resulted in a whiter version of the original teeth. Next, flowable composite was added directly to the temporaries to close off the gingival embrasures (LuxaFlow™ B1, Zenith DMG) (Figure 7 ).
The temporaries were then sculpted free-hand with rotary instruments to create a more ideal smile design (Figure 8 ). The smile design of the teeth was much improved for tooth morphology, but the color of the temporaries was self-limiting because they were monochromatic. The length appeared shorter in the temporaries because of small root indications placed in the gingival areas. This offset the look of where the anatomical crown actually began.
The patient was seen the next day to check for proper occlusion and review any esthetic considerations. The patient was very satisfied with the result, but decided he would like the teeth to be less white. The final shade selected was Vita A1 (Figure 9 ).
Restorative Materials Selection and Ceramic Fabrication
Because periodontally treated teeth have an increased clinical crown length, covering interproximal black triangles while creating proper morphology becomes very challenging. However, creating the illusion of correct tooth proportion is possible with the help of ceramic coloring and proper contouring of the restorations. In this particular case, there is a lack of normal gingival architecture and a loss of interdental papilla.
The coloring of the porcelain was created by using a layering technique with Willi Gellar’s Creation Feldspathic Porcelain (Jensen Industries, Inc, North Haven, CT). Feldspathic porcelain will allow for greater control of the color and provide for thinner restorations. Innova #5 was added to Dentin Shade B1 to intensify the chroma and to mimic root portion of the color. OD B1 was used at the incisal tips to mimic proper light transmission. D B1 and D A1 was used for the incisors, D A1.5 for the canines, E59 for the enamel, Innova #1 and #2 for the mamelon, and various opalescent and translucent porcelain such as SI2, SI4, TI3, OT, and 59/CLO, was applied in segments.
The contact point and light-reflected height of the contour must be carefully placed and sculpted for the proper tooth size and shadow effect during lip dynamics. This is what creates an optical illusion for the appearance of shorter teeth, along with the absence of black triangles. The polychromatic result enables the interproximal porcelain to appear narrow, so that the teeth do not look too wide (Figure 10 ).
Insertion of the Final Restorations
The temporary restorations were removed, and the preparations were cleaned off. The permanent restorations were then tried-in using water to verify fit and shade. The porcelain was able to block out the underlying dark tooth shade and, therefore, would not require any color modification.
A rubber dam was placed to isolate the arch and control the working field (Figure 11 ). The teeth were then conditioned with 37% phosphoric acid (Ultra-Etch, Ultradent Products, Inc). After 15 seconds, the teeth were rinsed off with copious amounts of water. Next, they were carefully dried using air and cotton rolls, so as not to over desiccate. A dentin desensitizer was placed (Gluma, Heraeus-Kulzer, Armonk, NY) followed by the bonding agent (OptiBond® Solo Plus, Kerr Corporation, Orange, CA). Each tooth was then cured for 10 seconds using a halogen curing light. The conditioned veneers were then inserted simultaneously using a transparent-shade, light-cured resin (Vitique®, Zenith DMG). The same procedure was then performed on the lower arch.
The fit of the PFM crown on tooth No. 12, and the implant PFM crowns on teeth Nos. 3 and 4 were verified clinically and by radiographs (Figure 12 ). They were permanently adhered using a conventional cement (GC Fuji Plus Multi-Purpose Cement, GC America, Alsip, IL). The prepared surfaces of the PFM crowns on teeth Nos. 14 and 15 were conditioned using hydrofluoric acid, rinsed with water, and then silanated. A layer of unfilled bonding resin was then placed (OptiBond® 2FL, Kerr Corporation). The conditioned restorations were then inserted using the same resin cement.
Finishing and Polishing
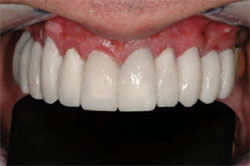
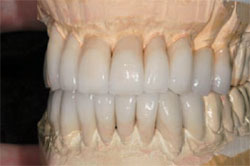
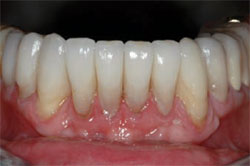
Excess cement was hand-scaled off, and the interproximal excess was eliminated using serrated and diamond finishing strips (Brasseler USA). The occlusion was checked using artist foil and articulating paper in maximum intercuspation, and in all working and non-working movements. Proper adjustments were made using a diamond bur (Brasseler #8368). Final polishing was done using high-speed ceramist points (Ceramist Porcelain Polishing System, Shofu Dental Corp, San Marcos, California) (Figure 13 and Figure 14 ).
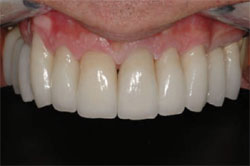
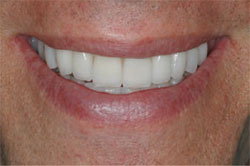
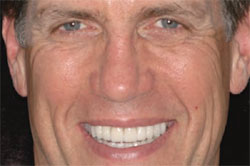
It is important to note how well the interproximal porcelain closed off the black triangles. The root indications were successful in making the clinical crowns appear shorter in length. The color was very warm and natural. The patient was extremely happy with his final result and felt very confident with his appearance (Figure 15 and Figure 16 ).
CONCLUSION
A successful result for the esthetically compromised periodontal patient requires careful planning and consideration. Perhaps the most important aspect of this treatment could be the artistic design created by the restorative dentist and ceramist. A great understanding of tooth morphology, light reflection, and color are the key ingredients for esthetic success. In addition, reasonable patient expectations are also required. The fact remains that when dealing with a compromised situation, there is not a perfect solution, but there certainly may be viable options.
ACKNOWLEDGMENT
The authors would like to thank Dr. Allen Schultz for his outstanding periodontal and implant treatment.
DISCLOSURE
Dr. Marashi is a current product consultant for, and has received material support from, Zenith DMG.
References
1. Magne P. Bonded Porcelain Restorations in theAnterior Dentition. Quintessence Publishing, Carol Stream, IL: 2003;140-148.2. Schillingburg H. Fundamentals of Fixed Prosthodontics. Quintessence Publishing, Carol Stream, IL: 1997;442-445.
3. Rosenthal L. The art of tooth preparation and recontouring. Dentistry Today. 1997;16(4): 1-4.
4. Weiss CM. Principles and Practice of Implant Dentistry. Mosby. 2001;169-193.
5. Rinaldi P, Marashi J. The changing face of dentistry. Contemporary Esthetics and Restorative Practice. 2004.
6. Gurel G. The Science and Art of Porcelain Laminate Veneers. Quintessence Publishing, Carol Stream, IL: 2003:61-82.
7. Marashi J. Temporization-free hand artistry defining clinical success. Dentistry Today. 2005;24(10):134-135.
8. Calamia JR. The etched porcelain veneer technique. NY State Dent J. 1988;54:48-50.
9. Chu S. Fundamentals of Color. Quintessence Publishing, Carol Stream, IL: 2004;20-48.
10. Lerner J. Conservative aesthetic enhancement of the maxillary anterior using porcelain laminate veneers. Pract Proced Aesthet Dent. 2006;18(6):361-366.
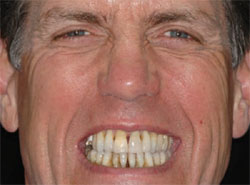 |  |
| Figure 1 Preoperative full-face view. | Figure 2 Preoperative smile view. |
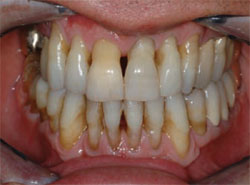 | 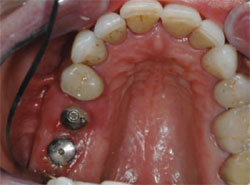 |
| Figure 3 Preoperative retracted view. Note the stippling of the gingival tissue | Figure 4 Preoperative occlusal view of the implants. |
 |  |
| Figure 5 0.5-mm depth grooves were made for facial reduction. | Figure 6 Completed upper and lower preparations. Note the open contacts to allow closure of black triangles. |
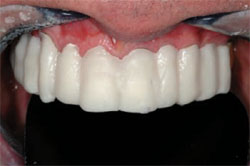 |  |
| Figure 7 Temporaries in unsculpted form. | Figure 8 Free-hand sculpted temporaries. |
 |  |
| Figure 9 Smile view of the temporaries. Note the relaxed upper-lip position. | Figure 10 Ceramic restorations. Note the depth of color and root indications. |
 | 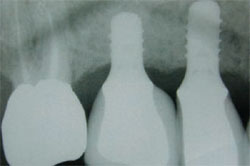 |
| Figure 11 Rubber dam isolation for insertion of restorations. | Figure 12 Radiograph of implants in teeth Nos. 3 and 4. |
 |  |
| Figure 13 Final restorations, upper arch. | Figure 14 Final restorations, lower arch. |
 |  |
| Figure 15 Smile view of the final result. | Figure 16 Full-face view of the final result. |
| About the Authors | |
 |  |
Jon B. Marashi, DDS | Jason J. Kim, MDT |

