
Take Advantage of Improved Materials: A Rapid and Effective Posterior Resin Placement Protocol
Stan Presley, DDS; and Jaimeé Morgan, DDS
Posterior composite placement has undergone a complete metamorphosis since its inception. What was once thought impossible is now easily attainable. Esthetic restorative dentistry has been simplified with the advent of microhybrid composite resin in that there is no longer a need for anterior- and posterior-specific composite systems. These resins have provided great improvements in surface wear, color integrity, and polishability.1-5 The problems associated with the early use of composite resins in posterior teeth have been drastically reduced because of scientific breakthroughs in resin chemistry.3,4,6,7 The industry continues to pursue study in the manipulation of particle size to improve wear characteristics while maintaining polishability. In addition, there is ongoing study in polymerization chemistry to achieve the complete elimination of polymerization shrinkage.8-11
At a similarly frenetic pace, dental adhesive systems have expanded to include dual-component systems, single-component systems, and self-etching systems. Tooth sensitivity after resin placement has been greatly reduced in the past decade, most likely because of the combination of better bonding agents and composites with low shrinkage.11
To provide transparency, translucency, and shades with higher value, a change from the traditional photoinitiator, camphorquinone (CQ), was necessary.12,13 Because CQ is yellow and interferes with the aforementioned desired optical properties, proprietary photoinitiators have been used.12,13 The proprietary photoinitiators are easily cured with a halogen curing light. However, when using an LED light, it is prudent to research its spectral wavelength characteristics. First- and second-generation LED curing lights produce a narrow spectral wavelength that falls between 450 nm and 470 nm, which will cure CQ and some proprietary photoinitiators.14,15 Third-generation LED curing lights (such as Ultra-Lume 5, Ultradent Products, Inc, South Jordan, UT) produce a broader spectral wavelength that will cure all proprietary photoinitiators.15
Just as curing lights have evolved, so have matrix band systems. Sectional matrix bands have allowed a more natural contour to the proximal walls of posterior restorations and, with the reduction in the thickness of the matrix band material, inter-proximal contacts are easier to achieve.16 It has been reported that sectional matrix bands decrease the potential for sensitivity because, unlike a hyper-constricted circumferential matrix band, they do not pull the cusps together.7 Improvements in the retainer rings have further enhanced the quality of the contacts. Interproximal wedges have been redesigned to integrate with their matrix counterparts to allow a seamless emergence profile.
THE NEW PROTOCOL
After rubber dam placement, the tooth is prepared. The modern cavity preparation for direct composite resin is logical and simple; the traditional rigid parameters are no longer required. The size of the modern preparation is only slightly larger than the decay itself.17 The internal line angles are rounded. Interproximal lesions can be eliminated with a simple slot or box preparation; there is no need to extend for prevention. After completion of the preparation, clean all debris from the area and ensure isolation from contaminating fluids (eg, blood, saliva, sulcular fluid, etc). Sectional matrix bands should be placed where needed and stabilized with plastic interproximal wedges and ring retainers. The matrix band should be burnished at the contact area with a hand instrument.
When adjacent teeth are prepared with proximal boxes opposing each other, place one matrix band only and restore the most distal box first. Once this restoration is placed, remove the matrix band and then contour and polish the proximal surface. Place a new segmental matrix band and restore the adjacent tooth. This technique allows the creation of more natural contacts that are easier to maintain by the patient.
When using a total-etch bonding agent, etch the dentin and enamel for 15 seconds with 35% phosphoric acid, rinse, and re-move excess moisture. Using a self-limiting etch may reduce the potential for postoperative sensitivity as well as using an antimicrobial solution after the etchant.
A bonding agent is then placed in the preparation according to the manufacturer’s instructions, followed by a thin layer of flowable resin—the super-adaptive initial layer—and light-cured. A microhybrid resin is introduced incrementally into the preparation and manipulated to adapt to the cavity shape with a smooth-ended hand instrument. Each increment is light-cured. When using a two-shade technique, use a dentin shade that matches the exposed dentin of the tooth to be restored until the dentinoenamel junction (DEJ) is reached. An enamel shade is placed from the DEJ to the occlusal surface.
The wedge and matrix system are removed and the occlusal anatomy is then contoured with a football-shaped carbide finishing bur. A flame-shaped finishing bur is used to properly shape the embrasures. The rubber dam is removed and the occlusion is checked using an ultra-thin marking paper. The restoration is then polished. The restoration and tooth are etched for 5 seconds, rinsed, and dried. A composite sealer is applied and light-cured to improve wear resistance and marginal integrity.18,19
CASE PRESENTATION
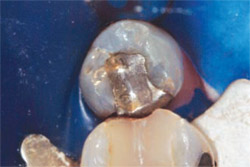
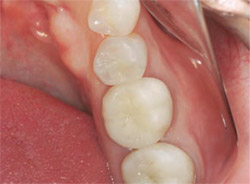
A female patient presented with failing restorations on teeth Nos. 29 and 30 (Figure 1). Traditionally, crowns would have been the treatment of choice for both teeth; however, due to the strength and esthetic appeal of microhybrid composite resins, it was decided that composite would be used to restore tooth No. 29 while a crown would be placed on tooth No. 30.
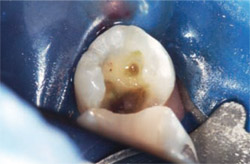
After anesthesia was obtained and the rubber dam was placed, the amalgam and decay were removed. A caries indicator (Sable Seek®, Ultradent Products, Inc) was used to detect carious tooth structure because it is paramount to provide a clean and bondable surface (Figure 2). The enamel margins were smoothed with a fine-tapered diamond before matrix placement. A sectional matrix band (Composi-Tight® Silver Plus, Garrison Dental Solutions, Spring Lake, MI) was placed and stabilized with a plastic wedge (G-Wedge, Garrison Dental Solutions).
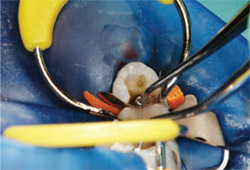
The concave edge of the matrix band is the occlusal aspect. An interproximal carver is often helpful in guiding the band past the floor of the box. The hand instrument is inserted from either the buccal or lingual and pushed interproximally and to the gingival, thus pulling the band material with it. It is then stabilized with finger pressure on the occlusal edge as the wedge is in-serted. To achieve optimal separation force, a hemostat should be used to place the wedge. This new wedge is curved, similar in shape to a suture needle, so as to engage the band below the preparation. The ring retainer was then placed with the tines oriented so that they were on the opposite side of the wedge from the matrix band. The matrix band was then burnished against the adjacent tooth (Figure 3).
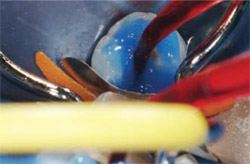
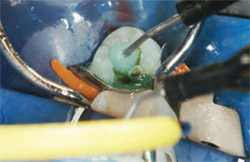
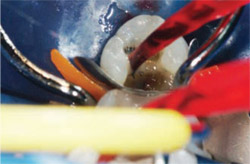
The tooth was etched with Ultra-Etch® (Ultradent Products, Inc) for 15 seconds, rinsed, and the excess moisture was removed (Figure 4). A 2% chlorhexidine gluconate solution (Consepsis®, Ultradent Products, Inc) was placed as the antimicrobial agent and then air-dried (Figure 5).
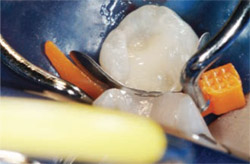
A dentin bonding agent (PQ1, Ultradent Products, Inc) was applied to all surfaces and air-thinned for 5 to 10 seconds to evaporate the ethanol carrier (Figure 6). The material was then light-cured for 10 seconds. The initial composite layer (Ultraseal XT® Plus Clear, Ultradent Products, Inc) was painted on all surfaces and light-cured for 10 seconds.
Starting at the box of the preparation, dentin shade A2 (Amelogen® Plus, Ultradent Products, Inc) was incrementally placed up to the DEJ (Figure 7). Shade Enamel Neutral (Amelogen Plus) was placed as the enamel layer. Before light-curing the final layer, the occlusal anatomy was incorporated. After light-curing, the matrix system was removed and the restoration was shaped using carbide finishing burs. The rubber dam was removed and the occlusion was checked using an ultra-thin articulating paper (AccuFilm I, Parkell Inc, Farmingdale, NY). The occlusal anatomy was perfected and polished using medium- and fine-grit composite polishing points followed by a polishing brush (Jiffy Polishers, Ultradent Products, Inc). The restoration was re-etched for 5 seconds, rinsed, and air-dried. A composite sealer (Perma-Seal®, Ultradent Products, Inc) was painted over the restoration, air-thinned, and light-cured. After completion of the direct composite on tooth No. 29, tooth No. 30 was restored with a Captek™ crown (Precious Chemicals Company Inc, Altamonte Springs, FL) (Figure 8).
CONCLUSION
It is advantageous to maintain an operating protocol because it contributes to time efficiency, reduces stress, and improves the predictability for optimal results which includes an esthetic, durable, and comfortable restoration. Use high-quality products and follow every step of the protocol to ensure consistency in your treatment. First and foremost, it is important to provide the best treatment for the patient at a fair fee and in a timely manner. Good protocol will get it done.
DISCLOSURE
The authors have received honoraria from Ultradent Products, Inc.
References
1. Behle C. Placement of direct composite ve-neers utilizing a silicone buildup guide and intraoral mock-up. Pract Periodont Aesthet Dent. 2000;12(3): 259-266.
2. Prati C. In vitro and in vivo adhesive in operative dentistry: A review and evaluation. Pract Periodont Aesthet Dent. 1998;10(3): 319-327.
3. Milner FJ. Recreating natural esthetics with a direct composite resin in the treatment of a complex class IV fracture—a case report. J Cosmet Dent. 2001;17(1):42-50.
4. Kugel G, Garcia-Godoy F. Direct esthetic adhesive restorative materials: A review. Contemporary Esthetics and Restorative Practice. 2000;4(9):6-10.
5. Barghi N. Surface polishing of new composite resins. Compend Contin Educ Dent. 2001;22(11):918-924.
6. Friedman MJ. Composite materials in restorative dentistry. Compend Contin Educ Dent. 2001;22(8): 666-672.
7. Aschheim K, Dale B. Esthetic Dentistry: A Clinical Approach to Techniques and Materials. 2nd ed. St Louis, MO: Mosby; 2001:79.
8. Kim Y, Kim CK, Cho BH, et al. A new resin matrix for dental composite having low volumetric shrinkage. J Biomed Mater Res B Appl Biomater. 2004; 70(1):82-90.
9. Chung CM, Kim JG, Kim MS, et al. Develop-ment of a new photocurable composite resin with reduced curing shrinkage. Dent Mater. 2002;18(2): 174-178.
10. Satsangi N, Rawls HR, Norling BK. Synthesis of low-shrinkage polymerizable methacrylate liquid-crystal monomers. J Biomed Mater Res B Appl Biomater. 2005;74(2):706-711.
11. Summitt JB, Robbins JW, Schwartz RS. Fundamentals of Operative Dentistry: A Contemporary Approach. 2nd ed. Chicago; 2001:266.
12. Price B, Felix CA, Andreou P. Third generation vs a second-generation LED curing light: effect on Knoop microhardness. Compend Contin Educ Dent. 2006;27(9):490-497.
13. Park YJ, Chae KH, Rawls HR. Development of a new photoinitiation system for dental light-cure composite resins. Dent Mater. 1999;15(2): 120-127.
14. Uhl A, Sigusch BW, Jandt KD. Second generation LEDs for the polymerization of oral biomaterials. Dent Mater. 2004;20(1):80-87.
15. Price RB, Felix CA, Andreou P. Evaluation of a dual peak third generation LED curing light. Compend Contin Educ Dent. 2005;26(5):331-338.
16. Loomans BA, Opdam NJ, Roeters FJ, et al. Comparison of proximal contacts of Class II resin composite restorations in vitro. Oper Dent. 2006;31(6):688-693.
17. Schmidseder J. Aesthetic Dentistry. 1st ed. New York, NY: Thieme Medical Publishers; 2000:147.
18. Kawai K, Leinfelder KF. Effect of surface penetrating sealant on composite wear. Dent Mater. 1993;9(2):108-113.
19. Dickinson GL, Leinfelder KF. Assessing the long-term effects of a surface penetrating sealant. J Am Dent Assoc. 1993;124(7): 68-72.
 |
 |
|
| Figure 1 Preoperative view of teeth Nos. 29 and 30. | Figure 2 Amalgam and obvious decay has been removed and caries indicator has been placed. | |
 |
 |
|
| Figure 3 Burnishing matrix band against adjacent tooth to enhance shape of contact. | Figure 4 Tooth was etched with 35% phosphoric acid for 15 seconds, rinsed, and excess moisture was removed. | |
 |
 |
|
| Figure 5 An antimicrobial agent was applied to tooth and then gently air-dried. | Figure 6 Dentin bonding agent was applied to the tooth, air-thinned, and light-cured. | |
 |
 |
|
| Figure 7 Incremental fill to the dentino-enamel junction using dentin shade composite resin. | Figure 8 Four-month postoperative view of completed composite restoration on tooth No. 29 and a Captek crown on tooth No. 30. | |
| About the Author | ||
 Stan Presley, DDS Stan Presley, DDSPrivate Practice Salt Lake City, Utah |
||
 Jaimee Morgan, DDS Jaimee Morgan, DDSPrivate Practice Salt Lake City, Utah |
||

