
Invisalign and Restorative Dentistry
Steven Glassman, DDS
Five years ago, no one had ever heard of the term “smile makeover.” As makeover shows became increasingly popular, the media began vast coverage of cosmetic surgery, from magazine articles and reality shows to blogs on the Internet. The result was a huge recognition of the importance of the smile, and how dentists ultimately play a large role in esthetic enhancement. While it is exciting to provide these dramatic cosmetic results, very often treatment plans require a more comprehensive approach to help patients address function and long-term health in addition to achieving superior esthetic results.
In many cases, patients can benefit from an orthodontic approach coordinated with periodontic and cosmetic procedures. Unfortunately, dentists often forgo this approach because of a lack of comfort with certain treatments or a reluctance to refer patients out. A patient’s unwillingness to undergo conventional orthodontics can also play a part in less comprehensive treatment. Invisalign® (Align Technology, Inc, Santa Clara, CA) is a system of clear invisible aligners that can help position the teeth to prepare for restorative and cosmetic treatment. Because the aligners are virtually invisible, patients tend to accept the treatment more readily. This article presents two cases where Invisalign was used in preparation for restorative treatment. It is important to note that, before Invisalign was presented as an option, these patients were unwilling to accept traditional orthodontics as part of their treatment.
CASE PRESENTATION ONE
(Figure 1; Figure 2 View Figure; Figure 3 View Figure; Figure 4 View Figure; Figure 5 View Figure)
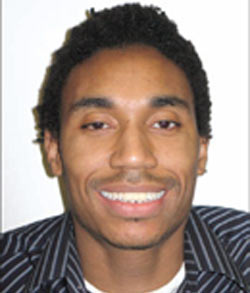
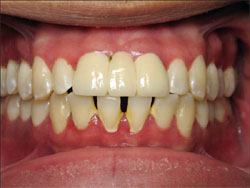
The patient in this case, Randy, was a young man who came to the office with a chief complaint of an unnatural-looking bridge. His actual words were, “I think my previous dentist may have messed up my teeth.”
Randy explained that he had gone to his last dentist 8 years ago with a desire to close a large diastema. At that time, the dentist cut down the two healthy teeth on either side to create a 3-unit bridge consisting of three central incisors. At the initial visit in the author’s office, Randy provided a high school photograph of himself, before having any dental work done, to show what his natural smile had looked like prior to the treatment of his previous dentist. The author gave him the option of recreating his diastema with provisionals, which would be followed by orthodontic treatment to close the space, either with conventional brackets and wires or the Invisalign system. Because Randy was a singer and did not want conventional orthodontic appliances to show, he opted for the Invisalign treatment.
With Invisalign, patients wear the clear, removable aligners at all times, for a total of about 20 hours per day, removing them only for eating, drinking, and performing oral hygiene. Patients wear each aligner for a period of 2 weeks, and then move on to the next aligner in the series until their treatment is complete. The average completion time for an Invisalign case in the author’s practice is 11 months.
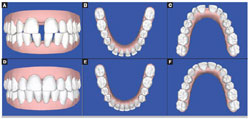
To begin the treatment process, the author took study models, facebow and centric bite records, and generated a diagnostic wax-up to recreate Randy’s original diastema. He removed the fixed bridge and bonded a bis-GMA resin (Luxatemp®, Zenith/DMG Brand Division, Foremost Dental LLC, Englewood, NJ) to the teeth with OptiBond® Solo (Kerr Corporation, Orange, CA) and a flowable composite (Tetric® Flow, Ivoclar Vivadent, Amherst, NY). Polyvinyl siloxane (PVS) impressions (Aquasil, DENTSPLY International, York, PA) and a centric bite record (Blu-Mousse®, Parkell, Inc, Edgewood, NY) were also taken, which were all sent to Align Technology, Inc. The Panorex digital photos of the patient and a treatment plan were submitted online through Invisalign’s case management Web site.
In 3 weeks, a 3-dimensional computerized graphic analysis, called ClinCheck™, was available on the Web site that depicted the expected movements of each aligner. Both dentists and patients can use this tool to visualize the sequencing of the movements and preview the total amount of aligners that are required for treatment, adjusting the predictions according to their specific clinical goals. Each aligner is designed to move the teeth 0.25 mm per tray. In Randy’s case, this meant that the entire treatment would take 15 aligners. Randy reported that Invisalign did not compromise his speech or singing. He was able to practice and perform normally during his treatment.
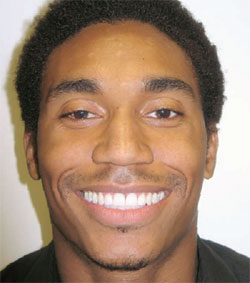
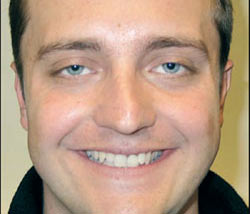
The author saw Randy every 6 weeks to monitor treatment. In a little more than 7 months, the Invisalign treatment was completed and his restorative treatment was finalized. The author took new records, including another set of photographs and mounted study models. The case was completed with Zoom!® power whitening completed in the office, followed by take-home trays for 2 weeks. The author and Randy decided to restore two additional teeth, the laterals, to allow for a better esthetic result. The height-width ratios and the golden proportion were factored into this decision.
Using the new mounted study models, a new diagnostic wax-up was created. After minimal preparation on teeth Nos. 7 and 10, and removal of the previous version of teeth Nos. 8 and 9, a template was made to create provisional models (with a 0.3-mm reduction) for porcelain laminates. Randy was able to function as usual with his new provisionals. Once satisfied with the esthetic, fit, and function, alginate impressions were taken and sent to the laboratory. The final four units, two minimally invasive porcelain veneers and two all-ceramic crowns, returned from the laboratory and, after a try-in and approval from the dentist and the patient, were bonded in with Optibond Solo and RelyX™ Veneer Cement (3M ESPE, St. Paul, MN). Alginate impressions were taken immediately after the ceramic restorations were finished, and the patient wears a clear Essix retainer to prevent relapse of the orthodontic movement. With comprehensive treatment and innovative techniques, Randy’s smile was restored, as was his confidence and trust in dentistry.
CASE PRESENTATION TWO
(Figure 6 View Figure; Figure 7 View Figure; Figure 8 View Figure; Figure 9 View Figure)
The second case will show how Invisalign has been instrumental in the author’s practice in properly aligning teeth before implant placements when it is used as a provisional instead of a removable acrylic partial, eg, “flipper.”
The patient, Adriano, came to the author’s office for a “smile makeover.” He was not exactly sure what he needed but he mentioned his “crooked teeth, unnatural crown, and lower teeth that do not show” when he smiled. In his initial consultation, the examination of tooth No. 9 revealed a suspicious apical lesion with a mobility of +2. The treatment plan involved the use of orthodontics, followed by the extraction of tooth No. 9 and an eventual single-tooth implant placement. After the orthodontic treatment and surgical implant phase, two to four porcelain restorations were proposed. Adriano was presented with two options for orthodontic treatment, conventional and invisible aligners. He chose the Invisalign treatment.
After periodontal therapy was completed—scaling, root planing, prophy, and oral hygiene instruction—records were taken for the Invisalign system, including PVS impressions (Aquasil), a centric occlusion bite record (Blu-Mousse), a panoramic radiograph, and eight digital photos. The impressions and bite record were sent to Align Technology in Santa Clara, CA, and the digital photographs and panoramic radiograph were submitted online with the patient’s treatment plan. In this case, the aligners were used to intrude the maxillary and mandibular incisors, reduce the deep overbite, align the maxillary gingiva, and correct the crowding in the arch.
On the first visit, Adriano was prepared to receive his first set of aligners. Composite “attachments” were placed on the teeth using a clear template. Attachments were added to aid certain movements, adding retention and anchorage to facilitate movement on specific teeth. In certain instances, when there is a need to create space for movement to solve crowding problems, Align’s computer software figures out the amount necessary and the dentist follows a template for interproximal enamel reduction. After removing the appropriate amount of enamel, the patient was given his first three aligners, instructions on how to clean them, and when to change to the next set. Because each aligner is to be worn for 2 weeks, the author generally sees the patient at 6-week intervals. The patient was scheduled for extraction and bone graft of tooth No. 9 in coordination with the oral surgeon.
Invisalign was used as an immediate provisional. A soft, flexible, tooth-colored resin material was used in the aligner to replace the extracted tooth. Auxillary staff fitted subsequent aligners with the same resin material and instructed the patient on how to keep the area clean. The implant fixture was placed 3 months later, and the implant was ready for restoration 8 weeks after placement. In this manner, orthodontic treatment and implant restoration can be coordinated to reduce total treatment time. As seen in the final photos, the anterior teeth were intruded, which decreased the overbite and evened out the gingival margins. When the patient was finished with the Invisalign treatment, the implant was ready to be restored.
The restorative phase included a fixture-level impression along with opposing models, centric bite record, and facebow. The dental laboratory fabricated an Atlantis abutment (Atlantis Components, Inc, Cambridge, MA), a duplicate abutment (Gemini, Atlantis Components) as well as a diagnostic wax-up and matrix. At the next appointment, the abutment was placed and teeth Nos. 7, 8, 10 were prepared for feldspathic veneers. The area was provisonalized with Luxatemp restorations that were spot-bonded in place. The patient was then scheduled for an appointment to check esthetics and function. Upon approval, the alignate impressions and photographs were sent to the laboratory. Finally, the case was inserted with RelyX Veneer Cement, and finished and polished.
When providing comprehensive care to a dental patient, orthodontics is an important part of the treatment plan. The author uses Invisalign to help accomplish minor movement for pre-restorative treatment in less than 6 months, allowing for more conservative restorative treatment. In this age of “smile makeovers,” Invisalign is an important tool to achieve improved esthetics as well as a healthy smile.
DISCLOSURE
The author has received honoraria for teaching Invisalign certification courses.
 |  | |
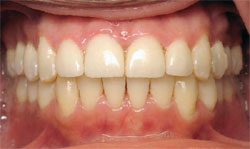
| Figure 1 Preoperative smile. Note the 3-unit bridge consisting of three central incistors. | Figure 2 Close-up view of 3-unit bridge consisting of three central incisors. | |
 |  | |
| Figure 3A through Figure 3F 3-D computer-generated "ClinCheck" showing before-and-after with Invisalign treatment | Figure 4 Postoperative view of successful smile restoration. | |
 |  | |
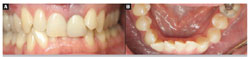
| Figure 5 Postoperative close-up of restorations for teeth Nos. 8 and 9. | Figure 6 Preoperative smile. | |
 | ||
| Figure 7A and Figure 7B Preoperative views showing overbite (Figure 8A), crowding in the lower incisors (Figure 8B). | Figure 8A through Figure 8D 3-D computer-generated "ClinCheck" showing intrusion of teeth Nos. 8 and 9 and movement of the lower incisors to correct crowding. | |
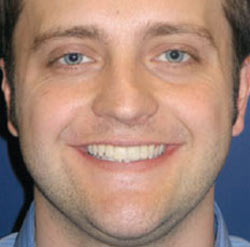 | ||
| Figure 9 Postoperative smile. | ||
| About the Author | ||
 Steven Glassman, DDS Steven Glassman, DDSGlassman Dental Care New York City, New York | ||

