
Simple Restorative Protocol With the Provide™ Abutment
Patients have come to expect excellence in implant esthetics and function. Clinicians wish to provide implant therapy as simply and as efficiently as possible, while still providing excellent esthetics. One simple surgical protocol involves placing transgingival implants where the final abutment and crown margins are determined at the time of implant placement. This protocol is surgically (not restoratively) driven relative to the final crown margin location. This may require the surgeon to place the implant more subgingival than desired or it may lead to implant collar exposure after osseointegration and soft tissue healing has occurred. The market demand for surgical flexibility without sacrificing restorative simplicity or esthetics led to the development of the Provide Abutment™ from 3i.
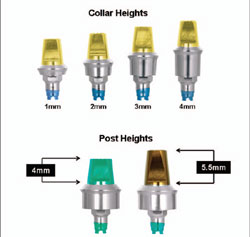
The Provide Abutment (Figure 1) features 2 dimensions: abutment collar heights (1, 2, 3, and 4 mm) and posts heights (4 and 5.5 mm). If an abutment selection proves to be incorrect in regard to collar height after tissue maturation (supra- or subgingival), it can easily be changed. Therefore, the design of the implant restoration is restoratively driven and focused on the esthetic outcome. With the range of collar and post heights, the clinician can consistently select the optimal abutment collar height after soft tissue maturation and then maximize the post height for optimal retention for the cement-retained crown.
Provide Abutments are color-coded on the apical end to match the implant restorative platform. The color-coding on the coronal post designates the post height and diameter and is matched to the impression coping color for easy selection of the appropriate size. Provide Abutments will also be available as kits to make component selection predictable and easy. Snap-on impression components eliminate the need for implant-level impressions.
Case Presentation
The following clinical case demonstrates the use of a Provide Abutment in the restoration of an internally interfaced OSSEOTITE® XP Certain® Implant.
A 44-year-old man presented with a missing mandibular left first molar and desired a fixed restoration. Based on the bone height above the inferior alveolar nerve, a 5-mm diameter with a 6-mm platform and a 10-mm length OSSEOTITE XP Certain Implant was placed in a single-stage protocol. A 5-mm restorative platform with a 6-mm EP® (Emergence Profile System) flared healing abutment was placed in lieu of a cover screw and the soft tissues were sutured around the abutment with intermittent sutures (Figure 2).
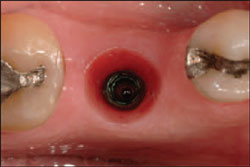
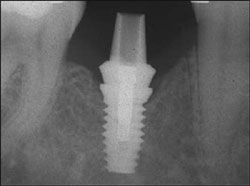
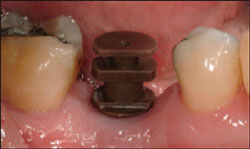
Two months after implant placement, osseointegration was verified and the healing abutment was removed with a large hex driver (Figure 3). An appropriate diameter Provide Abutment (5-mm restorative seating platform) was selected to allow for platform switching. The collar and post height (2-mm collar x 5.5-mm post height) were selected by determining the location of the collar height based on tissue depth, then measuring the distance from that point to the opposing dentition. This interarch space, minus 1.5 to 2 mm for occlusal clearance for the crown, determined the optimal post height. The Provide Abutment, with the Certain® QuickSeat™ Connection feature, was carried to the mouth and placed with an abutment driver (Figure 4). An audible and tactile sense confirmed complete seating of the abutment. The abutment screw was then placed to secure the abutment to the implant with a large hex driver. After radiographic verification of complete seating, the abutment screw was torqued to 20 Ncm with a Restorative Torque Indicator (Figure 5). A Provide Protection Cap of the appropriate size was selected and placed over the abutment to protect the patient’s tongue and integrity of the abutment during the restorative phase of treatment (Figure 6).
When the patient presented to the restorative clinician, the Provide Protection Cap was removed with a hemostat and a color-coded impression coping (brown) was selected to match the diameter of the abutment and post height and was seated onto the abutment collar. The snap-on feature of the impression coping provided the clinician with verification of complete seating (Figure 7). A stock impression tray was selected and an impression was made with an elastomeric impression material (Figure 8). The impressions of the abutment and the opposing arch along with the crown shade selection were sent to the dental laboratory for fabrication of a porcelain-fused-to-metal (PFM) crown. The Provide Protection Cap was then replaced onto the Provide Abutment to protect the tongue as well as the integrity of the Provide Abutment post during the fabrication of the definitive crown.
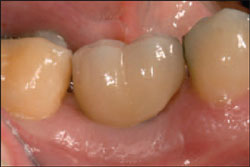
The Provide Protection Cap was removed with a hemostat and the abutment screw access hole was filled with a temporary filling material. The definitive PFM implant-retained crown was then tried-in and adjusted for optimal interproximal and occlusal contacts and cemented to the abutment with provisional cement (Figure 9).
Conclusion
The Provide Abutment, when combined with the internally interfaced OSSEOTITE Certain Implant, allows clinicians and dental laboratory technicians to fabricate esthetic implant-retained restorations in a simple and predictable fashion. Because the abutment heights can be selected or changed after osseointegration and soft tissue healing have occurred, surgeons have increased implant placement flexibility with this system. Clinicians gain the flexibility of abutment selection and margin placement with a 2-piece abutment and implant design. Abutment-level impression procedures are also easy to perform with the use of snap-on components as opposed to taking implant-level impressions.
The clinical case was provided courtesy of Drs. Robert Holt and Bruce Ouellette, West Palm Beach, Florida.
For More Information
3i Customer Support
Phone: 1-800-342-5454
Web: www.3i-online.com
 |
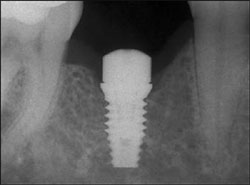 |
| Figure 1 The Provide Abutment features 2 dimensions: abutment collar heights (1, 2, 3, and 4 mm) and posts heights (4 and 5.5 mm). | Figure 2 Radiograph showing the 5-mm restorative platform with a 6-mm EP® (Emergence Profile System) flared healing abutment, which was placed in lieu of a cover screw. |
 |
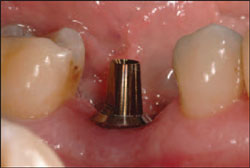 |
| Figure 3 Two months after implant placement, osseointegration was verified and the healing abutment was removed. | Figure 4 The Provide Abutment was placed with an abutment driver. |
 |
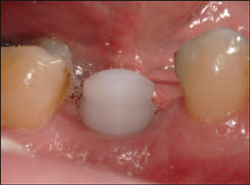 |
| Figure 5 After radiographic verification of complete seating, the abutment screw was torqued to 20 Ncm with a Restorative Torque Indicator. | Figure 6 A Provide Protection Cap of the appropriate size was selected and placed over the abutment to protect the patient’s tongue and integrity of the abutment. |
 |
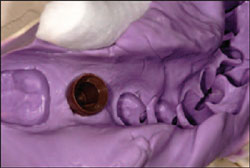 |
| Figure 7 The snap-on feature of the impression coping provided the clinician with verification of complete seating. | Figure 8 An impression was made with an elastomeric impression material. |
 |
|
| Figure 9 The definitive PFM implant-retained crown was tried-in, adjusted, and cemented to the abutment with provisional cement. |

