Prosthetic Procedures Simplified for Clinical
Andrew Shannon
Like all things modern, esthetic dentistry evolves to remain in step with the times. Methods, materials, and expectations each play a part in that evolution, and change over time to best suit the practice of dentistry. Perhaps the most dramatic change witnessed over the last several years has been in materials, which now provide more esthetic options than ever before.
Patients and practitioners alike expect the most from the materials used today in every technique from bleaching to full-mouth reconstruction. One thing, however, has remained true throughout the history of esthetic dentistry: Success depends as much on the restoration of function as it does on the restoration of appearance and form. Function is non-negotiable; without it, the patient is no better off than when he or she walked into the office seeking dental care. A beautiful restoration that fails is like painting your house with watercolors: Once that first rainstorm blows through, the beauty is lost and you are left with a bigger problem than you had before. As such, it is incumbent on all of us as dental caregivers to do everything in our power to ensure functional success in every esthetic restoration. One way we can maximize our chances for success is to pay close attention to occlusion, which plays a large role in determining functional and restorative success. Correct anatomical occlusion helps a restoration to withstand the functional load placed on it, thereby eliminating one of the primary culprits in restorative failure.
Material Selection—Heat-processed Composite
belleGlass™ HP (Kerr Corporation, Orange, CA) heat- and pressure-processed polymer glass restorative is an indirect restorative option that addresses clinical reliability as well as natural-looking esthetics. Developed to replicate natural tooth structure as closely as possible, the belleGlass™ system is comprised of an esthetic dentin material along with esthetic and polishable enamel.1-4 As an alternative to porcelain, the heat-processed composite is in a group of materials that are exceptionally kind to opposing dentition. In essence, it pairs the esthetics and performance of ceramics with the opposing kindness of composites.5 It has been shown that laboratory processed resin restorations have a slightly higher fracture resistance than that of fiber-reinforced composite or ceramic.6
Case Study
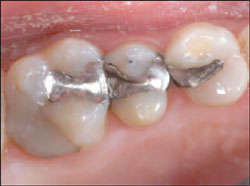
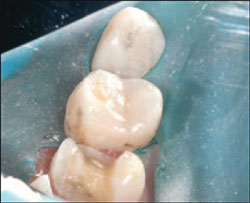
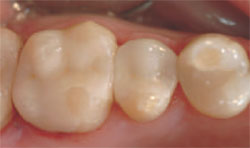
The patient was a young woman who presented with failing restorations that had been placed approximately 6 years previously (Figure 1). The first molar had a medium-sized alloy in acceptable condition, but the distal-occlusal-lingual aspect had been treated with a large direct composite which had, along with the first premolar, radiographic recurrent decay. The second premolar had a moderate-sized alloy with a deep undermining class VI lesion. The client was very specific in her request that we restore her mouth with metal-free restorations.
Treatment Planning
After discussing the patient’s goals, a treatment plan was developed that would restore the indirect aspect of the case using belleGlass™ HP to recover both form and function. These indirect partial crowns were selected over full coverage as the treatment of choice simply because the sizes of the defects did not warrant treatment with larger direct restorations.
The treatment of choice for the first premolar was to do a direct, 2-surface, distal-occlusal, stratified composite. This article will not focus on the complete step-by-step process but will give a brief overview of when and at what point of treatment it was done.
Preparation
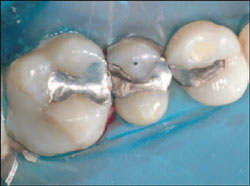
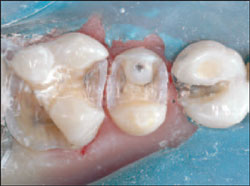
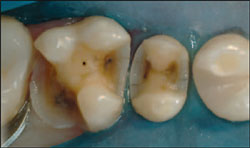
As with all restorative procedures, it is imperative that a rubber dam be used (Figure 2). The preparations were initiated by using the GW 330 and GW 557 carbide burs (SS White® Burs, Inc, Lakewood, NJ) to remove all of the old alloy and composite (Figure 3). To minimize if not eliminate the tooth chatter that can result in microfractures, it is imperative that new burs be used for each case. There will always be a difference in opinion on whether diamonds are better than carbides for tooth preparation, but this author feels that the major difference comes down to personal preference. In his experience, the GWU carbides (SS White) operate in a slightly different manner because of the blade design, which seems to allow the burto cut through various substrates fairly smoothly while not clogging up.
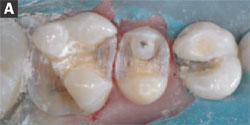
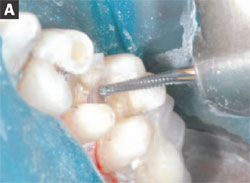
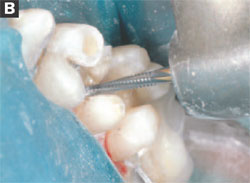
Next, the GWU845KR-016 carbide was used to shape the ideal occlusal taper. This bur design provides a 7° to 10° taper such that, if held perpendicular to the preparation area and moved toward the mesial-distal, it can accomplish the majority of the preparation protocol. Again, the author finds that the carbides provide a smooth cutting alternative to diamonds, make preparation more efficient, and also that the modified round shoulders will eliminate all sharp internal line angles, which will allow all of the occlusal forces to be dispersed through the restoration (Figures 4A and 4B). It has been shown that the use of carbide burs can potentially increase the bond strength to dentin.7 The GWU847KR-016 carbide bur was used at the interproximal areas at an angle following the enamel prism rods, ensuring that no unsupported enamel rods remained (Figures 5A and 5B). It should be noted that unsupported enamel rods can break, which would compromise the restoration.
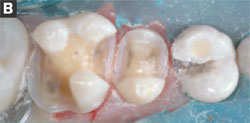
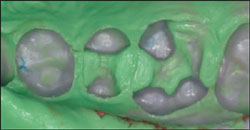
The main preparation parameters dictate that there should be a minimum of 1.5 mm of material thickness from the opposing cusp in the occlusal area. Smooth gingival box forms and line angles ensure that there are no unsupported enamel rods. Finally, there should be at least 1.5 mm of material covering the cusp tips if necessary (Figure 6).
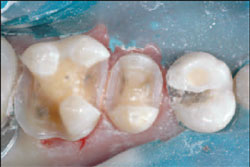
After the preparation was complete, a caries-indicating solution was applied to ensure that no recurrent decay was present. An overview of the technique involved is not a part of this article but the rationale for sequencing will follow. It was only after the preparations were complete that the author treated the direct restoration, having complete control over all of the critical class 2 points, ranging from gingival box marginal integrity to overall interproximal shape and contour. When this step is completed the final phase of prosthetic treatment can begin (Figure 7).
A polyvinylsiloxane (PVS) bite registration (Memoreg® 2, Heraeus Kulzer, Armonk, NY) was then taken to ensure that the case could be properly mounted for good centric occlusion. Before making a final impression, the soft tissue interface must be properly managed. This can be done with the use of retraction cord, electrosurgery, and even the use of lasers. For this case the author chose a newer method using a novel material called Expa-Syl™ (Kerr Corporation). When expressed into the sulcus, the clay-like, aluminous, chloride-impregnated material provided both adequate hemostasis and sulcular expansion. This allows the preparation to be viewed at 360 degrees and also prevents sulcular moisture, which is key to obtaining an accurate final impression.8,9
A light-body, vinyl polysiloxane (VPS) impression material (Flexitime® Correct Flow, Heraeus Kulzer) was used to accurately define and impress the preparations, and a heavy-body, VPS tray material (Flexitime Heavy Tray, Heraeus Kulzer) was loaded into a metal impression triple tray. The impression was made andafter 3 minutes was inspected for clarity (Figure 8). It is the clinician’s choice not to use plastic triple trays because of the possibility of flexing when the patient bites into the tray. The author uses plastic triple trays to make all preoperative bite registrations, which are put aside and only used to fabricate provisional restorations.
Temporization
Performing indirect restorative dentistry is challenging. Aside from the clinical skills required to prepare a case properly, there is also the time-consuming provisional stage. It is well known that a properly fitting provisional is critical to the ultimate success of the case. It not only maintains contact points and occlusal stability but also creates an ideal soft tissue response environment by providing a detailed marginal fit.
While many clinicians have used fabrication methods such as vacuum form stints and heated acrylic buttons, using alginate in conjunction with plastic disposable trays has been the most popular. Alginates are a relatively unstable means for creating and replicating provisionals. If the patient does not bite down on the impression matrix containing the self-curing resin in perfect accordance with the originally recorded bite, the only template is destroyed.
The author has been using heavy-body VPS tray materials to make pre-preparation temporization matrices for years because of their stability and predictability. VPS materials have recently become more popular for this application because they are dimensionally stable and therefore a reliable means of creating temporary restorations.
Creating a temporary comes at the end of a focused session of completing the needed prosthetic steps, and many clinicians want to be able to make temporaries in a quick, simple, predictable manner. As discussed previously, if a self-cure resin such as Fill-In™ (Kerr Corporation), Integrity™ (Dentsply Caulk, Milford, DE), Protemp™ 3 Garrant™ (3M ESPE), Luxatemp® (Zenith Dental Products, Englewood, NJ) is loaded into the tray with the preoperative bite, when it sets in approximately 2 minutes the temporaries will be finished and ready to be trimmed and seated with a noneugenol temporary cement.
Laboratory Fabrication
The relationship between the dentist and the laboratory technician is critical to the success of a restorative case. A team approach is the best method for providing the patient excellent care, and open lines of communication greatly enhance the work environment.
Recognizing that the quality of the communication between the clinician and the technician is a crucial factor in the indirect restorative process, in this case a detailed prescription was sent to the laboratory. The prescription identified the chroma and value of the final restorations, indicating a rich chroma in the central fossa and high value or brightness up the cusp incline. In addition, intraoral photographs were sent along with the prescription to assist the technician in matching characterizations.
Restoration Verification
When the completed restorations arrived from the laboratory, the author always checks for color, fit, contact points, and overall esthetic appearance. It is his preference to do this so that if, for any reason, the patient needed to be reappointed, it would save an unnecessary appointment. When the restorations are approved, the patient has his or her seating appointment made.
Cementation
Attention to detail is essential; a laboratory-manufactured restoration may have great esthetics and sound occlusion and contacts, but if it is not properly seated it is destined to fail. The 2 most common complaints heard from clinicians in the cementation phase of the restorative procedure are about accomplishing complete resin removal and completely isolating the tooth.
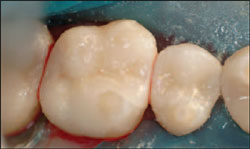
First and foremost, always isolate the tooth (or teeth) using a rubber dam (Figure 9). The water-soluble try-in paste from the polymer restoration is removed when both the dentist and the patient are happy with the look and fit of the restoration. The bondable surface must be cleaned and treated. Historically, a 37% phosphoric acid has been used to accomplish this step. Now there are new options available to clean and treat the bondable surfaces. Two of these new options are CoJet™ Silicate (3M ESPE), which is sandblasted onto the restoration and then air-dried, and Ceramic Primer (3M ESPE), which is a fresh silane and is applied chairside for 1 minute10 and followed by a layer of adhesive. The tooth should be rinsed thoroughly to remove any remaining debris. Once the restorations and teeth are prepared we are ready to deliver the prosthetics (Figures 10, 11, 12).
In the past, the preparation and cementation phase consisted of a series of technique-specific steps. Failure to follow these steps properly occasionally results in management issues such as heat and bite pressure sensitivity (assuming the pulp is still vital). Today, because of the creation of self-etch resin cements, the technique sensitivity experienced with conventional resin cements can be reduced along with the all-too-common postoperative sensitivity.12,13
CONCLUSION
With the seemingly daily advances being made in esthetic-restorative materials, today’s dental patients have a menu of esthetic options from which to choose. Given the ever-increasing esthetic demands of society as a whole, it is not surprising that more and more patients select metal-free restorations. Today’s clinicians are fortunate to have so many restorative options to offer their patients, thanks in large part to several of today’s tooth-colored alternatives that exhibit excellent strength and durability. Materials such as laboratory-processed composites can be used for an array of prosthetic procedures, broadening the scope of the dental armamentarium and making the job of the modern restorative clinician easier and more exciting.
DISCLOSURE
The author receives financial and other support from Kerr Corporation and Heraeus Kulzer.
Clinical Steps for Restoration Cementation
|
REFERENCES
1. Nash R, Radz G. An improved composite-onlay system. Compend Cont Educ Dent. 1997;18(2)98-104.
2. Mizrachi M. Using processed composites to achieve superior esthetic results. Contemporary Esthetics and Restorative Practice 1997;1(3)60-64.
3. Miara P. Aesthetic guidelines for second-generation indirect inlay and onlay composite restorations. Pract Periodontics Aesth Dent. 1998;10(4)423-432.
4. Roetzer PL. Single-visit, adjacent composite onlays—a dual-catalyst, inert gas-processed chairside technique. Compend Contin Educ Dent. 2003;24(8 Suppl):53-59.
5. Nash RW. Indirect composite resin restorations: esthetics and function without wear of opposing natural teeth. Compend Cont Educ Dent. 1997;18(9): 838-842.
6. Brunton PA, Cattell P, Burke FJ, et al. Fracture resistance of teeth restored with onlays of three contemporary tooth-colored resin-bonded restorative materials. J Prosthet Dent. 1999;82(2):167-171.
7. Dias WR, Pereira PN, Swift EJ Jr. Effect of bur type on microtensile bond strengths of self-etching systems to human dentin. J Adhes Dent. 2004;6(3):195-203.
8. Shannon A. Expanded uses of a novel tissue-retraction material. Compend Contin Educ Dent. 2002;23(1 Suppl)3-6.
9. The periodontal-restorative interface in fixed prosthodontics: tooth preparation, provisionalization, and biologic final impressions. Part II. Prac Periodontics Aesthet Dent. 1994;6(3)49-60.
10. Hornbrook DS, Pai ND. Silane coupling agents: The missing link in porcelain resin bonding. Esthetic Dental Updates 1992;3(1):13.
11. Oliveira SS, Pugach MK, Hilton JF, et al. The influence of the dentin smear layer on adhesion: a self-etching primer vs a total-etch system. Dent Mater. 2003;19(8):758-767.
12. Piwowarczyk A, Lauer HC, Sorensen JA. In vitro shear bond strength of cementing agents to fixed prosthodontic restorative materials. J Prosthet Dent. 2004;92(3):265-273.
13. Turssi CP, Ferracane JL, Serra MC. Abrasive wear of resin composites as related to finishing and polishing procedures. Dent Mater. 2005;21(7): 641-648.
14. Schmidlin PR, Gohring TN. Finishing tooth-colored restorations in vitro: an index of surface alteration and finish-line destruction. Oper Dent. 2004;29(1):80-86.
15. Mitchell CA, Pintado MR, Douglas WH. Iatrogenic tooth abrasion comparisons among composite materials and finishing techniques. J Prosthet Dent. 2002;88(3): 320-328.
 |
 |
||||
| Figure 1 Preoperative view of failed restorations. | Figure 2 Application of the rubber dam. | ||||
 |
|||||
| Figure 3 Individual removal of failed restorations showing clinical decay. | |||||
 |
 |
||||
| Figures 4A and 4B View of the preparation as the process of eliminating all decay begins. Note how the buccal cusp decay on the premolar directed the preparation design. | |||||
 |
 |
||||
| Figures 5A and 5B Note the proper angulations of the GEU 847KR.016 as it is used to prepare the tooth. | |||||
 |
 |
||||
| Figure 6 View of the final indirect preparation. | Figure 7 Final view of direct class 2 preparation. | ||||
 |
 |
||||
| Figure 8 View of detailed impression showing all margins for clean visibility at the laboratory. | Figure 9 Rubber dam isolation was completed for the cementation step. | ||||
 |
 |
||||
| Figure 10 View of case after it has been seated and cleaned up. | Figure 11 View of the case after checking with articulating paper. | ||||
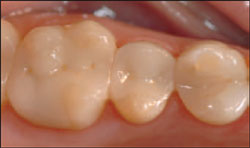 |
|||||
| Figure 12 Case is completed with polished finish. | |||||
|
|||||