
Altering Tooth Inclination and Overall Esthetics with Direct Composite Veneers, Gingival Contouring, and Enamelplasty
Frank J. Milnar, DDS
Clinicians are fortunate to practice at a time when heightened awareness of dental esthetics is prompting increasing numbers of patients to seek out and accept cosmetic restorative treatments. However, this motivated patient population also is becoming more educated about the benefits and limitations of the options available to them and, as a result, are not always inclined to pursue the “ultimate” in esthetic enhancement first. Rather, they are requesting cosmetic alterations that are completed in the most conservative and minimally invasive manner possible, reserving the right to have the ability to consider and/or undergo other possibilities in the future.
Therefore, while the prospects for performing artistically fulfilling and financially rewarding cosmetic treatments are ample, we may be simultaneously challenged. Clinicians will increasingly be expected to exhaust the most conservative possibilities first to achieve the patient’s desired results.1 Conservative alternatives may include the placement of direct composites for changes in tooth shape and inclination,2 enamelplasty to correct incisal edge symmetry,3 and minor gingival contouring to correct disharmonies in the dentogingival complex.4 Such expectations will inherently require more in-depth treatment planning, greater consideration of material alternatives,5 and long-term conservation of maintainable natural tooth structure.6
TODAY’S COMPOSITE MATERIALS AND ESTHETICS
The newest category of esthetic materials is generally referred to as “small-particle hybrids,”7 although individual manufacturers have coined their own terminology. These materials demonstrate improved mechanical and physical properties (eg, strength, wear, and handling) in addition to enhanced optical properties that enable the replication of a natural tooth. Among the intentions of developing and introducing these materials is the simplification of the composite placement process to the extent that, in many cases, a singular composite shade can be used, yet the clinician is still able to create a natural-looking and durable restoration.2,7 Polychromatic stratification techniques are still advocated to achieve the most natural esthetic results but without the requisite physical properties.7
Before the introduction of small-particle hybrid composites, a combination of microfilled composites and hybrid composites were used to realize clinical success.2,7 In particular, microfills are noted for their ability to replicate the enamel layer in terms of polishability and refractive and reflective indexes (ie, optical properties), as well as their compatibility with gingival tissues.2 Hybrid composites, alternatively, are recognized for their ability to imitate the appearance of underlying dentin and impart strength to the restoration.2
One such small-particle hybrid composite that has been used by this author for a variety of esthetic enhancement cases is a Bis-GMA-based fluorescent and opalescent composite system (Vit-l-escence™, Ultradent Products, Inc., South Jordan, UT) that features a particle size of 0.07µm according to the manufacturer. As a result of its composition, it is readily sculptable—without slumping—and blends well, facilitating the placement process. The unified system contains low-translucency, fluorescent dentin composites and high-translucency, opalescent/transparent enamel composites that, combined, contribute to a restoration that mimics the appearance of natural teeth.
INCISAL EDGE POSITION
Unquestionably, incisal edge position is a key consideration for establishing a sound and functional occlusal relationship between the maxillary and mandibular arches. From an esthetic perspective, the incisal edge position of a patient’s teeth should be evaluated in terms of the proportion or ratio of the width-to-height of the teeth.3 Also, by evaluating the patient’s smile line, the clinician can determine if the patient’s maxillary teeth are properly positioned in relation to the lower lip, or if a correction is necessary.3
GINGIVAL CONSIDERATIONS
Among the 4 areas significant to the overall esthetic impact of a smile is gingival esthetics.8 Its significance to smile esthetics lies in the relationship and ratio of multiple teeth to the soft tissue, as well as to overall facial characteristics.8 In fact, some clinicians have referred to the gingival architecture as a “frame” for the artistry that is the cosmetically enhanced smile.4 A variety of techniques have been developed to manipulate the gingiva into a more favorable contour surrounding the restored dentition.4,9
OVERALL TREATMENT CONSIDERATIONS
When presented with a patient who requests smile enhancement in the most minimally invasive manner possible, it behooves clinicians to thoroughly examine the current state of the dentition and gingival architecture, as well as to evaluate the patient’s overall smile esthetics.10 From there, the techniques and material armamentarium that can be used to most conservatively achieve the anticipated results can be determined.8 Doing so will enable the completion of the case according to the patient’s esthetic needs, but in such a way that a minimal amount of maintainable hard tooth structures would have to be sacrificed.6 The following case report briefly describes the manner in which conservative smile enhancement was achieved for a 2005 Miss USA Pageant contestant using a combination of direct composite veneers, enamelplasty, and gingival contouring.
CASE PRESENTATION
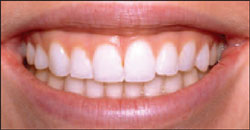
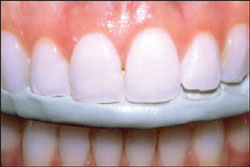
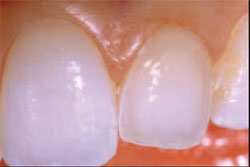
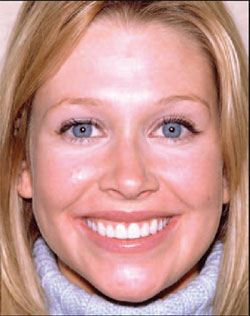
A 21-year-old beauty contestant for the 2005 Miss USA Pageant presented to the office seeking conservative treatment to enhance her smile (Figure 1). She admitted that she had difficulty smiling because of the lingual inclination and shortness of teeth Nos. 10 and 11 (Figure 2). She was satisfied with the shade of her teeth and did not want bleaching or orthodontic therapy. Additionally, she was not interested in porcelain veneers because, in her words, “they look way too big and artificially white.” She also was apprehensive about this cosmetic enhancement modality because one of her fellow contestants already needed root canal therapy on one of her veneers.
A complete examination was performed that included radiographs, photographs, and a review of the patient’s periodontal condition. No pathologies were found to contraindicate esthetic enhancement. Occlusal analysis found no interferences or contributory factors that would necessitate the incorporation of functional and/ or occlusal rehabilitation.
In terms of the patient’s request for esthetic enhancement, visual assessment and co-diagnosis of her gingival architecture and tooth symmetry were performed to best determine a conservative and reversible treatment plan that would accommodate her treatment parameters. Paramount to this process was making impressions of the patient’s preoperative condition to create a diagnostic model and, ultimately, a wax-up demonstrating the manner in which her smile could be enhanced.11
The patient accepted the proposed enhanced wax-up. As a result, and in consideration of her time constraints, the treatment plan for this patient would include: gingival arching and contouring of tooth No. 8 followed by 4 weeks of healing; composite veneers on teeth Nos. 10 and 11; incisal enamelplasty on teeth Nos. 6 through 8; and mesial composite placement on tooth No. 8. Research has shown that the placement of direct composites is valuable and effective for the esthetic and conservative treatment of malformed and misaligned anterior teeth.12
TREATMENT SEQUENCE
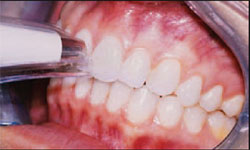
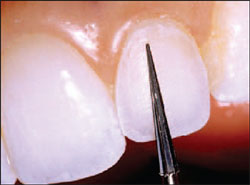
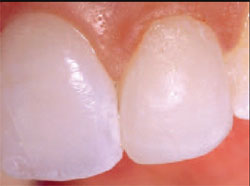
The patient was appointed for atraumatic gingival arching and contouring of tooth No. 8. This procedure was uneventful, and the patient was allowed to heal for 4 weeks before returning for incisal enamelplasty and placement of the composite veneers (Figure 3).
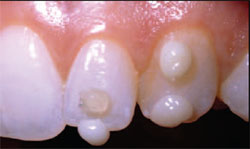
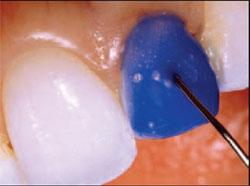
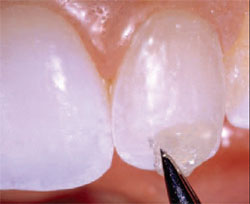
On her return to the office, a shade map and colorimetry (EasyShade, Vident, Brea, CA) were used to determine which composite shades should be placed on teeth Nos. 8, 10, and 11 (Figure 4). Colorimetric analysis has been shown to provide computerized shade guide definitions of a tooth and essential information to help verify visual and subjectively based shade mapping.13 The identified shades of the selected composite (Vit-l-escence) were then assessed on teeth Nos. 10 and 11 (Figure 5).
A high-viscosity putty stent was made from the esthetically enhanced diagnostic wax-up to be used as a volumetric, 3-dimensional guide during the placement of the composite veneers on teeth Nos. 10 and 11.11,14 Specifically, the putty stent would be beneficial in preserving facial and lingual line angles, as well as indicating where and in what volume to apply the desired composite. Before initiating preparation and composite placement, the stent was tried into the patient’s mouth (Figure 6).
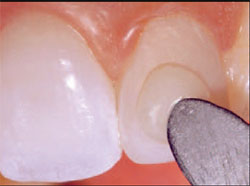
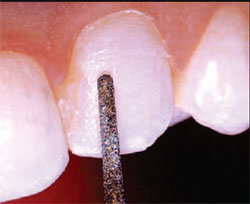
The patient was anesthetized, her lips and cheeks properly retracted, and the immediate surrounding dentition isolated with cotton rolls. Tooth No. 10 was minimally prepared with a composite veneer preparation of 0.5 mm facially using a diamond bur (Brasseler USA, Savannah, GA) (Figure 7). A reduction of 0.5 mm incisally and a 0.5-mm modified lingual shoulder were also completed.
Tooth No. 10 was then etched with 37% phosphoric acid (Ultra-Etch®, Ultradent Products, Inc.) for 20 seconds (Figure 8), rinsed for 15 seconds with an air-water spray, and lightly air-dried.15,16 A single-component adhesive bonding agent (PQ1®, Ultradent Products, Inc.) was placed on the preparation for tooth No. 10 for 15 seconds (Figure 9), lightly air-dried for 5 seconds, and light-cured for 20 seconds with an LED curing light (Ultra-Lume™ LED 2, Ultradent Products, Inc.) (Figure 10).
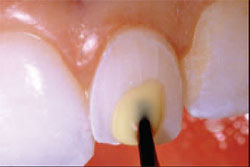
The putty stent was returned to the patient’s mouth for reference, and a layer of Opaque Snow dentin composite was placed on the facial and into the incisal area of tooth No. 10 (Figure 11). Care was taken to carefully sculpt the composite into place at this time to help facilitate easy finishing.17 The stent was removed, and this composite layer was cured with an LED curing light for 10 seconds to create the additional incisal length and initial lingual enamel layer.
An initial translucent enamel layer of Iridescent Blue composite was applied to tooth No. 10 (Figure 12), carefully sculpted, and light-cured for 10 seconds. The final enamel composite layer—in Pearl Frost—was applied over the entirety of tooth No. 10 (Figure 13), and the restoration was light-cured from multiple directions for 60 seconds. Although texturization, finishing, and polishing had not yet been completed, the initial restoration of tooth No. 10 demonstrated a natural, “imperceptible” blend with the adjacent central incisor (Figure 14).
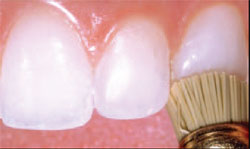
The esthetic enhancement of tooth No. 11 was similarly performed, beginning with conservative preparation (Figure 15) and proceeding with composite placement using the putty stent as a spatial and volumetric guide. On completion of the composite veneer on tooth No. 11, the final geometric design of both teeth Nos. 10 and 11 was achieved using an ultrafine finishing and contouring disc (Sof-Lex™, 3M Dental Products, St. Paul, MN). Secondary anatomy was accomplished using a carbide bur (#7901, Brasseler USA). Finishing and polishing were completed using medium grade discs, a goat hair brush with 0.5-µm diamond polishing paste, and high shine points, cups, and brushes (Jiffy®, Ultradent Products, Inc.) (Figures 16 and 17).
Treatment continued uneventfully with the placement of composite on the mesial aspect of tooth No. 8 according to the aforementioned conservative adhesive protocol. When the composite portion of the treatment was complete, the enamelplasty of teeth Nos. 6 through 8 was performed. The putty stent was used again to verify the dimensional accuracy of the chosen procedures (Figure 18), and the colorimeter was used postoperatively to ensure the restorations’ exact duplication of the patient’s natural dentition.
CONCLUSION
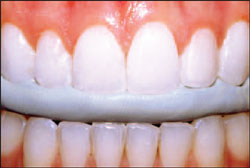
A review of the final case (Figures 19 and 20) demonstrates the manner in which the integration of conservative approaches to esthetic smile enhancement achieved significant results for this patient. By manipulating the shape and contour of the gingival arch surrounding tooth No. 8, a more complementary final esthetic result was achieved.4 Enhancing the alignment of the incisal edges of teeth Nos. 6 through 8 with conservative and instantaneous enamelplasty produced a more pleasing and symmetrical smile line. Finally, using a new small-particle hybrid composite as part of this minimally invasive and reversible cosmetic approach resulted in an overall esthetically enhanced, symmetrical appearance to this patient’s smile.
DISCLOSURE
Dr. Milnar has received financial and materials/product support from Ultradent Products, Inc.
REFERENCES
1. Friedman MJ. Porcelain veneer restorations: a clinician’s opinion about a disturbing trend. J Esthet Restor Dent. 2001;13(5): 318-27.
2. Mopper KW. Maximizing the potential of composite artistry: three decades of direct resin bonding. Picture Perfect Aesthetics: The AACD Monograph. Vol. II. Mahwah, NJ: Montage Media Corporation; 2005:95-99.
3. Bruce WE. The missing link: on the edge of aesthetics and function. Picture Perfect Aesthetics: The AACD Monograph. Vol. II. Mahwah, NJ: Montage Media Corporation; 2005: 57-60.
4. Braswell LD. Soft tissue contouring as periodontal plastic surgery. Curr Opin Cosmet Dent. 1997;4:22-28.
5. Louka AN. Esthetic treatment of anterior teeth. Technique choices. J Can Dent Assoc. 1989;55(1):29-32.
6. Staehle HJ. Minimally invasive restorative treatment. J Adhes Dent. 1999;1(3):267-284.
7. Terry DA. Natural Esthetics with Composite Resin. 1st ed. Mahwah, NJ: Montage Media Corporation; 2004.
8. Morley J, Eubank J. Macroesthetic elements of smile design. J Am Dent Assoc. 2001; 132(1):39-45.
9. Bichacho N. Cervical contouring concepts: enhancing the dentogingival complex. Pract Periodontics Aesthet Dent. 1996;8(3):241-254.
10. Rifkin R. Facial analysis: a comprehensive approach to treatment planning in aesthetic dentistry. Pract Periodontics Aesthet Dent. 2000;12(9): 865-871.
11. Garcia LT, Bohnenkamp DM. The use of diagnostic wax-ups in treatment planning. Compend Contin Educ Dent. 2003;24(3): 210-216.
12. Peumans M, Van Meerbeek B, Lambrechts P, et al. The 5-year clinical performance of direct composite additions to correct tooth form and position. I. Esthetic qualities. Clin Oral Investig. 1997;1(1): 12-18.
13. Milnar FJ. Selecting nanotechnology-based composites using colorimetric and visual analysis for the restoration of anterior dentition: a case report. J Esthet Restor Dent. 2004;16(2):89-100.
14. Behle C. Placement of direct composite veneers utilizing a silicone buildup guide and intraoral mock-up. Pract Periodontics Aesthet Dent. 2000;12(3): 259-266.
15. Kanca J 3rd. Improving bond strength through acid etching of dentin and bonding to wet dentin surfaces. J Am Dent Assoc. 1992;123(9):35-43.
16. Kanca J 3rd. Resin bonding to wet substrate. II. Bonding to enamel. Quintessence Int. 1992;23(9):623-627.
17. Peyton JH. Finishing and polishing techniques: direct composite resin restorations. Pract Proced Aesthet Dent. 2004;16(4):293-298.
 |
 |
||||
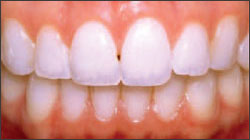
| Figure 2 Retracted preoperative view of the patient’s smile. Note the lingual inclination of teeth Nos. 10 and 11, as well as the lack of symmetry between the gingival arches of teeth Nos. 8 and 9. | |||||
| Figure 1 Preoperative full-facial view of the patient. | |||||
 |
 |
||||
| Figure 3 Postcontouring view demonstrating enhanced gingival symmetry between teeth Nos. 8 and 9. | Figure 4 A colorimeter was used to help determine the appropriate composite shades for placement on teeth Nos. 8, 10, and 11. | ||||
 |
 |
||||
| Figure 5 The selected composite shades were assessed on the teeth: Iridescent Blue and Opaque Snow on tooth No. 10; B1 and Pearl Front on tooth No. 11. | Figure 6 Preoperative view demonstrating tryin of the 3-dimensional putty stent guide. | ||||
 |
 |
||||
| Figure 7 A Brasseler diamond was used to create the facial veneer preparation on tooth No. 10 with 0.5 mm of reduction. | Figure 8 Tooth No. 10 was acid etched with 37% phosphoric acid for 20 seconds. | ||||
 |
 |
||||
| Figure 9 A single-component adhesive bonding agent was applied to the preparation for 15 seconds. | Figure 10 View of the fully-cured adhesive bonding agent. | ||||
 |
 |
||||
| Figure 11 A layer of Opaque Snow dentin composite was placed on tooth No. 10 and cured. | Figure 12 The initial translucency layer, Iridescent Blue, was applied to tooth No. 10, shaped appropriately, and cured. | ||||
 |
 |
||||
| Figure 13 The final enamel layer, Pearl Front, was applied to tooth No. 10, sculpted carefully, and cured. | Figure 14 View of the restoration on tooth No. 10 before finishing and polishing. | ||||
 |
 |
||||
| Figure 15 Tooth No. 11 was similarly prepared using Brasseler diamond burs. | Figure 16 A series of high shine points and cups were used for final polishing. | ||||
 |
 |
||||
| Figure 17 A series of Jiffy® polishing brushes was used to impart a high shine to the final restorations. | Figure 18 The putty stent was returned to the patient’s mouth to confirm the length and proportions of the completed veneer restorations on teeth Nos. 10 and 11. | ||||
 Figure 19 Retracted postoperative view showing complete composite veneers on teeth Nos. 10 and 11, mesial composite on tooth No. 8, and enamelplasty on teeth Nos. 6 through 8. |
 |
||||
| Figure 20 Postoperative full-facial view of the patient in natural smile. | |||||
|
|||||


